weird xelad ai thing lol

This sketch creates a real-time video distortion effect that warps your webcam feed with a bulging or pinching effect centered on your mouse cursor. The intensity of the warp is controlled by microphone volume, while time-based animation adds subtle continuous oscillation to the distortion.

🧪 Try This!

Experiment with the code by making these changes:

  1. Change the distortion color
  2. Make the effect always active — Remove the audio and time reactivity so the distortion warps at a constant fixed intensity regardless of sound
  3. Swap audio and time control — Let the time oscillation drive the main distortion while audio provides subtle modulation—hearing becomes visual motion alone
  4. Stretch the effect vertically — Use only vertical distance (dy) instead of full distance to create a vertical line effect instead of a circle
  5. Reverse the distortion direction — Flip the sign of morphFactor so loud sounds pinch inward instead of bulging outward
  6. Make the effect follow your voice horizontally — Lock the distortion Y-position to the center while audio controls the X-position, making it sway with sound
Prefer the full editor? Open it there →

📖 About This Sketch

This sketch builds an interactive audio-reactive video effect by manipulating individual pixels from your webcam feed in real time. The core technique—polar coordinate transformation—lets you create a bulging or pinching distortion that follows your mouse and responds to sound. It's a striking example of how pixel-level control using loadPixels() and direct array manipulation can create effects that feel magical, even though the math underneath is elegant and learnable.

The code is organized into four main functions: setup() initializes the canvas, microphone, and video capture; draw() runs every frame and contains the pixel-morphing logic; mousePressed() activates audio and video on user interaction for browser security; and windowResized() keeps the effect responsive as the window changes size. By studying this sketch, you'll learn how to access raw pixel data, how polar coordinates enable complex warping, and how to layer audio input with time-based animation to create reactive visuals.

⚙️ How It Works

  1. When you load the sketch, setup() creates a full-window canvas, initializes the p5.sound microphone input, and starts the webcam video capture hidden behind the scenes. The sketch waits for you to click the canvas before the microphone activates (browser security rule).
  2. Every frame, draw() loads both the canvas and video pixels into memory so we can read and modify them. It calculates the current audio level (microphone volume) and a time-based oscillation using sin() and frameCount.
  3. The sketch then loops through every pixel on the canvas. For each pixel, it calculates the distance from your mouse cursor. If the pixel is within a circular morphing radius, the code applies a polar coordinate transformation: it converts the pixel's position to distance and angle from the morph center, adds a displacement based on audio level and time, then converts back to x,y coordinates.
  4. This displacement creates the bulging effect—audio makes it stronger (higher volume = more distortion), and the sine wave ensures the effect fades smoothly from center to edge rather than cutting off abruptly.
  5. The warped coordinates are constrained to stay within the video bounds, then the pixel color from the video at that new location is copied to the canvas, creating the illusion of the webcam feed being stretched and pinched.
  6. When you move your mouse, the center of the effect follows. Move it to the edge of the screen to shrink the effect radius; near the center makes it larger. Speak into your microphone to see the distortion intensify in real time.

🎓 Concepts You'll Learn

Pixel manipulation with loadPixels() and updatePixels()Polar coordinate transformationReal-time video capture and processingAudio reactivity with p5.soundDistance-based effect radiusSine wave displacement for smooth warpingArray indexing for RGBA color channels

📝 Code Breakdown

preload()

preload() runs before setup() and is traditionally used to load images, fonts, or sound files. Here it's empty because the webcam provides video in real time.

function preload() {
  // No image loading needed anymore as we'll use webcam video.
}
Line-by-line explanation (1 lines)
// No image loading needed anymore as we'll use webcam video.
This comment explains that preload() is left empty because we're using live webcam input instead of loading static images

setup()

setup() runs once when the sketch loads and is where you initialize your canvas, variables, and media inputs. The pixelDensity(1) line is especially important for pixel-manipulation sketches because it ensures your math works correctly on all screen types.

function setup() {
  // Create a canvas that fills the window
  createCanvas(windowWidth, windowHeight);
  // Important for pixel manipulation: ensure pixelDensity is 1
  // This makes sure 1 p5 pixel corresponds to 1 screen pixel,
  // preventing issues on high-DPI (Retina) displays.
  pixelDensity(1);
  // Optional: Set noSmooth() for a sharper, pixel-art look, especially for this effect
  noSmooth();

  // Initialize audio input
  mic = new p5.AudioIn();
  // Initialize amplitude analysis
  amplitude = new p5.Amplitude();
  amplitude.setInput(mic); // Set the microphone as the input for amplitude analysis

  // Create video capture
  // The callback ensures the video stream is ready before we interact with its properties,
  // though p5.js usually handles this gracefully.
  video = createCapture(VIDEO, function() {
    console.log("Video stream ready. Video dimensions:", video.width, "x", video.height);
    // Once video is ready, size it and hide the HTML element
    video.size(width, height);
    video.hide();
    videoStarted = true; // Set flag
  });
  // Hide the HTML video element immediately. It will be resized and shown
  // (or rather, its pixels drawn) in the callback once ready.
  video.hide();
}
Line-by-line explanation (9 lines)

🔧 Subcomponents:

function-call Canvas Creation createCanvas(windowWidth, windowHeight);

Creates a canvas that fills the entire browser window

function-call Pixel Density Configuration pixelDensity(1);

Ensures 1 p5 pixel = 1 screen pixel on high-DPI displays, critical for correct pixel manipulation

function-call Audio Input Setup mic = new p5.AudioIn(); amplitude = new p5.Amplitude(); amplitude.setInput(mic);

Creates microphone input and connects an amplitude analyzer to it for volume detection

function-call Video Capture Initialization video = createCapture(VIDEO, function() { console.log("Video stream ready. Video dimensions:", video.width, "x", video.height); video.size(width, height); video.hide(); videoStarted = true; });

Starts webcam capture, resizes it to match canvas, and sets videoStarted flag when ready

createCanvas(windowWidth, windowHeight);
Creates a canvas that matches the full window size, so the effect fills your entire screen
pixelDensity(1);
Critical for pixel manipulation—ensures that 1 p5 coordinate equals 1 actual screen pixel, preventing math errors on Retina/high-DPI displays
noSmooth();
Disables anti-aliasing for a sharper, more pixelated look that emphasizes the distortion effect
mic = new p5.AudioIn();
Creates a new microphone input object that will capture audio from your device
amplitude = new p5.Amplitude();
Creates an analyzer that extracts the overall volume level (amplitude) from audio
amplitude.setInput(mic);
Connects the amplitude analyzer to the microphone so it can measure your voice/sounds
video = createCapture(VIDEO, function() { ... });
Starts the webcam and runs the callback function once the video stream is ready
video.size(width, height);
Resizes the captured video to match the canvas dimensions so pixels map correctly
videoStarted = true;
Sets a flag to true so draw() knows the video is ready and can start processing

mousePressed()

mousePressed() is called automatically whenever the user clicks the canvas. This function must start audio and video because browsers require user interaction before accessing the microphone or camera for privacy reasons.

function mousePressed() {
  // Start the microphone if it's not already started
  if (mic && !mic.started) {
    mic.start();
    console.log("Microphone started. You can now speak to interact with the sketch.");
  }
  // Ensure the video context is active (createCapture usually handles this,
  // but calling userStartVideo() on interaction is good practice).
  userStartVideo();
  console.log("Video started.");
}
Line-by-line explanation (4 lines)

🔧 Subcomponents:

conditional Microphone Start Check if (mic && !mic.started) { mic.start(); console.log("Microphone started. You can now speak to interact with the sketch."); }

Safely starts the microphone only if it exists and hasn't already been started

if (mic && !mic.started) {
Checks that the mic object exists AND hasn't been started yet—prevents starting it multiple times
mic.start();
Activates the microphone input so it begins capturing audio
console.log("Microphone started. You can now speak to interact with the sketch.");
Prints a message to the browser console confirming the microphone is active
userStartVideo();
Explicitly ensures the video context is active (usually already running, but good practice to call on user interaction)

draw()

draw() is where the magic happens. It runs 60 times per second and contains the pixel-processing loop that creates the distortion. The key insight is that we don't move pixels directly—instead, we calculate where each output pixel should SAMPLE FROM in the input video by using polar coordinate math. This is how shaders and advanced image filters work.

🔬 These three lines calculate the distance from each pixel to your mouse cursor. What happens if you change the calculation to ONLY use dx (deleting dy), like let dist = abs(dx)? How does the circular effect become a vertical line?

      let dx = x - morphCenterX;
      let dy = y - morphCenterY;
      let dist = sqrt(dx * dx + dy * dy);
function draw() {
  // Clear the canvas with a background color
  background(220);

  // If video is not yet started, display a message
  if (!videoStarted || video.width === 0 || video.height === 0) {
    textSize(24);
    textAlign(CENTER, CENTER);
    text("Click on the canvas to start your camera and microphone!", width / 2, height / 2);
    return; // Stop draw() if video isn't ready
  }

  // Load the pixels of the canvas for direct manipulation
  // This is more efficient than using get() and set() repeatedly.
  loadPixels();

  // Load the pixels of the video feed
  // This ensures we have access to the most recent frame's data.
  video.loadPixels();

  // --- AUDIO AND TIME REACTIVITY ---

  // Get the current overall amplitude (volume) level from the microphone
  // The level ranges from 0.0 (silent) to 1.0 (loudest)
  let level = amplitude.getLevel();

  // Create a time-based oscillation using sin() function and frameCount
  // frameCount counts the number of frames since the sketch started
  // 0.05 controls the speed of the oscillation
  let timeFactor = sin(frameCount * 0.05);

  // Define the center of the morphing effect
  // It follows the mouse pointer for interactivity.
  let morphCenterX = mouseX;
  let morphCenterY = mouseY;

  // Define the radius of the morphing effect
  // The mouse's X-position controls the base radius, allowing you to make the effect larger or smaller.
  let baseRadius = map(mouseX, 0, width, 50, 300); // Base radius from 50 to 300 pixels
  let morphRadius = baseRadius;

  // Define the strength of the morphing effect (bulge/pinch)
  // Audio level controls the main intensity of the bulge/pinch effect.
  // timeFactor adds a subtle, continuous oscillation on top of the audio reactivity.
  let audioMorphFactor = map(level, 0, 1, -0.7, 0.7); // Stronger audio influence for noticeable effect
  let timeMorphFactor = map(timeFactor, -1, 1, -0.1, 0.1); // Subtle time oscillation for continuous movement
  let morphFactor = audioMorphFactor + timeMorphFactor;

  // --- END REACTIVITY ---

  // Loop through every pixel on the canvas
  for (let y = 0; y < height; y++) {
    for (let x = 0; x < width; x++) {
      // Calculate the index for the current pixel in the canvas's pixels array
      // Each pixel has 4 values (R, G, B, A)
      let canvasIndex = (x + y * width) * 4;

      // Calculate the distance and angle of the current pixel from the morph center
      let dx = x - morphCenterX;
      let dy = y - morphCenterY;
      let dist = sqrt(dx * dx + dy * dy);

      // Check if the current pixel is within the morphing radius
      if (dist < morphRadius) {
        // Normalize the distance (0 to 1 within the radius)
        let normalizedDist = dist / morphRadius;

        // Calculate a displacement value using a sine wave
        // This creates a smooth bulge/pinch effect that is strongest at the center
        // and fades out towards the edge of the morphRadius.
        let displacement = sin(normalizedDist * PI) * morphFactor * morphRadius;

        // Calculate the new distance from the morph center after displacement
        let newDist = dist + displacement;

        // Calculate the angle of the pixel relative to the morph center
        let angle = atan2(dy, dx);

        // Convert the new polar coordinates back to Cartesian coordinates
        let newX = morphCenterX + newDist * cos(angle);
        let newY = morphCenterY + newDist * sin(angle);

        // Constrain the new coordinates to be within the bounds of the video feed
        // This prevents trying to access pixels outside the video, which would cause errors.
        newX = constrain(newX, 0, video.width - 1);
        newY = constrain(newY, 0, video.height - 1);

        // Calculate the index for the pixel at the new coordinates in the video's pixels array
        // We use floor() because pixel coordinates must be integers.
        let videoIndex = (floor(newX) + floor(newY) * video.width) * 4;

        // Copy the color from the original video at the new coordinates to the current canvas pixel
        pixels[canvasIndex] = video.pixels[videoIndex];       // Red
        pixels[canvasIndex + 1] = video.pixels[videoIndex + 1]; // Green
        pixels[canvasIndex + 2] = video.pixels[videoIndex + 2]; // Blue
        pixels[canvasIndex + 3] = video.pixels[videoIndex + 3]; // Alpha
      } else {
        // If the pixel is outside the morphing radius, just copy the original video pixel
        // Check if the canvas pixel (x, y) is within the bounds of the video feed
        if (x < video.width && y < video.height) {
          let videoIndex = (x + y * video.width) * 4;
          pixels[canvasIndex] = video.pixels[videoIndex];
          pixels[canvasIndex + 1] = video.pixels[videoIndex + 1];
          pixels[canvasIndex + 2] = video.pixels[videoIndex + 2];
          pixels[canvasIndex + 3] = video.pixels[videoIndex + 3];
        } else {
          // If the canvas pixel is outside the video bounds (e.g., if canvas is larger than video),
          // fill it with the background color.
          pixels[canvasIndex] = 220;
          pixels[canvasIndex + 1] = 220;
          pixels[canvasIndex + 2] = 220;
          pixels[canvasIndex + 3] = 255;
        }
      }
    }
  }

  // Apply all the pixel changes to the canvas
  updatePixels();
}
Line-by-line explanation (28 lines)

🔧 Subcomponents:

conditional Video Readiness Check if (!videoStarted || video.width === 0 || video.height === 0) { textSize(24); textAlign(CENTER, CENTER); text("Click on the canvas to start your camera and microphone!", width / 2, height / 2); return; }

Prevents the pixel-morphing code from running until video is fully loaded and ready

calculation Audio and Time Reactivity let level = amplitude.getLevel(); let timeFactor = sin(frameCount * 0.05); let audioMorphFactor = map(level, 0, 1, -0.7, 0.7); let timeMorphFactor = map(timeFactor, -1, 1, -0.1, 0.1); let morphFactor = audioMorphFactor + timeMorphFactor;

Calculates the intensity of the distortion based on microphone volume and elapsed time

for-loop Nested Pixel Loop for (let y = 0; y < height; y++) { for (let x = 0; x < width; x++) { // ... pixel processing ... } }

Iterates through every pixel on the canvas to apply the morphing effect

calculation Distance Calculation let dx = x - morphCenterX; let dy = y - morphCenterY; let dist = sqrt(dx * dx + dy * dy);

Calculates how far each pixel is from the morph center using the Pythagorean theorem

conditional Polar Coordinate Transformation if (dist < morphRadius) { let normalizedDist = dist / morphRadius; let displacement = sin(normalizedDist * PI) * morphFactor * morphRadius; let newDist = dist + displacement; let angle = atan2(dy, dx); let newX = morphCenterX + newDist * cos(angle); let newY = morphCenterY + newDist * sin(angle); newX = constrain(newX, 0, video.width - 1); newY = constrain(newY, 0, video.height - 1); let videoIndex = (floor(newX) + floor(newY) * video.width) * 4; pixels[canvasIndex] = video.pixels[videoIndex]; pixels[canvasIndex + 1] = video.pixels[videoIndex + 1]; pixels[canvasIndex + 2] = video.pixels[videoIndex + 2]; pixels[canvasIndex + 3] = video.pixels[videoIndex + 3]; }

The core morphing effect: converts pixels to polar coordinates, displaces them, converts back, and samples from the warped video location

conditional Fallback Pixel Copy } else { if (x < video.width && y < video.height) { let videoIndex = (x + y * video.width) * 4; pixels[canvasIndex] = video.pixels[videoIndex]; pixels[canvasIndex + 1] = video.pixels[videoIndex + 1]; pixels[canvasIndex + 2] = video.pixels[videoIndex + 2]; pixels[canvasIndex + 3] = video.pixels[videoIndex + 3]; } else { pixels[canvasIndex] = 220; pixels[canvasIndex + 1] = 220; pixels[canvasIndex + 2] = 220; pixels[canvasIndex + 3] = 255; } }

For pixels outside the morph radius: copy video directly, or fill with background gray if out of bounds

background(220);
Clears the canvas with a light gray color each frame, preparing it for new pixel data
if (!videoStarted || video.width === 0 || video.height === 0) {
Checks if the video is ready before trying to access its pixels; prevents crashes if video isn't loaded yet
text("Click on the canvas to start your camera and microphone!", width / 2, height / 2);
Displays instructions to the user while waiting for the video to start
return;
Exits the draw() function early if video isn't ready, skipping the expensive pixel-processing loop
loadPixels();
Loads the canvas pixels into memory as an array so we can modify them directly
video.loadPixels();
Loads the most recent video frame's pixels into memory so we can read from it
let level = amplitude.getLevel();
Gets the current microphone volume as a number between 0.0 (silent) and 1.0 (loud)
let timeFactor = sin(frameCount * 0.05);
Creates a smooth oscillation from -1 to 1 that cycles over time; frameCount increases by 1 each frame
let morphCenterX = mouseX;
Sets the horizontal center of the distortion effect to follow your mouse
let baseRadius = map(mouseX, 0, width, 50, 300);
Maps your mouse X position to a radius between 50 and 300 pixels—move left for small effect, right for large
let audioMorphFactor = map(level, 0, 1, -0.7, 0.7);
Converts the audio level (0 to 1) into a strength value (-0.7 to 0.7) that controls bulge/pinch intensity
let morphFactor = audioMorphFactor + timeMorphFactor;
Combines audio and time factors so the effect pulses with your voice AND subtly oscillates on its own
for (let y = 0; y < height; y++) {
Outer loop iterates through every row of pixels on the canvas
for (let x = 0; x < width; x++) {
Inner loop iterates through every column in the current row, processing each individual pixel
let canvasIndex = (x + y * width) * 4;
Calculates the array index for the current pixel's red channel; multiply by 4 because each pixel has R, G, B, and Alpha
let dist = sqrt(dx * dx + dy * dy);
Calculates the straight-line distance from the current pixel to the morph center using the distance formula
if (dist < morphRadius) {
Only applies the morphing effect to pixels within the morphing radius; outside pixels copy unchanged
let normalizedDist = dist / morphRadius;
Scales the distance to a 0-1 range: 0 at the center, 1 at the edge of the morphing radius
let displacement = sin(normalizedDist * PI) * morphFactor * morphRadius;
Creates a smooth hill-shaped displacement using sin(π*x): strongest at center (sin(π/2)=1), zero at edges (sin(0)=sin(π)=0)
let angle = atan2(dy, dx);
Calculates the angle from the morph center to the current pixel (in radians, -π to π)
let newX = morphCenterX + newDist * cos(angle);
Converts the new distance and angle back to a Cartesian X coordinate using polar math
newX = constrain(newX, 0, video.width - 1);
Ensures the new X coordinate stays within the video bounds, clamping to valid pixel indices
let videoIndex = (floor(newX) + floor(newY) * video.width) * 4;
Calculates the array index for the pixel in the video at the warped coordinates
pixels[canvasIndex] = video.pixels[videoIndex];
Copies the red channel from the video's warped location to the canvas pixel
pixels[canvasIndex + 1] = video.pixels[videoIndex + 1];
Copies the green channel (index + 1 skips over the red we just set)
pixels[canvasIndex + 2] = video.pixels[videoIndex + 2];
Copies the blue channel
pixels[canvasIndex + 3] = video.pixels[videoIndex + 3];
Copies the alpha (transparency) channel
updatePixels();
Applies all the pixel modifications we made and displays them on the canvas

windowResized()

windowResized() is called automatically by p5.js whenever the browser window is resized. This ensures your sketch stays responsive and fills the available space. Always reapply pixelDensity(1) after resizing if you're doing pixel manipulation.

function windowResized() {
  resizeCanvas(windowWidth, windowHeight);
  // Re-apply pixelDensity(1) after resizing
  pixelDensity(1);
  // Also resize the video capture to match the new canvas size
  if (video) {
    video.size(width, height);
  }
}
Line-by-line explanation (4 lines)

🔧 Subcomponents:

function-call Canvas Resize resizeCanvas(windowWidth, windowHeight);

Resizes the canvas to fill the new window dimensions when the browser is resized

conditional Video Resize if (video) { video.size(width, height); }

Resizes the video capture to match the new canvas size, ensuring pixels stay aligned

resizeCanvas(windowWidth, windowHeight);
Updates the canvas size to match the new window dimensions when the user resizes their browser
pixelDensity(1);
Reapplies pixelDensity after resize to ensure pixel math stays correct on high-DPI displays
if (video) {
Checks that the video object exists before trying to resize it
video.size(width, height);
Resizes the video capture to match the new canvas size so the warping still works correctly

📦 Key Variables

video p5.Capture object

Stores the live webcam feed so we can read its pixel data and apply distortion to it

let video;
mic p5.AudioIn object

Represents the microphone input device; we call mic.start() to begin capturing audio

let mic;
amplitude p5.Amplitude object

Analyzes the microphone input and provides the overall volume level via getLevel()

let amplitude;
videoStarted boolean

Flag that tracks whether the video has fully loaded and is ready to use; prevents crashes in draw() if video isn't ready

let videoStarted = false;
level number

Stores the current microphone amplitude (volume) as a value between 0.0 and 1.0; used to control distortion intensity

let level = amplitude.getLevel();
timeFactor number

A sine-wave oscillation that cycles from -1 to 1 over time; used to add subtle pulsing to the distortion independent of sound

let timeFactor = sin(frameCount * 0.05);
morphCenterX number

The X coordinate of the center of the distortion effect; set to mouseX to follow the cursor

let morphCenterX = mouseX;
morphCenterY number

The Y coordinate of the center of the distortion effect; set to mouseY to follow the cursor

let morphCenterY = mouseY;
baseRadius number

The radius in pixels of the circular area affected by the distortion; controlled by mouse X position

let baseRadius = map(mouseX, 0, width, 50, 300);
morphRadius number

Currently set equal to baseRadius; controls the size of the distortion circle

let morphRadius = baseRadius;
audioMorphFactor number

Maps the microphone level (0-1) to a distortion intensity (-0.7 to 0.7); negative values pinch, positive values bulge

let audioMorphFactor = map(level, 0, 1, -0.7, 0.7);
timeMorphFactor number

A subtle oscillation added to the distortion to make it pulse gently even when silent

let timeMorphFactor = map(timeFactor, -1, 1, -0.1, 0.1);
morphFactor number

The combined distortion intensity; sum of audioMorphFactor and timeMorphFactor

let morphFactor = audioMorphFactor + timeMorphFactor;
dx number

The horizontal distance from the current pixel to the morph center

let dx = x - morphCenterX;
dy number

The vertical distance from the current pixel to the morph center

let dy = y - morphCenterY;
dist number

The straight-line distance from the current pixel to the morph center, calculated using the Pythagorean theorem

let dist = sqrt(dx * dx + dy * dy);
normalizedDist number

The distance scaled to 0-1 range within the morphing radius; used to create smooth fading effect

let normalizedDist = dist / morphRadius;
displacement number

How much to move each pixel away from or toward the morph center; uses sine wave to be strongest at center and fade at edges

let displacement = sin(normalizedDist * PI) * morphFactor * morphRadius;
newDist number

The new distance from the morph center after applying the displacement

let newDist = dist + displacement;
angle number

The angle in radians from the morph center to the current pixel; used for polar coordinate conversion

let angle = atan2(dy, dx);
newX number

The X coordinate in the video to sample from after polar coordinate transformation

let newX = morphCenterX + newDist * cos(angle);
newY number

The Y coordinate in the video to sample from after polar coordinate transformation

let newY = morphCenterY + newDist * sin(angle);

🔧 Potential Improvements (5)

Here are some ways this code could be enhanced:

PERFORMANCE draw() pixel loop

The nested for-loop processes every pixel on every frame. On a 1920x1080 display, that's over 2 million pixels per frame—this can cause lag on slower devices.

💡 Add a step variable: for (let y = 0; y < height; y += 2) and for (let x = 0; x < width; x += 2) to process every other pixel and interpolate results. This cuts processing time by 75% with minimal visual loss.

BUG draw() video bounds check

When the canvas is larger than the video, pixels outside the video bounds are filled with gray (220), creating a gray border. If the video hasn't loaded yet, video.width and video.height might be 0, causing incorrect bounds checks.

💡 Check video.width > 0 before using it as a bound. Consider resizing the video to always fill the canvas: video.size(width, height) should already do this, but verify in setup() that the callback has fired.

STYLE variable naming

Variables like morphFactor, audioMorphFactor, and timeMorphFactor have similar names but different purposes, which can be confusing when reading.

💡 Rename for clarity: audioIntensity, timeOscillation, totalIntensity. This makes it immediately clear which variables control what.

FEATURE morphFactor calculation

The distortion effect is always either positive (bulge) or negative (pinch), never both at once. Audio transitions smoothly between -0.7 and 0.7, but the effect direction flips abruptly.

💡 Add a variable to control morphFactor direction independently: let direction = 1; // or -1; then apply it as morphFactor *= direction. This lets users choose bulge vs pinch without code changes.

BUG setup() video callback

The video is called with hide() twice: once inside the callback and once after createCapture(). This is redundant and could mask timing issues.

💡 Remove the second video.hide() call after createCapture(). The callback handles it, and keeping the code DRY prevents confusion.

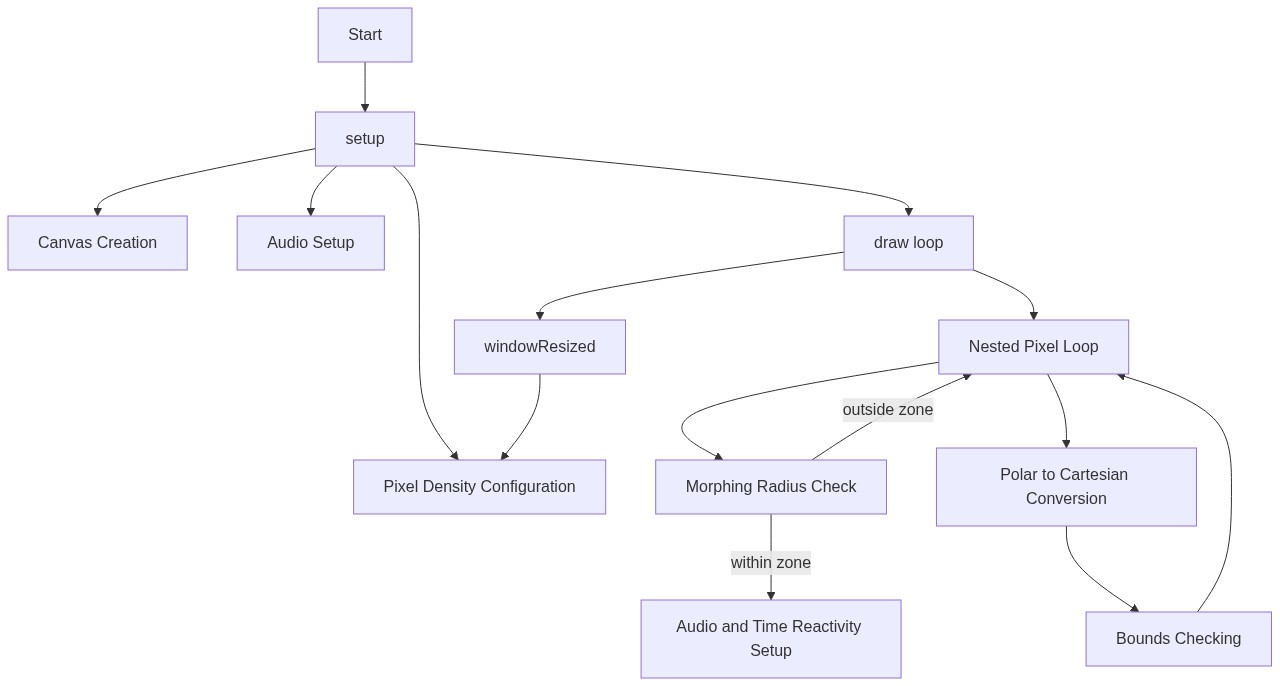
🔄 Code Flow

Code flow showing preload, setup, mousePressed, draw, windowResized

💡 Click on function names in the diagram to jump to their code

graph TD start[Start] --> setup[setup] setup --> canvas-creation[Canvas Creation] setup --> pixel-density-setup[Pixel Density Configuration] setup --> audio-initialization[Audio Input Setup] setup --> video-capture-setup[Video Capture Initialization] setup --> draw[draw loop] click setup href "#fn-setup" click canvas-creation href "#sub-canvas-creation" click pixel-density-setup href "#sub-pixel-density-setup" click audio-initialization href "#sub-audio-initialization" click video-capture-setup href "#sub-video-capture-setup" draw --> video-readiness-check[Video Readiness Check] video-readiness-check -->|Ready| pixel-loop[Pixel Loop] pixel-loop --> distance-calculation[Distance Calculation] distance-calculation --> polar-transformation[Polar Coordinate Transformation] polar-transformation --> fallback-copy[Fallback Pixel Copy] pixel-loop -->|Continue| pixel-loop click draw href "#fn-draw" click video-readiness-check href "#sub-video-readiness-check" click pixel-loop href "#sub-pixel-loop" click distance-calculation href "#sub-distance-calculation" click polar-transformation href "#sub-polar-transformation" click fallback-copy href "#sub-fallback-copy" windowResized --> canvas-resize[Canvas Resize] canvas-resize --> video-resize[Video Resize] click windowResized href "#fn-windowResized" click canvas-resize href "#sub-canvas-resize" click video-resize href "#sub-video-resize" mousePressed --> audio-initialization click mousePressed href "#fn-mousePressed"

❓ Frequently Asked Questions

What visual effects does the 'weird xelad ai thing lol' sketch create?

The sketch captures video from the user's webcam and applies creative effects based on audio input, resulting in dynamic visuals that respond to sound.

How can users interact with the 'weird xelad ai thing lol' sketch?

Users can start the sketch by pressing the mouse, which activates both the microphone and video feed for interactive audio-visual experiences.

What creative coding techniques are demonstrated in this p5.js sketch?

This sketch showcases concepts such as real-time video processing, audio amplitude analysis, and user interaction to create a responsive multimedia experience.

Preview

weird xelad ai thing lol - p5.js creative coding sketch preview
Sketch Preview
Code flow diagram showing the structure of weird xelad ai thing lol - Code flow showing preload, setup, mousePressed, draw, windowResized
Code Flow Diagram