Welcome to p5js AI - Mobile-Friendly Creative Coding. Learn how to Vibecode, then create your own!

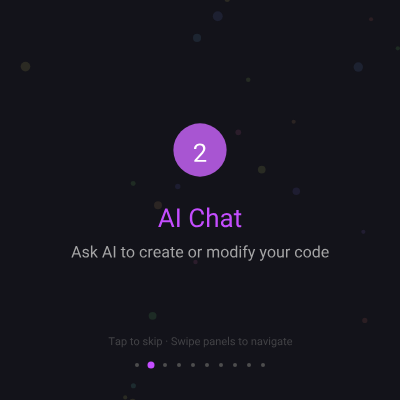
This sketch creates a welcoming onboarding screen with a soft gradient background, gently drifting particles, and an animated carousel of instructional panels. Each panel pulses inside a circular badge while its title and description fade smoothly in and out, automatically cycling through ten steps that introduce users to p5js AI.

🧪 Try This!

Experiment with the code by making these changes:

  1. Speed up the carousel — Lowering stepDuration makes the panels cycle faster—perfect for a quick demo or impatient users.
  2. Make the badge pulse more dramatically — Increasing the pulse multiplier exaggerates the growing-and-shrinking effect, making the badge much more prominent and eye-catching.
  3. Change the background color — The first value in background() is the hue (0-360 in HSB mode). Try 200 for bright blue, 30 for orange, or 120 for green.
  4. Make particles bigger and more visible — Increasing the size range and alpha creates a more prominent, less subtle particle effect.
  5. Add more particles to the background — Increasing the loop count from 25 to a higher number creates a denser, more atmospheric effect.
  6. Make text fade faster at step edges — Reducing the fade window (0.15 to 0.05) makes the text appear and disappear more snappily instead of gradually.
Prefer the full editor? Open it there →

📖 About This Sketch

This sketch demonstrates how to build a polished, mobile-friendly welcome screen using p5.js. It combines a soft HSB gradient background, an array of floating particles with semi-transparent fills, a pulsing circular badge that displays step numbers, and text that fades elegantly in and out. The result is a calm, professional onboarding experience that automatically cycles through ten instructional panels every 3.75 seconds—a great example of how p5.js can power interactive UI, not just visual art.

The code is organized into a setup() function that initializes the canvas, particles array, and font, a draw() function that handles all animation and rendering, and two event handlers (mousePressed and windowResized) for interactivity and responsiveness. By studying this sketch you will learn how to animate text opacity with the alpha parameter, use HSB color mode for hue-based effects, create smooth fade-in/fade-out transitions, draw responsive layouts that adapt to window size, and build a carousel that auto-advances while remaining clickable.

⚙️ How It Works

  1. When the sketch loads, setup() creates a full-window canvas, loads a custom Roboto font from a CDN, sets color mode to HSB (hue, saturation, brightness), and populates a particles array with 25 floating objects, each with random x, y, size, speed, and hue values.
  2. Every frame, draw() first paints a dark background and animates the particles upward—their hues also shift continuously to create a subtle, glowing effect, and when particles drift off the top, they respawn at the bottom with new random x positions.
  3. A stepTimer counter increments each frame; when it exceeds stepDuration (225 frames or 3.75 seconds), the timer resets and step advances to the next instruction panel.
  4. The current instruction's title and description are retrieved from the instructions array, and a progress value (0 to 1) is calculated to drive smooth fade-in and fade-out: text appears fully opaque in the middle 70% of the step duration and fades out at both ends.
  5. A pulsing circular badge is drawn at the center of the screen using a sin() wave to scale its size, with the step number (1-indexed) displayed inside using responsive text sizing.
  6. Below the badge, the title and description are drawn with the calculated alpha value applied to their fill colors so they fade in and out synchronously.
  7. Finally, progress indicator dots are drawn at the bottom—inactive dots are small and dark, the active dot is larger and bright—and a tap/swipe hint is displayed, making the UI feel complete and instructive.

🎓 Concepts You'll Learn

Animation loop (frameCount, draw cycle)HSB color mode (hue-based coloring)Alpha transparency (fade effects)Responsive design (windowWidth, windowHeight)Text rendering (textFont, textSize, textAlign)Particle systems (array of objects, animation)State management (step counter, timer)Smooth easing (map function, progress calculation)Event handling (mousePressed, windowResized)

📝 Code Breakdown

preload()

preload() is a p5.js function that runs once before setup(). Use it to load external resources like fonts, images, and audio files. Without preload(), fonts may not load in time, causing text to render in the default browser font.

function preload() {
  robotoFont = loadFont('https://unpkg.com/@fontsource/roboto@latest/files/roboto-latin-400-normal.woff');
}
Line-by-line explanation (1 lines)
robotoFont = loadFont('https://unpkg.com/@fontsource/roboto@latest/files/roboto-latin-400-normal.woff');
Loads a custom Roboto font from a CDN and stores it in the robotoFont variable. preload() runs BEFORE setup(), ensuring the font is ready before we try to use it with textFont().

setup()

setup() runs once when the sketch starts. Use it to initialize your canvas, load fonts and images, create variables, and populate arrays like particles. Everything you set up here will be available to use in draw().

function setup() {
  createCanvas(windowWidth, windowHeight);
  textFont(robotoFont);
  colorMode(HSB, 360, 100, 100, 100);
  noStroke();
  
  // Create floating particles for subtle background animation
  for (let i = 0; i < 25; i++) {
    particles.push({
      x: random(width),
      y: random(height),
      size: random(4, 10),
      speed: random(0.2, 0.8),
      hue: random(360)
    });
  }
}
Line-by-line explanation (11 lines)

🔧 Subcomponents:

for-loop Particle Creation Loop for (let i = 0; i < 25; i++) {

Creates 25 particle objects with randomized properties and adds them to the particles array for animation

createCanvas(windowWidth, windowHeight);
Creates a canvas that fills the entire window. windowWidth and windowHeight are p5.js variables that automatically reflect the current browser size.
textFont(robotoFont);
Tells p5.js to use the Roboto font (loaded in preload) for all text drawn after this point.
colorMode(HSB, 360, 100, 100, 100);
Switches from RGB (red, green, blue) to HSB (hue, saturation, brightness) color mode. HSB is great for creating smooth color transitions and effects—the ranges are 0-360 for hue, 0-100 for saturation, 0-100 for brightness, and 0-100 for alpha.
noStroke();
Disables outlines on all shapes drawn after this line. Without this, every circle and shape would have a visible border.
for (let i = 0; i < 25; i++) {
Loops 25 times (i goes from 0 to 24). Each iteration creates one particle object.
x: random(width),
Assigns a random x position between 0 and the canvas width to the new particle.
y: random(height),
Assigns a random y position between 0 and the canvas height to the new particle.
size: random(4, 10),
Assigns a random size between 4 and 10 pixels to the new particle—this variation makes particles look more natural and organic.
speed: random(0.2, 0.8),
Assigns a random upward drift speed between 0.2 and 0.8 pixels per frame. Slower speeds make some particles drift leisurely while faster ones zoom by.
hue: random(360)
Assigns a random hue value between 0 and 360, giving each particle a random starting color on the color spectrum.
particles.push({...});
Adds the newly created particle object to the particles array so it can be animated in draw().

draw()

draw() is the heartbeat of your p5.js sketch—it runs 60 times per second by default. Every frame, you update variables (like particle positions and timers), calculate derived values (like alpha for fading), and render everything to the canvas. The key to smooth animation is making small incremental changes each frame; the eye perceives these as fluid motion.

🔬 This loop animates each particle upward and shifts its hue every frame. What happens if you change p.hue + 0.3 to p.hue + 1.5? Or to p.hue + 0.05?

  for (let p of particles) {
    p.y -= p.speed;
    if (p.y < -20) {
      p.y = height + 20;
      p.x = random(width);
    }
    p.hue = (p.hue + 0.3) % 360;

🔬 This is the carousel timer and auto-advance logic. What happens if you change the condition from >= to > or remove the modulo operator at the end of the step assignment?

  // Auto-advance steps
  stepTimer++;
  if (stepTimer >= stepDuration) {
    stepTimer = 0;
    step = (step + 1) % instructions.length;
  }
function draw() {
  // Dark gradient background
  background(240, 25, 10);
  
  // Animate floating particles
  for (let p of particles) {
    p.y -= p.speed;
    if (p.y < -20) {
      p.y = height + 20;
      p.x = random(width);
    }
    p.hue = (p.hue + 0.3) % 360;
    fill(p.hue, 50, 70, 15);
    circle(p.x, p.y, p.size);
  }
  
  // Auto-advance steps
  stepTimer++;
  if (stepTimer >= stepDuration) {
    stepTimer = 0;
    step = (step + 1) % instructions.length;
  }
  
  let current = instructions[step];
  let progress = stepTimer / stepDuration;
  
  // Smooth fade in/out
  let alpha = progress < 0.15 ? map(progress, 0, 0.15, 0, 100) :
              progress > 0.85 ? map(progress, 0.85, 1, 100, 0) : 100;
  
  let centerY = height / 2;
  
  // Animated step number with gentle pulse
  let pulse = 1 + sin(frameCount * 0.08) * 0.08;
  let iconSize = 50 * pulse;
  
  // Draw circular badge with step number
  fill(280, 60, 90, alpha * 0.9);
  circle(width / 2, centerY - 50, iconSize);
  
  // Step number inside circle
  fill(0, 0, 100, alpha);
  textSize(24 * pulse);
  textAlign(CENTER, CENTER);
  text(step + 1, width / 2, centerY - 50);
  
  // Title - responsive size
  textSize(min(26, width / 15));
  fill(280, 70, 100, alpha);
  text(current.title, width / 2, centerY + 15);
  
  // Description - responsive size
  textSize(min(16, width / 24));
  fill(0, 0, 75, alpha * 0.85);
  text(current.desc, width / 2, centerY + 50);
  
  // Progress indicator dots
  let dotSpacing = 14;
  let dotsWidth = (instructions.length - 1) * dotSpacing;
  let dotsX = (width - dotsWidth) / 2;
  
  for (let i = 0; i < instructions.length; i++) {
    let isActive = i === step;
    fill(isActive ? color(280, 70, 100) : color(0, 0, 30));
    circle(dotsX + i * dotSpacing, height - 35, isActive ? 7 : 4);
  }
  
  // Swipe hint
  textSize(11);
  fill(0, 0, 45, 50);
  text("Tap to skip · Swipe panels to navigate", width / 2, height - 60);
}

Line-by-line explanation (42 lines)

🔧 Subcomponents:

for-loop Particle Animation Loop for (let p of particles) {

Updates each particle's position and color each frame, creating continuous drifting and hue-shifting effects

conditional Particle Respawn Check if (p.y < -20) {

Detects when a particle drifts off the top of the canvas and resets it to the bottom with a new random x position

conditional Step Auto-Advance Logic if (stepTimer >= stepDuration) {

Counts frames and automatically advances to the next onboarding panel when the timer reaches stepDuration

calculation Alpha Fade Calculation let alpha = progress < 0.15 ? map(progress, 0, 0.15, 0, 100) : progress > 0.85 ? map(progress, 0.85, 1, 100, 0) : 100;

Uses nested ternary operators to calculate a smooth fade-in for the first 15% of the step, hold full opacity for the middle 70%, and fade-out for the last 15%

calculation Pulse Sine Wave let pulse = 1 + sin(frameCount * 0.08) * 0.08;

Creates a smooth pulsing effect by using sin(frameCount) to oscillate between 0.92 and 1.08, scaling the badge size on every frame

for-loop Progress Indicator Dots Loop for (let i = 0; i < instructions.length; i++) {

Draws one dot for each instruction panel at the bottom; the active dot is larger and brighter than inactive dots

background(240, 25, 10);
Clears the canvas with a dark gray-blue (hue 240, saturation 25, brightness 10 in HSB mode), creating a fresh slate each frame and preventing trails.
for (let p of particles) {
Loops through each particle object stored in the particles array. The 'for...of' syntax is cleaner than traditional for loops when you want each element, not its index.
p.y -= p.speed;
Moves each particle upward by subtracting its speed from its y position. Lower y values are toward the top of the canvas, so this creates upward motion.
if (p.y < -20) {
Checks if the particle has drifted 20 pixels above the top of the canvas (y < 0 means off-screen, y < -20 adds a margin before respawning).
p.y = height + 20;
Resets the particle to 20 pixels below the bottom of the canvas so it will drift upward again, creating a continuous loop.
p.x = random(width);
Assigns a new random x position so particles don't always respawn in the same horizontal location—this randomness makes the effect feel more organic.
p.hue = (p.hue + 0.3) % 360;
Gradually shifts the particle's hue value by 0.3 each frame. The '%' operator (modulo) wraps the hue back to 0 when it exceeds 360, creating a continuous color cycle.
fill(p.hue, 50, 70, 15);
Sets the fill color for the next shape: the particle's hue (continuously changing), 50 saturation, 70 brightness, and 15 alpha (mostly transparent). This creates the glowing, semi-transparent effect.
circle(p.x, p.y, p.size);
Draws a circle at the particle's current position with its current size—because alpha is 15, the circle is very faint and glowing.
stepTimer++;
Increments the timer by 1 each frame, counting up toward stepDuration to determine when to advance to the next panel.
if (stepTimer >= stepDuration) {
Checks if enough frames have passed to advance. When true, the next panel will display.
stepTimer = 0;
Resets the timer to 0 so it starts counting toward the next panel's duration.
step = (step + 1) % instructions.length;
Advances step to the next index. The '%' operator wraps back to 0 after reaching the last instruction, creating a looping carousel.
let current = instructions[step];
Retrieves the current instruction object (title and description) using the current step index.
let progress = stepTimer / stepDuration;
Calculates a value from 0 to 1 representing how far through the current step we are—0 means just started, 1 means about to advance.
let alpha = progress < 0.15 ? map(progress, 0, 0.15, 0, 100) :
This nested ternary operator starts the alpha fade-in: if progress is less than 0.15 (the first 15% of the step), map it from 0-0.15 to 0-100 alpha, creating a smooth fade-in.
progress > 0.85 ? map(progress, 0.85, 1, 100, 0) : 100;
Continues the alpha calculation: if progress is greater than 0.85 (the last 15% of the step), map it from 0.85-1 to 100-0 alpha, creating a smooth fade-out. Otherwise (middle 70%), use full alpha of 100.
let centerY = height / 2;
Calculates the vertical center of the canvas to position the badge, title, and description in the middle of the screen.
let pulse = 1 + sin(frameCount * 0.08) * 0.08;
Uses sin(frameCount * 0.08) to create a smooth, continuous wave that oscillates between -1 and 1. Multiplying by 0.08 gives a range of ±0.08, so pulse oscillates between 0.92 and 1.08, creating a gentle growing-and-shrinking effect.
let iconSize = 50 * pulse;
Multiplies the base badge size (50) by the pulse value, so the badge smoothly grows and shrinks each frame.
fill(280, 60, 90, alpha * 0.9);
Sets the fill color for the badge: hue 280 (purple), 60 saturation, 90 brightness, and alpha scaled to 90% so the badge fades in and out along with the text.
circle(width / 2, centerY - 50, iconSize);
Draws the circular badge at the horizontal center and 50 pixels above the vertical center, with the pulsing size.
fill(0, 0, 100, alpha);
Sets the fill color for the step number text: hue 0 (ignored), saturation 0, brightness 100 (white), with the same alpha fade as the badge.
textSize(24 * pulse);
Sets the text size for the step number, scaling it with the pulse so the number grows and shrinks in sync with the badge.
textAlign(CENTER, CENTER);
Centers the next text both horizontally and vertically around its x, y position—without this, text would be aligned differently and look off-center.
text(step + 1, width / 2, centerY - 50);
Draws the step number (step + 1 so it displays 1, 2, 3... instead of 0, 1, 2...) centered inside the badge. The number fades in and out with the alpha value.
textSize(min(26, width / 15));
Sets the title text size using min() to pick the smaller of two values: a fixed 26 or 1/15th of the window width. This makes the title responsive—it shrinks on small mobile screens and grows on large displays.
fill(280, 70, 100, alpha);
Sets the title color to bright purple (hue 280, high saturation and brightness) with the same alpha fade.
text(current.title, width / 2, centerY + 15);
Draws the title 15 pixels below the badge, centered horizontally. The title fades in and out with the alpha value.
textSize(min(16, width / 24));
Sets the description text size using min() to pick the smaller of 16 or 1/24th of the window width, making the description responsive.
fill(0, 0, 75, alpha * 0.85);
Sets the description color to a light gray (brightness 75) with slightly reduced alpha (85% of the text fade) to make it appear subtly less prominent than the title.
text(current.desc, width / 2, centerY + 50);
Draws the description 50 pixels below the badge, centered horizontally. It fades in and out with the calculated alpha value.
let dotSpacing = 14;
Sets the horizontal distance between progress indicator dots to 14 pixels.
let dotsWidth = (instructions.length - 1) * dotSpacing;
Calculates the total width of all dots: if there are 10 instructions, that's 9 gaps of 14 pixels each (136 pixels total).
let dotsX = (width - dotsWidth) / 2;
Calculates where the first dot should be drawn so all dots are centered horizontally on the canvas.
for (let i = 0; i < instructions.length; i++) {
Loops through each instruction index to draw one progress dot for each panel.
let isActive = i === step;
Determines if this dot represents the current step (true if i equals step, false otherwise).
fill(isActive ? color(280, 70, 100) : color(0, 0, 30));
Uses a ternary operator: if this is the active dot, use bright purple; otherwise use dark gray. This makes the current step visually obvious.
circle(dotsX + i * dotSpacing, height - 35, isActive ? 7 : 4);
Draws the dot: x position is calculated to center all dots, y is 35 pixels from the bottom, and the diameter is 7 for active dots or 4 for inactive dots.
textSize(11);
Sets the text size for the hint at the bottom to a small 11 pixels.
fill(0, 0, 45, 50);
Sets the hint color to medium gray (brightness 45) with very low alpha (50) so it's subtle and doesn't distract from the main content.
text("Tap to skip · Swipe panels to navigate", width / 2, height - 60);
Draws the instruction text 60 pixels from the bottom, centered horizontally. The low alpha makes it appear as helpful guidance rather than a dominant element.

mousePressed()

mousePressed() is a built-in p5.js function that runs once every time the user clicks the mouse. It's perfect for adding interactivity—buttons, skipping, toggling features. Note that it fires when the mouse button goes DOWN, not when it's released; if you need the release event, use mouseReleased() instead.

function mousePressed() {
  step = (step + 1) % instructions.length;
  stepTimer = 0;
}
Line-by-line explanation (2 lines)
step = (step + 1) % instructions.length;
Advances to the next instruction panel immediately when the mouse is clicked. The modulo operator wraps back to 0 after the last instruction, so clicking at the end loops back to the beginning.
stepTimer = 0;
Resets the timer to 0 so the new panel has its full duration before auto-advancing, giving the user time to read before the carousel moves again.

windowResized()

windowResized() is a built-in p5.js event handler that fires whenever the browser window changes size. By calling resizeCanvas() with the new windowWidth and windowHeight, you ensure your sketch adapts to mobile phones being rotated, browser windows being dragged, and displays of different sizes. Without this function, your sketch would keep its original size and look broken when resized.

function windowResized() {
  resizeCanvas(windowWidth, windowHeight);
}
Line-by-line explanation (1 lines)
resizeCanvas(windowWidth, windowHeight);
Updates the canvas size to match the current window dimensions. This function is called automatically by p5.js whenever the browser window is resized, ensuring the sketch stays responsive and fills the full screen on mobile and desktop.

📦 Key Variables

robotoFont p5.Font object

Stores the loaded Roboto font for rendering text. Loaded in preload() and applied with textFont() in setup().

let robotoFont;
particles array of objects

Holds all 25 floating particle objects, each with x, y, size, speed, and hue properties. Updated every frame in the particle animation loop.

let particles = [];
step number

Tracks the current onboarding panel index (0-9). Increments when stepTimer reaches stepDuration or when the user clicks.

let step = 0;
stepTimer number

Counts up each frame to measure how long the current panel has been displayed. Resets when step advances.

let stepTimer = 0;
stepDuration number

The number of frames each panel displays before auto-advancing (225 frames ≈ 3.75 seconds at 60 fps). Controls the carousel speed.

let stepDuration = 225;
instructions array of objects

Contains 10 onboarding panels, each with a title and description. Indexed by the step variable to display the current panel.

let instructions = [{title: '...', desc: '...'}, ...];

🔧 Potential Improvements (6)

Here are some ways this code could be enhanced:

FEATURE mousePressed() function

Only left-clicks are handled; right-clicks and touch events are not distinguished

💡 Use mouseButton === LEFT to explicitly check for left clicks, and add touchStarted() for mobile swipe support (as mentioned in the UI hint)

PERFORMANCE draw() particle loop

The particle color is recalculated as HSB every frame using fill(p.hue, 50, 70, 15), which is a small overhead repeated 25+ times per frame

💡 Pre-calculate a palette of colors in setup() and cycle through them, or use lerpColor() to interpolate between colors stored as constants

STYLE instructions array

Hard-coded strings for all 10 panels makes the code less maintainable if you want to update copy later

💡 Consider loading instructions from an external JSON file or a content management system so text can be updated without editing the code

BUG setup() particle creation

If a particle's y starts very close to the top, it will immediately respawn, creating a frame of discontinuity

💡 Add a minimum starting y position: y: random(height/2, height) to ensure particles always start in the lower half and drift upward naturally

FEATURE windowResized() function

Particles are not repositioned when the window resizes, so they may drift off if the canvas suddenly shrinks

💡 Re-initialize particle positions or clamp them within the new canvas bounds when windowResized() fires

STYLE progress dots calculation

The dot positioning math is readable but could be clearer with intermediate variable names

💡 Use descriptive names like 'totalDotsSpacing' and 'firstDotX' to make the responsive layout logic easier to understand at a glance

🔄 Code Flow

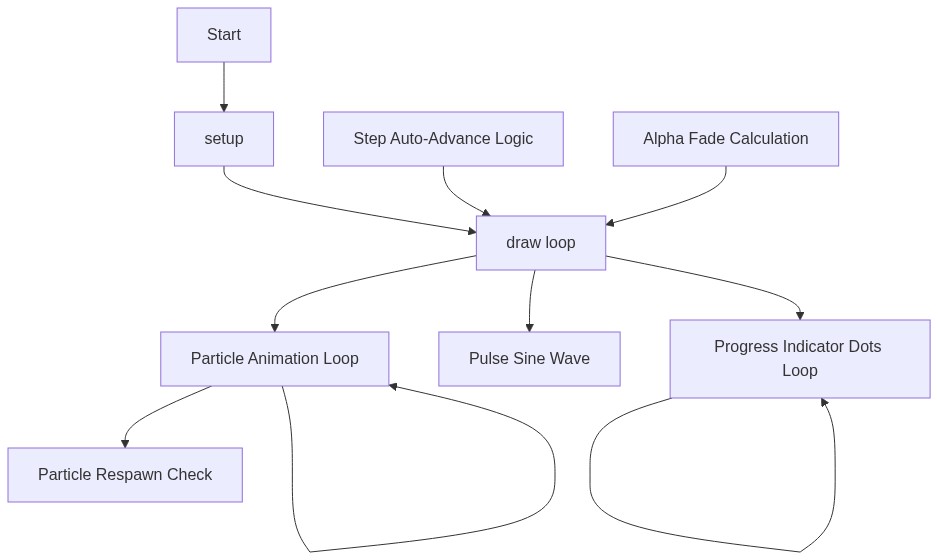
Code flow showing preload, setup, draw, mousepressed, windowresized

💡 Click on function names in the diagram to jump to their code

graph TD start[Start] --> setup[setup] setup --> draw[draw loop] draw --> particle-animation-loop[Particle Animation Loop] draw --> pulse-sine-wave[Pulse Sine Wave] draw --> progress-dots-loop[Progress Indicator Dots Loop] particle-animation-loop --> particle-respawn-check[Particle Respawn Check] particle-animation-loop --> particle-animation-loop progress-dots-loop --> progress-dots-loop step-advance-logic[Step Auto-Advance Logic] --> draw alpha-fade-calculation[Alpha Fade Calculation] --> draw click setup href "#fn-setup" click draw href "#fn-draw" click particle-animation-loop href "#sub-particle-animation-loop" click particle-respawn-check href "#sub-particle-respawn-check" click step-advance-logic href "#sub-step-advance-logic" click alpha-fade-calculation href "#sub-alpha-fade-calculation" click pulse-sine-wave href "#sub-pulse-sine-wave" click progress-dots-loop href "#sub-progress-dots-loop"

❓ Frequently Asked Questions

What visual effects can users expect from the p5.js AI welcome sketch?

The sketch features a soft, glowing gradient background with gently drifting particles, creating a calm and inviting atmosphere.

How can users interact with the p5.js AI onboarding panels?

Users can swipe between onboarding panels to explore various features and functionalities of the p5.js AI platform.

What creative coding techniques are showcased in this sketch?

The sketch demonstrates the use of animated particles, dynamic text transitions, and mobile-first design principles for an engaging user experience.

Preview

Welcome to p5js AI - Mobile-Friendly Creative Coding. Learn how to Vibecode, then create your own! - p5.js creative coding sketch preview
Sketch Preview
Code flow diagram showing the structure of Welcome to p5js AI - Mobile-Friendly Creative Coding. Learn how to Vibecode, then create your own! - Code flow showing preload, setup, draw, mousepressed, windowresized
Code Flow Diagram