
- xelsed.ai

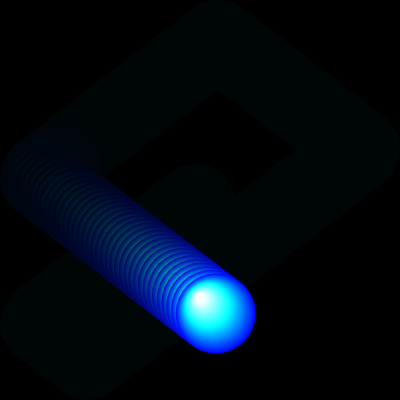
This sketch animates a glowing gradient ball that bounces around the full browser window, leaving behind a slowly fading trail. It combines classic velocity-based motion with the raw HTML5 Canvas API to create a radial gradient that makes the ball look like a glossy 3D sphere.

🧪 Try This!

Experiment with the code by making these changes:

  1. Make the trail last longer — Lowering the background's alpha value slows down how fast old frames fade, producing longer, dreamier trails.
  2. Recolor the ball to fire tones — The three gradient color stops define the ball's look from center to edge; swapping them changes the ball's entire color scheme.
  3. Supercharge the ball's speed — Widening the random velocity range makes the ball dart around much faster right from the start.
  4. Shrink or grow the ball — The ballRadius variable controls both the visual size of the sphere and the distance used for wall collisions.
Prefer the full editor? Open it there →

📖 About This Sketch

This sketch creates a glossy, glowing ball that bounces endlessly around the edges of the browser window, dragging a soft fading trail behind it like a comet. What makes it visually striking is the combination of a semi-transparent background rectangle (which produces the fading trail) with a radial gradient drawn directly through the underlying Canvas API, giving the ball a realistic glassy highlight instead of a flat color.

The code is organized around p5.js's setup()/draw() animation loop plus a windowResized() handler that keeps the canvas full-screen. Studying it teaches you velocity-based movement, edge-collision detection with position clamping, how to fake motion trails with low-alpha backgrounds, and how to reach past p5.js's simple shape functions into the native drawingContext for advanced effects like gradients.

⚙️ How It Works

  1. When the sketch loads, setup() creates a canvas that fills the whole window and places the ball at its center with a random velocity in both directions.
  2. Every frame, draw() paints a nearly-transparent black rectangle over everything, which very slightly dims older frames instead of erasing them, producing the fading trail effect.
  3. The ball's x and y position are updated by adding its current velocity, moving it a little further each frame.
  4. Four boundary checks detect when the ball's edge touches a wall; when it does, the corresponding velocity is flipped in sign to bounce it back, and the position is clamped so the ball can't visually get stuck inside the wall.
  5. The sketch then reaches into the raw Canvas 2D API (drawingContext) to build a radial gradient from white at the center to cyan to blue at the edge, and fills a circular arc with it so the ball looks like a glowing 3D sphere.
  6. If the browser window is resized, windowResized() automatically resizes the canvas to match the new dimensions so the animation always fills the screen.

🎓 Concepts You'll Learn

Animation loop (setup/draw)Velocity-based motionCollision detection and clampingAlpha transparency for motion trailsCanvas 2D drawingContext and radial gradientsResponsive canvas with windowResized

📝 Code Breakdown

setup()

setup() runs once when the sketch first loads. It's the right place to size the canvas and give your objects their starting position and velocity before the animation loop begins.

🔬 This sets the ball's starting speed randomly between -5 and 5 in each direction. What happens visually if you widen the range to random(-15, 15)? What if you narrow it to random(-1, 1)?

  ballVX = random(-5, 5);
  ballVY = random(-5, 5);
function setup() {
  // Create a canvas that fills the entire window
  createCanvas(windowWidth, windowHeight);
  
  // Initialize the ball's position to the center of the canvas
  ballX = width / 2;
  ballY = height / 2;
  
  // Initialize the ball's velocity with random values
  // The ball will move with a speed between -5 and 5 pixels per frame
  ballVX = random(-5, 5);
  ballVY = random(-5, 5);
  
  // Ensure the ball doesn't start stationary
  if (ballVX === 0 && ballVY === 0) {
    ballVX = 3;
    ballVY = 3;
  }
}
Line-by-line explanation (8 lines)

🔧 Subcomponents:

conditional Prevent Stationary Ball if (ballVX === 0 && ballVY === 0) {

Guards against the rare case where random() returns exactly 0 for both velocities, which would leave the ball frozen forever

createCanvas(windowWidth, windowHeight);
Creates a drawing canvas that exactly matches the browser window's current width and height, making the sketch full-screen
ballX = width / 2;
Places the ball's starting horizontal position exactly in the middle of the canvas
ballY = height / 2;
Places the ball's starting vertical position exactly in the middle of the canvas
ballVX = random(-5, 5);
Picks a random horizontal speed between -5 and 5, so the ball starts moving in an unpredictable direction and pace
ballVY = random(-5, 5);
Picks a random vertical speed between -5 and 5, similarly randomizing vertical motion
if (ballVX === 0 && ballVY === 0) {
Checks the very unlikely case that both random values happened to be exactly zero
ballVX = 3;
Gives the ball a fallback horizontal speed so it never stays perfectly still
ballVY = 3;
Gives the ball a fallback vertical speed for the same reason
draw()

draw() runs continuously, about 60 times per second, and is where all motion and rendering logic lives. This particular draw() mixes standard p5.js calls (background, noStroke) with direct calls to the browser's native Canvas 2D API (drawingContext) to achieve an effect - a radial gradient - that p5.js doesn't provide a built-in shortcut for.

🔬 These three color stops define the ball's gradient from center to edge. What happens if you swap the hex codes for warm colors like '#FFFF00', '#FF8800', and '#FF0000'?

  gradient.addColorStop(0, '#FFFFFF'); // White at the center (lightest point)
  gradient.addColorStop(0.5, '#00FFFF'); // Cyan in the middle
  gradient.addColorStop(1, '#0000FF'); // Blue at the edge (darkest point)

🔬 This clamps the ball's position after a wall bounce. What do you think happens visually if you delete the two clamping lines but keep the velocity flip - would the ball ever visibly get stuck?

  if (ballX + ballRadius >= width || ballX - ballRadius <= 0) {
    ballVX *= -1; // Reverse the X velocity
    
    // Clamp the ball's position to prevent it from getting stuck in the wall
    if (ballX + ballRadius > width) ballX = width - ballRadius;
    if (ballX - ballRadius < 0) ballX = ballRadius;
  }
function draw() {
  // Create a fading trail effect
  // Draw a semi-transparent dark rectangle over the entire canvas
  // The low alpha value (20) makes previous frames slowly fade out
  background(0, 0, 0, 20); 

  // --- Update Ball Position ---
  // Move the ball by adding its velocity to its current position
  ballX += ballVX;
  ballY += ballVY;

  // --- Wall Collision Detection ---
  // Check for collision with left or right walls
  if (ballX + ballRadius >= width || ballX - ballRadius <= 0) {
    ballVX *= -1; // Reverse the X velocity
    
    // Clamp the ball's position to prevent it from getting stuck in the wall
    if (ballX + ballRadius > width) ballX = width - ballRadius;
    if (ballX - ballRadius < 0) ballX = ballRadius;
  }

  // Check for collision with top or bottom walls
  if (ballY + ballRadius >= height || ballY - ballRadius <= 0) {
    ballVY *= -1; // Reverse the Y velocity
    
    // Clamp the ball's position to prevent it from getting stuck in the wall
    if (ballY + ballRadius > height) ballY = height - ballRadius;
    if (ballY - ballRadius < 0) ballY = ballRadius;
  }

  // --- Draw Ball with Gradient ---
  // Disable stroke for the ball, so it doesn't have a border
  noStroke(); 

  // Access the underlying 2D rendering context of the canvas
  // This allows us to use advanced Canvas API features like gradients
  // Reference: https://p5js.org/reference/#/p5/drawingContext
  let gradient = drawingContext.createRadialGradient(
    ballX - ballRadius * 0.4, ballY - ballRadius * 0.4, ballRadius * 0.1, // Inner circle (light source, slightly offset)
    ballX, ballY, ballRadius // Outer circle (edge of the ball)
  );
  
  // Add color stops to define the gradient's appearance
  gradient.addColorStop(0, '#FFFFFF'); // White at the center (lightest point)
  gradient.addColorStop(0.5, '#00FFFF'); // Cyan in the middle
  gradient.addColorStop(1, '#0000FF'); // Blue at the edge (darkest point)

  // Apply the created gradient to the fill style of the drawing context
  drawingContext.fillStyle = gradient;
  
  // Start a new path for drawing the circle
  drawingContext.beginPath();
  
  // Draw an arc (a full circle) at the ball's position with its radius
  // Reference: https://developer.mozilla.org/en-US/docs/Web/API/CanvasRenderingContext2D/arc
  drawingContext.arc(ballX, ballY, ballRadius, 0, TWO_PI);
  
  // Fill the defined path with the current fillStyle (our gradient)
  drawingContext.fill();
}
Line-by-line explanation (18 lines)

🔧 Subcomponents:

conditional Left/Right Wall Collision if (ballX + ballRadius >= width || ballX - ballRadius <= 0) {

Detects when the ball's edge touches the left or right side of the canvas and reverses its horizontal velocity, clamping position to avoid sticking

conditional Top/Bottom Wall Collision if (ballY + ballRadius >= height || ballY - ballRadius <= 0) {

Detects when the ball's edge touches the top or bottom of the canvas and reverses its vertical velocity, clamping position to avoid sticking

calculation Radial Gradient Setup let gradient = drawingContext.createRadialGradient(...)

Builds a light-to-dark radial gradient offset from center to simulate a glossy highlight on the ball

background(0, 0, 0, 20);
Paints a black rectangle over the whole canvas with very low opacity (20 out of 255), so old frames aren't fully erased - just slightly darkened, which is what creates the fading trail
ballX += ballVX;
Moves the ball horizontally by adding its current horizontal velocity to its position
ballY += ballVY;
Moves the ball vertically by adding its current vertical velocity to its position
if (ballX + ballRadius >= width || ballX - ballRadius <= 0) {
Checks if the ball's right edge has reached the canvas's right side, OR its left edge has reached the left side
ballVX *= -1; // Reverse the X velocity
Flips the sign of the horizontal velocity, making the ball bounce back in the opposite direction
if (ballX + ballRadius > width) ballX = width - ballRadius;
If the ball overshot the right wall, snaps its position back so it sits exactly at the edge instead of poking through
if (ballX - ballRadius < 0) ballX = ballRadius;
If the ball overshot the left wall, snaps its position back to sit exactly at the edge
if (ballY + ballRadius >= height || ballY - ballRadius <= 0) {
Same collision check as above but for the top and bottom edges of the canvas
ballVY *= -1; // Reverse the Y velocity
Flips the vertical velocity's sign so the ball bounces off top or bottom
noStroke();
Turns off outlines for anything drawn afterward, so the ball has no border line
let gradient = drawingContext.createRadialGradient(
Reaches past p5.js into the native Canvas 2D API to create a radial gradient object, defined by an inner circle (the highlight) and an outer circle (the ball's edge)
gradient.addColorStop(0, '#FFFFFF'); // White at the center (lightest point)
Sets the very center of the gradient to pure white, creating a bright highlight
gradient.addColorStop(0.5, '#00FFFF'); // Cyan in the middle
Sets the gradient's midpoint to cyan, transitioning the color outward
gradient.addColorStop(1, '#0000FF'); // Blue at the edge (darkest point)
Sets the outer edge of the gradient to deep blue, completing the glossy sphere look
drawingContext.fillStyle = gradient;
Tells the canvas to use this gradient as the fill color for the next shape drawn
drawingContext.beginPath();
Starts a new empty drawing path on the raw canvas, required before drawing a new shape with the native API
drawingContext.arc(ballX, ballY, ballRadius, 0, TWO_PI);
Traces a full circle (an arc from 0 to a full turn, TWO_PI) centered on the ball's position with its radius
drawingContext.fill();
Fills the traced circular path with the gradient we set up, rendering the glowing ball

windowResized()

windowResized() is a special p5.js function that p5.js automatically calls whenever the browser window is resized. It's the standard way to keep a full-screen sketch responsive.

function windowResized() {
  // Resize the canvas to match the new window dimensions
  resizeCanvas(windowWidth, windowHeight);
  
  // Recalculate ball position if needed, or simply let it continue from its last point
  // For this sketch, just resizing is enough.
}
Line-by-line explanation (1 lines)
resizeCanvas(windowWidth, windowHeight);
Automatically called by p5.js whenever the browser window changes size; this resizes the canvas element to match the new width and height so the sketch always fills the screen

📦 Key Variables

ballX number

Stores the ball's current horizontal position on the canvas, updated every frame by velocity

let ballX, ballY;
ballY number

Stores the ball's current vertical position on the canvas, updated every frame by velocity

let ballX, ballY;
ballVX number

The ball's horizontal velocity (speed and direction); flips sign when the ball hits a left or right wall

let ballVX, ballVY;
ballVY number

The ball's vertical velocity (speed and direction); flips sign when the ball hits the top or bottom wall

let ballVX, ballVY;
ballRadius number

The radius of the ball in pixels, used for drawing the circle and for all collision detection math

let ballRadius = 40;

🔧 Potential Improvements (4)

Here are some ways this code could be enhanced:

BUG draw() wall collision detection

If the ball's speed is very high, it can move past a wall by more than its radius in a single frame, and the >= / <= checks combined with the clamping could momentarily place it exactly at the boundary every frame, causing it to visually stick and jitter at high velocities instead of bouncing smoothly.

💡 Consider using a more accurate collision response that accounts for how far past the wall the ball traveled (e.g. reflecting the overshoot distance) rather than always clamping to the exact edge.

PERFORMANCE draw() gradient creation

A brand new radial gradient object is created from scratch every single frame via drawingContext.createRadialGradient(), even though the gradient's colors never change - only its position does.

💡 While gradients must be repositioned each frame since the ball moves, you could cache the color-stop setup logic or profile whether recreating the gradient object is a bottleneck on lower-end devices, especially if adding many balls.

STYLE global variable declarations

ballX, ballY, ballVX, and ballVY are declared without initial values (let ballX, ballY;), relying entirely on setup() to assign them, which could cause confusion or bugs if other code tried to read them before setup() runs.

💡 Initialize them to sensible defaults (e.g. let ballX = 0, ballY = 0;) at declaration time for clarity and safety.

FEATURE draw()

The sketch only supports a single ball, and there's no user interaction - mouse or keyboard input could make the sketch far more engaging.

💡 Add support for spawning additional balls on mousePressed(), or let arrow keys / mouse position influence the ball's velocity for interactive play.

🔄 Code Flow

Code flow showing setup, draw, windowresized

💡 Click on function names in the diagram to jump to their code

graph TD start[Start] --> setup[setup] setup --> draw[draw loop] draw --> stationarycheck[stationary-check] draw --> horizontalcollision[horizontal-collision] draw --> verticalcollision[vertical-collision] draw --> gradientcreation[gradient-creation] stationarycheck --> draw horizontalcollision --> draw verticalcollision --> draw gradientcreation --> draw click setup href "#fn-setup" click draw href "#fn-draw" click stationarycheck href "#sub-stationary-check" click horizontalcollision href "#sub-horizontal-collision" click verticalcollision href "#sub-vertical-collision" click gradientcreation href "#sub-gradient-creation"

❓ Frequently Asked Questions

What visual effect does the XeLseDai sketch create?

The XeLseDai sketch visually creates a simple bouncing ball that leaves a fading trail effect as it moves across the canvas.

Is the XeLseDai sketch interactive for users?

The sketch is not interactive; it autonomously animates the ball's movement within the canvas boundaries.

What creative coding concept does the XeLseDai sketch showcase?

This sketch demonstrates the concept of motion and collision detection, along with the use of a fading background to create a trail effect.

Preview

- xelsed.ai - p5.js creative coding sketch preview
Sketch Preview
Code flow diagram showing the structure of - xelsed.ai - Code flow showing setup, draw, windowresized
Code Flow Diagram