
You can’t find the right door heehee

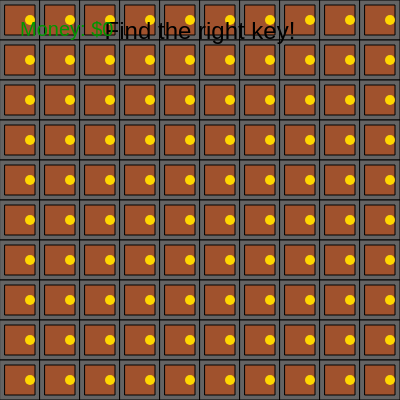
This sketch creates an interactive game where you click through a grid of 100 doors trying to find the one "right" door. Click the correct door to win and open all doors; click wrong doors and a playful animated dog chases you. It combines object-oriented programming, collision detection, and animation.

🧪 Try This!

Experiment with the code by making these changes:

  1. Make the grid bigger — More doors make the game harder. The grid will resize to fill the window.
  2. Change the background color — Make the canvas a different color to change the visual mood.
  3. Win with less money — Lower the jackpot amount to a more reasonable number.
  4. Make doors purple and orange — Closed doors turn purple; open doors turn orange.
  5. Speed up the dog — Make the dog chase twice as fast by doubling its speed.
  6. Change the win message — Customize what text appears when you find the right door.
Prefer the full editor? Open it there →

📖 About This Sketch

This sketch creates a delightful game of chance: a grid of 100 clickable doors hides one winning door among many decoys. Click the right one and all doors fly open; click wrong and a cute brown dog chases your cursor in playful retaliation. The visual effect is simple but engaging, and it is powered by three core p5.js techniques: object-oriented programming with the Door and Dog classes, collision detection to check mouse clicks against door boundaries, and animation via the draw loop updating dog movement and message timers.

The code is organized into two custom classes (Door and Dog) that encapsulate all their own data and methods, plus a setup() function that builds a 10×10 grid of door objects, and a draw() function that renders everything and handles the win condition. By studying it, you will learn how to structure interactive sketches using classes, manage arrays of interactive objects, and layer animations and UI text on top of game logic.

⚙️ How It Works

  1. When the sketch loads, setup() creates a 10×10 grid of Door objects and picks one random door to be the winning door. A Dog object is also created, starting below the bottom of the screen.
  2. Every frame, draw() clears the canvas and displays all 100 doors, each showing its state (open and blue, or closed and brown with a gold handle). It also updates and draws the dog.
  3. When you click the mouse, mouseClicked() checks if you clicked inside any door using the contains() collision detection method.
  4. If you click the right door, its tryOpen() method sets isOpen to true and displays a winning message. The draw() function detects this, opens all other doors instantly, and adds money to your counter.
  5. If you click a wrong door, it displays "Wrong key!" and the dog chases toward your mouse position for 2 seconds, returning home afterward.
  6. Clicking again after winning resets the game: one new random door becomes the key, all doors close, money resets to zero, and the dog returns home.

🎓 Concepts You'll Learn

Object-oriented programming (classes)Arrays and iterationCollision detectionMouse interactionAnimation with timersGame state management

📝 Code Breakdown

Door (class)

A class is a blueprint for creating objects. Every door shares the same properties (x, y, isOpen) but with different values. When you write 'new Door(...)' you create a new instance with its own data.

class Door {
  constructor(x, y, w, h, id, isKeyDoor) {
    this.x = x;
    this.y = y;
    this.w = w;
    this.h = h;
    this.id = id; // Unique ID for each door
    this.isKeyDoor = isKeyDoor; // True if this is the "right key" door
    this.isOpen = false; // Current state of the door
    this.statusMessage = ""; // Message to display on the door (e.g., "Wrong key!")
    this.messageTimer = 0; // Timer to make the message disappear
  }
}
Line-by-line explanation (5 lines)
constructor(x, y, w, h, id, isKeyDoor) {
The constructor method runs once when a new Door is created, setting up all its properties.
this.x = x;
Stores the door's horizontal position on the canvas - 'this' means "this specific door object".
this.isKeyDoor = isKeyDoor;
Stores whether this particular door is the winning door (true) or a decoy (false).
this.isOpen = false;
Every door starts closed; this flag will be set to true when clicked correctly.
this.messageTimer = 0;
Countdown timer for displaying messages - when 0, no message shows; when > 0, decrement each frame.
display()

The display() method draws one door on screen. It runs every frame for every door. Push/pop isolate transformations so each door draws independently. The messageTimer countdown creates the disappearing text effect.

🔬 This conditional draws either a light blue or brown rectangle based on whether the door is open. What happens if you swap the fill colors, so closed doors are blue and open doors are brown?

    // Door panel
    if (this.isOpen) {
      fill(200, 200, 255); // Light blue for open door
      rect(5, 5, this.w - 10, this.h - 10); // Inner panel, slightly smaller
    } else {
      fill(160, 82, 45); // Brown for closed door
      rect(5, 5, this.w - 10, this.h - 10); // Inner panel

🔬 The handle is drawn only on closed doors. What if you change the diameter from 10 to 20? Or move it to a different position by changing 0.75 to 0.5?

      // Door handle (simple circle)
      fill(255, 215, 0); // Gold color
      noStroke(); // No border for the handle
      ellipse(this.w * 0.75, this.h * 0.5, 10, 10); // Draw handle on the right side
  // Method to display the door
  display() {
    push(); // Save current drawing style
    translate(this.x, this.y); // Move to the door's position

    // Door frame
    fill(100); // Dark gray
    rect(0, 0, this.w, this.h); // Draw the outer frame

    // Door panel
    if (this.isOpen) {
      fill(200, 200, 255); // Light blue for open door
      rect(5, 5, this.w - 10, this.h - 10); // Inner panel, slightly smaller
    } else {
      fill(160, 82, 45); // Brown for closed door
      rect(5, 5, this.w - 10, this.h - 10); // Inner panel

      // Door handle (simple circle)
      fill(255, 215, 0); // Gold color
      noStroke(); // No border for the handle
      ellipse(this.w * 0.75, this.h * 0.5, 10, 10); // Draw handle on the right side
    }

    // Display status message if timer is active
    if (this.messageTimer > 0) {
      fill(255, 0, 0); // Red text
      textSize(16);
      textAlign(CENTER, CENTER); // Center text within the door
      text(this.statusMessage, this.w / 2, this.h / 2); // Draw message
      this.messageTimer--; // Decrease timer each frame
    }

    pop(); // Restore previous drawing style
  }
Line-by-line explanation (9 lines)

🔧 Subcomponents:

conditional Open/Closed Visual if (this.isOpen) {

Determines whether to draw the door as blue (open) or brown (closed)

conditional Message Timer if (this.messageTimer > 0) {

Only shows status messages when the timer is counting down

push(); // Save current drawing style
Saves the current fill, stroke, and transform settings so changes only affect this door.
translate(this.x, this.y); // Move to the door's position
Moves the coordinate system to the door's x,y position so all drawing happens relative to the door.
fill(100); // Dark gray
Sets the fill color to dark gray for the outer frame rectangle.
rect(0, 0, this.w, this.h); // Draw the outer frame
Draws the door frame starting at (0,0) with width this.w and height this.h (the door's size).
if (this.isOpen) {
Checks whether the door is open - if true, draw light blue; if false, draw brown.
ellipse(this.w * 0.75, this.h * 0.5, 10, 10); // Draw handle on the right side
Only drawn for closed doors - places a gold circle handle at 75% of the door's width horizontally.
if (this.messageTimer > 0) {
Only show the message if the timer is still counting down (greater than 0).
this.messageTimer--; // Decrease timer each frame
Every frame, reduce the timer by 1. When it hits 0, the message disappears next frame.
pop(); // Restore previous drawing style
Undoes the translate() and all style changes, returning to the previous state for the next door.

contains(px, py)

Collision detection is the foundation of interactive games. This simple rectangle-contains-point check is called AABB (Axis-Aligned Bounding Box) collision. It returns a boolean: true if you clicked a door, false if you missed.

🔬 This method returns true if a point is inside the rectangular door. What happens if you change the first > (greater than) to >= (greater than or equal)? Does the boundary still work? Try adding a 10-pixel buffer by changing 'px < this.x + this.w' to 'px < this.x + this.w - 10' — now the clickable area shrinks.

  contains(px, py) {
    return (
      px > this.x &&
      px < this.x + this.w &&
      py > this.y &&
      py < this.y + this.h
    );
  }
  // Method to check if a point (mouse position) is inside the door
  contains(px, py) {
    return (
      px > this.x &&
      px < this.x + this.w &&
      py > this.y &&
      py < this.y + this.h
    );
  }
Line-by-line explanation (5 lines)
contains(px, py) {
Method that takes two parameters: px (point x) and py (point y), typically the mouse position.
px > this.x &&
Returns true only if the point is to the RIGHT of the door's left edge (x position).
px < this.x + this.w &&
And the point is to the LEFT of the door's right edge (x position plus width).
py > this.y &&
And the point is BELOW the door's top edge (y position).
py < this.y + this.h
And the point is ABOVE the door's bottom edge (y position plus height). If all four are true, the point is inside the door.

tryOpen()

This method is the core of the game logic. It returns a boolean that mouseClicked() uses to decide whether to trigger a win or a dog chase. The messageTimer countdown is how temporary UI feedback works in p5.js.

🔬 The if/else checks isKeyDoor and returns true or false. What if you change the win message to say 'NOPE! TRY AGAIN' and swap the timers so wrong doors show for 180 frames and the right door for 90? Does the game still work correctly?

    if (this.isKeyDoor) {
      this.isOpen = true; // Open the door
      this.statusMessage = "YOU FOUND THE KEY!"; // Set win message
      this.messageTimer = 180; // Display message for 3 seconds (60 frames/sec * 3)
      return true; // Indicate that the key door was found
    } else {
      this.statusMessage = "Wrong key!"; // Set wrong key message
      this.messageTimer = 90; // Display message for 1.5 seconds
      return false; // Indicate it was not the key door
    }
  // Method to attempt opening the door
  tryOpen() {
    if (this.isKeyDoor) {
      this.isOpen = true; // Open the door
      this.statusMessage = "YOU FOUND THE KEY!"; // Set win message
      this.messageTimer = 180; // Display message for 3 seconds (60 frames/sec * 3)
      return true; // Indicate that the key door was found
    } else {
      this.statusMessage = "Wrong key!"; // Set wrong key message
      this.messageTimer = 90; // Display message for 1.5 seconds
      return false; // Indicate it was not the key door
    }
  }
Line-by-line explanation (9 lines)

🔧 Subcomponents:

conditional Key Door Detection if (this.isKeyDoor) {

Determines if this is the winning door or a decoy, triggering different messages and return values

tryOpen() {
Method called when you click a door - it checks if it's the right one and returns true or false.
if (this.isKeyDoor) {
Checks the isKeyDoor boolean flag set during setup(). If true, you found the right door.
this.isOpen = true; // Open the door
Sets the door's state to open so display() will draw it blue next frame.
this.statusMessage = "YOU FOUND THE KEY!"; // Set win message
Stores the win message that will be displayed on the door by display().
this.messageTimer = 180; // Display message for 3 seconds (60 frames/sec * 3)
Sets the timer to 180 frames. Since p5 runs at 60 FPS, this displays the message for 3 seconds before it disappears.
return true; // Indicate that the key door was found
Sends true back to the caller (mouseClicked) so it knows the game is won.
} else {
If isKeyDoor is false, this is a wrong door.
this.messageTimer = 90; // Display message for 1.5 seconds
Wrong doors show their message for 1.5 seconds (90 frames), which is shorter than the win message.
return false; // Indicate it was not the key door
Sends false back to mouseClicked, triggering the dog chase instead of a win.

reset()

Reset methods are a game design pattern. They restore objects to their starting state, allowing players to play multiple rounds without creating new objects or reloading the sketch.

  // Method to reset the door to its initial closed state
  reset() {
    this.isOpen = false;
    this.statusMessage = "";
    this.messageTimer = 0;
  }
Line-by-line explanation (4 lines)
reset() {
Method to return a door to its initial state - called when restarting the game.
this.isOpen = false;
Closes the door so it displays as brown again, not blue.
this.statusMessage = "";
Clears any message that was shown ("Wrong key!" or "YOU FOUND THE KEY!").
this.messageTimer = 0;
Resets the timer to 0 so the message won't display (display() only shows messages when messageTimer > 0).

Dog (class)

Like the Door class, Dog encapsulates all of a dog's data and behavior. Separating objects into classes makes the code organized and reusable.

class Dog {
  constructor() {
    this.homeX = width / 2;
    this.homeY = height + 50; // Start below the screen
    this.x = this.homeX;
    this.y = this.homeY;
    this.targetX = this.homeX;
    this.targetY = this.homeY;
    this.chasing = false;
    this.speed = 5; // How fast the dog moves
    this.chaseTimer = 0; // Timer for chase animation
    this.wagTimer = 0; // Timer for tail wagging
  }
}
Line-by-line explanation (6 lines)
constructor() {
Creates a new Dog with all its properties initialized to starting values.
this.homeX = width / 2;
Sets the dog's home position (where it rests) to the horizontal center of the canvas.
this.homeY = height + 50; // Start below the screen
Places the dog below the bottom of the screen so it mostly stays out of the way until chasing.
this.chasing = false;
Boolean flag: false means the dog is idle; true means it's chasing the cursor.
this.chaseTimer = 0; // Timer for chase animation
Countdown for how long the chase lasts before the dog returns home. When 0, not chasing.
this.wagTimer = 0; // Timer for tail wagging
Counter used in display() to animate the dog's tail back and forth using sine waves.

chase(targetX, targetY)

This method is the entry point for a chase. It stores the target position and timer, then update() handles the actual movement toward that target each frame.

  // Method to trigger the chase
  chase(targetX, targetY) {
    this.chasing = true;
    this.targetX = targetX;
    this.targetY = targetY;
    this.chaseTimer = 120; // Chase for 2 seconds (60 frames/sec * 2)
  }
Line-by-line explanation (5 lines)
chase(targetX, targetY) {
Method called from mouseClicked() when you click a wrong door. Takes the mouse position as parameters.
this.chasing = true;
Sets the chase flag to true so update() will move the dog toward the target.
this.targetX = targetX;
Stores the x position to chase (usually the mouse x when you clicked a wrong door).
this.targetY = targetY;
Stores the y position to chase (usually the mouse y when you clicked a wrong door).
this.chaseTimer = 120; // Chase for 2 seconds (60 frames/sec * 2)
Sets the chase duration to 120 frames. Since 60 FPS is the default, the dog will chase for about 2 seconds.

update()

This is core animation logic using vector math. The distance calculation and normalization ensure the dog moves at a constant speed regardless of how far away the target is. The cascading if-statements create a state machine: chasing → reached target → returning home → arrived home → idle.

🔬 These lines calculate the direction to the target and move the dog smoothly toward it by normalizing and scaling. What happens if you change this.speed to this.speed * 2 in the movement lines? The dog will chase twice as fast, but will it stop in the same place?

      let dirX = this.targetX - this.x;
      let dirY = this.targetY - this.y;
      let distance = dist(this.x, this.y, this.targetX, this.targetY);

      if (distance > this.speed) {
        this.x += dirX / distance * this.speed;
        this.y += dirY / distance * this.speed;
  // Method to update dog's position
  update() {
    if (this.chasing) {
      // Move towards the target
      let dirX = this.targetX - this.x;
      let dirY = this.targetY - this.y;
      let distance = dist(this.x, this.y, this.targetX, this.targetY);

      if (distance > this.speed) {
        this.x += dirX / distance * this.speed;
        this.y += dirY / distance * this.speed;
      } else {
        // Dog reached target, pause briefly then return home
        if (this.chaseTimer <= 0) {
          this.targetX = this.homeX;
          this.targetY = this.homeY;
          this.speed = 3; // Slower return
        }
      }

      this.chaseTimer--; // Decrease chase timer

      // If chase timer is up and dog is close to home, stop chasing
      if (this.chaseTimer <= 0 && dist(this.x, this.y, this.homeX, this.homeY) < this.speed) {
        this.chasing = false;
        this.x = this.homeX;
        this.y = this.homeY;
        this.speed = 5; // Reset speed
      }
    }
  }
Line-by-line explanation (15 lines)

🔧 Subcomponents:

conditional Chase Active Check if (this.chasing) {

Only updates position if the dog is currently chasing; idle dogs don't move

conditional Distance Check if (distance > this.speed) {

Only moves the dog if it hasn't reached the target yet; prevents overshooting

conditional Timer Expiration if (this.chaseTimer <= 0) {

When the chase time expires, switches the target to home so the dog returns

conditional Home Arrival if (this.chaseTimer <= 0 && dist(this.x, this.y, this.homeX, this.homeY) < this.speed) {

Stops the chase completely when the dog reaches home after the timer expires

update() {
Method called every frame by the main draw() function to move the dog if it's chasing.
if (this.chasing) {
Only runs movement code if chasing is true; idle dogs don't update position.
let dirX = this.targetX - this.x;
Calculates the horizontal distance from the dog to the target (positive if target is to the right).
let dirY = this.targetY - this.y;
Calculates the vertical distance from the dog to the target (positive if target is below).
let distance = dist(this.x, this.y, this.targetX, this.targetY);
Uses p5's built-in dist() function to calculate the straight-line distance from dog to target.
if (distance > this.speed) {
Only move if the dog is more than one speed unit away; prevents overshooting the target.
this.x += dirX / distance * this.speed;
Moves the dog toward the target by adding a scaled direction vector. Dividing by distance normalizes the direction.
} else {
The dog has reached the target position (within one speed unit).
if (this.chaseTimer <= 0) {
If the chase timer has expired, switch the target to home so the dog walks back.
this.targetX = this.homeX;
Sets a new target at the dog's home x position so it walks away from the cursor.
this.speed = 3; // Slower return
Slows the dog down for the return journey, making it less aggressive as it retreats.
this.chaseTimer--; // Decrease chase timer
Every frame, count down the chase duration. When it reaches 0, the chase phase ends.
if (this.chaseTimer <= 0 && dist(this.x, this.y, this.homeX, this.homeY) < this.speed) {
Once the timer is up AND the dog is close to home, stop chasing completely.
this.chasing = false;
Sets the chase flag to false so update() stops running next frame; the dog is now idle.
this.speed = 5; // Reset speed
Restores the default speed for the next potential chase.

display()

The dog's display is a series of simple shapes (ellipses, triangles, lines) positioned relative to each other. The tail animation uses sin() and cos() for smooth motion—a fundamental technique in creative coding. The wagTimer increment on every frame drives the animation forward.

🔬 This tail uses a sine wave to create a smooth back-and-forth wag. What happens if you change this.wagTimer * 0.1 to this.wagTimer * 0.3? The tail will wag faster. What if you change PI / 8 to PI / 2? The wag angle will be much larger.

    // Tail (wagging animation)
    stroke(139, 69, 19);
    strokeWeight(4);
    let wagAngle = map(sin(this.wagTimer * 0.1), -1, 1, -PI / 8, PI / 8);
    line(-35, -5, -50 + cos(wagAngle) * 10, -10 + sin(wagAngle) * 10);
    this.wagTimer++;
  // Method to display the dog
  display() {
    push();
    translate(this.x, this.y);

    // Body
    fill(139, 69, 19); // Brown
    ellipse(0, 0, 60, 40);

    // Head
    ellipse(25, -10, 30, 25);

    // Ears
    triangle(15, -20, 35, -20, 25, -35); // Right ear
    triangle(15, -20, 35, -20, 25, -35); // Left ear (drawn twice for thickness, or just move to the left side)
    triangle(-5, -15, 15, -15, 5, -30); // Corrected left ear position

    // Tail (wagging animation)
    stroke(139, 69, 19);
    strokeWeight(4);
    let wagAngle = map(sin(this.wagTimer * 0.1), -1, 1, -PI / 8, PI / 8);
    line(-35, -5, -50 + cos(wagAngle) * 10, -10 + sin(wagAngle) * 10);
    this.wagTimer++;

    // Eyes
    fill(0);
    ellipse(28, -15, 5, 5);
    ellipse(35, -15, 5, 5);

    // Nose
    ellipse(35, -5, 8, 4);

    pop();
  }
Line-by-line explanation (15 lines)

🔧 Subcomponents:

calculation Tail Wagging let wagAngle = map(sin(this.wagTimer * 0.1), -1, 1, -PI / 8, PI / 8);

Uses sine wave and wagTimer to make the tail rotate smoothly back and forth

push();
Saves the current drawing state so transforms only apply to the dog.
translate(this.x, this.y);
Moves the coordinate system to the dog's position so all dog parts draw relative to its center.
fill(139, 69, 19); // Brown
Sets the fill color to brown for the dog's body and head.
ellipse(0, 0, 60, 40);
Draws the dog's body as a brown ellipse centered at the dog's position (now 0,0 due to translate).
ellipse(25, -10, 30, 25);
Draws the dog's head as an ellipse at position (25, -10) relative to the body, slightly forward and up.
triangle(15, -20, 35, -20, 25, -35); // Right ear
Draws the right ear as a triangle pointing upward.
triangle(-5, -15, 15, -15, 5, -30); // Corrected left ear position
Draws the left ear at a different position to balance with the right ear.
stroke(139, 69, 19);
Sets the stroke color to brown for the tail line.
strokeWeight(4);
Makes the tail line 4 pixels thick so it's visible.
let wagAngle = map(sin(this.wagTimer * 0.1), -1, 1, -PI / 8, PI / 8);
Creates an oscillating angle: sin() produces -1 to 1 based on wagTimer, map() converts that to -22.5° to +22.5°, making the tail rock side to side.
line(-35, -5, -50 + cos(wagAngle) * 10, -10 + sin(wagAngle) * 10);
Draws the tail line from the back of the body, with the endpoint wobbling based on wagAngle using cos/sin for smooth rotation.
this.wagTimer++;
Increments the wag timer every frame so the tail animation continues to cycle.
fill(0);
Sets fill to black for the eyes.
ellipse(28, -15, 5, 5);
Draws the right eye as a small black circle.
pop();
Restores the previous drawing state so the next draw() call doesn't get the translate offset.

reset()

Like the Door reset() method, this restores the dog to its initial state for a new game round without creating a new object.

  // Method to reset dog's position and state
  reset() {
    this.chasing = false;
    this.x = this.homeX;
    this.y = this.homeY;
    this.targetX = this.homeX;
    this.targetY = this.homeY;
    this.chaseTimer = 0;
    this.speed = 5;
  }
Line-by-line explanation (6 lines)
reset() {
Method to restore the dog to its starting state when the game restarts.
this.chasing = false;
Stops any active chase so the dog returns to idle.
this.x = this.homeX;
Moves the dog's x position back to its home position (center of canvas).
this.y = this.homeY;
Moves the dog's y position back to home (below the screen).
this.chaseTimer = 0;
Resets the chase timer so no chase is in progress.
this.speed = 5;
Resets the speed back to the default 5 pixels per frame.

setup()

setup() runs once when the sketch loads. It initializes the canvas, calculates responsive dimensions, and pre-creates all game objects. The nested loops demonstrate how 2D arrays are typically built in p5.js—one loop for rows, one for columns.

🔬 This nested loop creates a 10×10 grid of doors. Each door's position is calculated from its row (i) and column (j). What happens if you change the row position from 'i * doorHeight' to 'i * doorHeight + 10'? All doors shift down by 10 pixels. What if you change numRows from 10 to 5 at the top of the file?

  for (let i = 0; i < numRows; i++) {
    for (let j = 0; j < numCols; j++) {
      let id = i * numCols + j; // Calculate unique ID for the door
      let isKey = (id === keyDoorId); // Check if this door is the key door
      doors.push(new Door(j * doorWidth, i * doorHeight, doorWidth, doorHeight, id, isKey));
    }
function setup() {
  createCanvas(windowWidth, windowHeight);
  // Tip: Use windowWidth/windowHeight for responsive canvas

  // Calculate door dimensions based on window size and number of doors
  doorWidth = width / numCols;
  doorHeight = height / numRows;

  // Create the dog object
  myDog = new Dog();

  // Randomly select one door as the key door (ID from 0 to 99)
  keyDoorId = floor(random(numRows * numCols));

  // Create 100 Door objects and add them to the 'doors' array
  for (let i = 0; i < numRows; i++) {
    for (let j = 0; j < numCols; j++) {
      let id = i * numCols + j; // Calculate unique ID for the door
      let isKey = (id === keyDoorId); // Check if this door is the key door
      doors.push(new Door(j * doorWidth, i * doorHeight, doorWidth, doorHeight, id, isKey));
    }
  }
}
Line-by-line explanation (10 lines)

🔧 Subcomponents:

for-loop Door Grid Creation for (let i = 0; i < numRows; i++) {

Nested loop that creates all 100 door objects in a 10×10 grid

createCanvas(windowWidth, windowHeight);
Creates a canvas that fills the entire browser window and responds to resizing.
doorWidth = width / numCols;
Calculates each door's width by dividing the canvas width by 10 columns, so doors fit perfectly.
doorHeight = height / numRows;
Calculates each door's height by dividing the canvas height by 10 rows.
myDog = new Dog();
Creates a new Dog object and stores it in the myDog variable so it can be updated and displayed.
keyDoorId = floor(random(numRows * numCols));
Picks a random integer from 0 to 99; this door's ID will be the correct one. floor() converts the random decimal to a whole number.
for (let i = 0; i < numRows; i++) {
Outer loop: iterates through each row (0 to 9) to position doors vertically.
for (let j = 0; j < numCols; j++) {
Inner loop: for each row, iterates through each column (0 to 9) to position doors horizontally.
let id = i * numCols + j; // Calculate unique ID for the door
Converts the row and column indices into a single unique ID: row 0, col 0 is ID 0; row 0, col 1 is ID 1; row 1, col 0 is ID 10, etc.
let isKey = (id === keyDoorId); // Check if this door is the key door
Compares this door's ID to keyDoorId; if they match, isKey is true (this is the winning door); otherwise false.
doors.push(new Door(j * doorWidth, i * doorHeight, doorWidth, doorHeight, id, isKey));
Creates a new Door object with calculated position and size, and adds it to the doors array. j * doorWidth is the x position; i * doorHeight is the y position.

draw()

draw() is the heart of a p5.js sketch—it runs 60 times per second and renders every frame. Notice how it combines display logic (drawing doors), game logic (checking win condition), and animation (updating the dog). The background() call at the start is crucial: it's what lets you see motion instead of seeing permanent trails.

🔬 This code runs the win sequence once. What happens if you remove the '&& !allDoorsFound' condition? The win block will run EVERY frame. What if you change '!door.isKeyDoor' to 'door.isKeyDoor'? Now it closes the key door and opens everything else—a funny inverted win!

  // Check if the key door has been found and perform win actions
  if (doors[keyDoorId].isOpen && !allDoorsFound) {
    allDoorsFound = true; // Set flag to true to prevent re-execution
    money += 10000000000000000; // Add money when the key door is found
    // Open all other doors to reveal the "win" state
    for (let door of doors) {
      if (!door.isKeyDoor) {
        door.isOpen = true; // Open all non-key doors
      }
    }
function draw() {
  background(220); // Light gray background

  // Display all doors
  for (let door of doors) {
    door.display();
  }

  // Check if the key door has been found and perform win actions
  if (doors[keyDoorId].isOpen && !allDoorsFound) {
    allDoorsFound = true; // Set flag to true to prevent re-execution
    money += 10000000000000000; // Add money when the key door is found
    // Open all other doors to reveal the "win" state
    for (let door of doors) {
      if (!door.isKeyDoor) {
        door.isOpen = true; // Open all non-key doors
      }
    }
  }

  // Update and display the dog
  myDog.update();
  myDog.display();

  // Display game instructions or win message
  fill(0); // Black text
  textSize(24);
  textAlign(CENTER, TOP); // Center text horizontally, align to top
  if (!allDoorsFound) {
    text("Find the right key!", width / 2, 20);
  } else {
    text("Congratulations! You found the key!\nClick to play again.", width / 2, 20);
  }

  // Display the money counter
  fill(0, 150, 0); // Green text for money
  textSize(20);
  textAlign(LEFT, TOP);
  text(`Money: $${money.toLocaleString()}`, 20, 20); // Use toLocaleString for comma formatting
}
Line-by-line explanation (20 lines)

🔧 Subcomponents:

for-loop Door Display Loop for (let door of doors) {

Iterates through all doors and calls display() on each one every frame

conditional Win Condition if (doors[keyDoorId].isOpen && !allDoorsFound) {

Checks if the key door is open; if so, opens all other doors and sets the win flag

conditional UI Message Display if (!allDoorsFound) {

Shows different text depending on whether the game is won

background(220); // Light gray background
Clears the canvas every frame with a light gray color, removing previous door and dog drawings.
for (let door of doors) {
Loops through every door in the doors array. 'for...of' is a modern JavaScript syntax that's simpler than traditional for loops.
door.display();
Calls the display() method on each door, drawing it at its current state (open/closed).
if (doors[keyDoorId].isOpen && !allDoorsFound) {
Checks two conditions: (1) the key door is open, and (2) allDoorsFound is currently false. The ! means 'NOT', so !allDoorsFound means 'if this is the FIRST time the key door opened'.
allDoorsFound = true; // Set flag to true to prevent re-execution
Sets the flag to true so this win block only runs once, not every frame.
money += 10000000000000000; // Add money when the key door is found
Adds a huge amount to the money variable (just for fun). The += operator means 'add this amount to the current value'.
for (let door of doors) {
Loops through all doors to open every non-key door.
if (!door.isKeyDoor) {
Checks if this door is NOT the key door (the ! negates the boolean). Only non-key doors will be opened.
door.isOpen = true; // Open all non-key doors
Sets the door's isOpen flag to true so display() draws it blue next frame.
myDog.update();
Calls update() on the dog to move it if it's chasing, or to bring it home after a chase.
myDog.display();
Calls display() on the dog to draw it at its current position and with its current tail wag.
fill(0); // Black text
Sets the fill color to black for the text that comes next.
textSize(24);
Sets the font size to 24 pixels for the main game message.
textAlign(CENTER, TOP); // Center text horizontally, align to top
Positions text so it's centered horizontally and anchored at its top edge.
if (!allDoorsFound) {
If the game is NOT yet won, show the instruction.
text("Find the right key!", width / 2, 20);
Displays the game instruction at the horizontal center (width / 2) and 20 pixels from the top.
} else {
If the game IS won...
text("Congratulations! You found the key!\nClick to play again.", width / 2, 20);
Displays the win message. The \n creates a line break so the text wraps to two lines.
fill(0, 150, 0); // Green text for money
Changes the fill color to green (0 red, 150 green, 0 blue) for the money display.
text(`Money: $${money.toLocaleString()}`, 20, 20);
Displays the money in the top-left corner. toLocaleString() adds commas (e.g., 10,000,000) so the number is readable.

mouseClicked()

mouseClicked() is an event handler—a function that p5.js calls for you whenever something happens (in this case, a mouse click). Combined with collision detection (contains()), this is how interactive sketches become games. The break statement is a performance optimization: once you've found the clicked door, no need to check the remaining 99 doors.

🔬 This loop checks every door until it finds one that contains the click, then it breaks. What happens if you remove the 'break' statement? The dog will be told to chase multiple times in one click (though only the last one matters). What if you add a console.log(door.id) inside the if statement to see which door's ID you clicked?

  // Iterate through all doors to check if the mouse is over one
  for (let door of doors) {
    if (door.contains(mouseX, mouseY)) {
      if (door.tryOpen()) {
        // If the key door was opened, 'allDoorsFound' will be set in draw()
      } else {
        // If it was a wrong door, make the dog chase
        myDog.chase(mouseX, mouseY);
      }
      break; // Only interact with one door at a time, then exit the loop
// Function called when the mouse is clicked
function mouseClicked() {
  // If the key has been found, clicking anywhere will reset the game
  if (allDoorsFound) {
    resetGame();
    return; // Exit the function after resetting
  }

  // Iterate through all doors to check if the mouse is over one
  for (let door of doors) {
    if (door.contains(mouseX, mouseY)) {
      if (door.tryOpen()) {
        // If the key door was opened, 'allDoorsFound' will be set in draw()
      } else {
        // If it was a wrong door, make the dog chase
        myDog.chase(mouseX, mouseY);
      }
      break; // Only interact with one door at a time, then exit the loop
    }
  }
}
Line-by-line explanation (10 lines)

🔧 Subcomponents:

conditional Game Over Reset if (allDoorsFound) {

If the game is won, clicking resets it instead of opening doors

for-loop Click Detection Loop for (let door of doors) {

Checks each door to see if the mouse click is inside it

conditional Door Collision Check if (door.contains(mouseX, mouseY)) {

Uses the Door's contains() method to detect if the click is inside this door

conditional Win or Chase Decision if (door.tryOpen()) {

If tryOpen() returns true (correct door), nothing happens here; if false (wrong door), the dog chases

function mouseClicked() {
This built-in p5.js function runs automatically whenever the user clicks the mouse.
if (allDoorsFound) {
Checks if the game is already won (allDoorsFound is true).
resetGame();
Calls resetGame() to start a new round with fresh doors and a new key door.
return; // Exit the function after resetting
The return statement stops the function immediately, so the rest of the code doesn't run. This prevents doors from opening after you click to restart.
for (let door of doors) {
Loops through every door to check if the mouse click landed on one.
if (door.contains(mouseX, mouseY)) {
Calls the contains() method to test if the click position (mouseX, mouseY) is inside this door's boundaries.
if (door.tryOpen()) {
Calls tryOpen() on the door, which returns true if it's the key door, false if it's a wrong door. Stores the result in an if-statement.
} else {
If tryOpen() returned false (wrong door)...
myDog.chase(mouseX, mouseY);
Calls the dog's chase() method, telling it to run toward where you just clicked.
break; // Only interact with one door at a time, then exit the loop
After interacting with one door, break out of the loop. This prevents clicking one location from opening multiple overlapping doors (good design for avoiding bugs).

resetGame()

resetGame() is a classic game development pattern: when the player wants to play again, you reset all state variables and object properties, but you don't create new objects (that would be wasteful). Instead, you reuse the existing door and dog objects by calling their reset() methods. This is much more efficient than deleting and recreating 100 doors every round.

// Function to reset the game state
function resetGame() {
  allDoorsFound = false; // Reset win flag
  money = 0; // Reset money
  // Pick a new random key door for the next round
  keyDoorId = floor(random(numRows * numCols));
  // Reset all doors to their closed state and assign the new key door
  for (let door of doors) {
    door.reset(); // Reset door state
    door.isKeyDoor = (door.id === keyDoorId); // Assign new key door
  }
  myDog.reset(); // Reset the dog
}
Line-by-line explanation (8 lines)

🔧 Subcomponents:

for-loop Door Reset Loop for (let door of doors) {

Resets each door's state and assigns the new key door ID

function resetGame() {
Function called when you click to play again after winning. It resets all game state to start a new round.
allDoorsFound = false; // Reset win flag
Sets the win flag back to false so the game is no longer in 'won' state.
money = 0; // Reset money
Resets the money counter to zero for the new round.
keyDoorId = floor(random(numRows * numCols));
Picks a brand new random key door ID (0–99) so every game is different.
for (let door of doors) {
Loops through all 100 doors to reset each one individually.
door.reset(); // Reset door state
Calls reset() on each door, which closes it, clears its message, and resets its timer.
door.isKeyDoor = (door.id === keyDoorId); // Assign new key door
For each door, checks if its ID matches the newly picked keyDoorId. If yes, sets isKeyDoor to true; if no, sets it to false.
myDog.reset(); // Reset the dog
Calls reset() on the dog, stopping any active chase and returning it to its home position.

windowResized()

windowResized() ensures the sketch stays responsive: when the window changes size (or a mobile device rotates), all doors reposition and resize to fit. This is why the sketch looks good on phones, tablets, and desktops. Without it, the grid would break on resize.

// Called when the browser window (or preview panel) is resized
function windowResized() {
  resizeCanvas(windowWidth, windowHeight);
  // Recalculate door dimensions and positions to fit the new window size
  doorWidth = width / numCols;
  doorHeight = height / numRows;
  for (let i = 0; i < numRows; i++) {
    for (let j = 0; j < numCols; j++) {
      let id = i * numCols + j;
      doors[id].x = j * doorWidth;
      doors[id].y = i * doorHeight;
      doors[id].w = doorWidth;
      doors[id].h = doorHeight;
    }
  }
  myDog.updateHomePosition(); // Update dog's home position
}
Line-by-line explanation (10 lines)

🔧 Subcomponents:

for-loop Door Repositioning Loop for (let i = 0; i < numRows; i++) {

Updates every door's position and size to fit the new window dimensions

function windowResized() {
This built-in p5.js function runs automatically whenever the browser window is resized.
resizeCanvas(windowWidth, windowHeight);
Resizes the p5 canvas to match the new window dimensions (windowWidth and windowHeight are p5 variables).
doorWidth = width / numCols;
Recalculates the door width based on the new canvas width.
doorHeight = height / numRows;
Recalculates the door height based on the new canvas height.
for (let i = 0; i < numRows; i++) {
Outer loop through rows to update every door's position and size.
doors[id].x = j * doorWidth;
Updates the door's x position by multiplying its column index (j) by the new doorWidth.
doors[id].y = i * doorHeight;
Updates the door's y position by multiplying its row index (i) by the new doorHeight.
doors[id].w = doorWidth;
Updates the door's width to the newly calculated doorWidth.
doors[id].h = doorHeight;
Updates the door's height to the newly calculated doorHeight.
myDog.updateHomePosition(); // Update dog's home position
Calls updateHomePosition() on the dog so its home moves to the center-bottom of the new canvas.

📦 Key Variables

doors array

Stores all 100 Door objects. Each element is a Door instance with its own position, state, and methods.

let doors = [];
numRows number

The number of rows in the door grid (10). Controls how many doors tall the grid is.

let numRows = 10;
numCols number

The number of columns in the door grid (10). Controls how many doors wide the grid is.

let numCols = 10;
doorWidth number

The width of each door in pixels. Calculated in setup() by dividing canvas width by numCols.

let doorWidth = width / numCols;
doorHeight number

The height of each door in pixels. Calculated in setup() by dividing canvas height by numRows.

let doorHeight = height / numRows;
keyDoorId number

The unique ID (0–99) of the door that is the correct 'key door'. Randomly chosen in setup() and reset each game.

let keyDoorId = floor(random(numRows * numCols));
allDoorsFound boolean

Flag tracking whether the game has been won. True after the correct door is found; false at the start and after reset.

let allDoorsFound = false;
myDog object

Stores the Dog object that chases the player when wrong doors are clicked. Updated and displayed every frame.

let myDog;
money number

Global money counter. Increases when the correct door is found (for fun). Displayed and reset in draw() and resetGame().

let money = 0;

🔧 Potential Improvements (5)

Here are some ways this code could be enhanced:

BUG Dog.display() - ear drawing

The right ear is drawn twice with identical coordinates instead of drawing both left and right ears

💡 Change the second triangle to: triangle(-15, -20, 5, -20, -5, -35) so the left ear is mirrored on the opposite side

PERFORMANCE windowResized() loop

The nested loop that repositions doors runs on every window resize, but this is unavoidable for a responsive grid

💡 This is actually fine—the loop runs rarely (only on resize). No performance fix needed, but note that this is why keeping doors in an array and reusing them is better than creating new objects.

FEATURE mouseClicked()

The dog only chases toward the clicked position; it has no awareness of the actual door clicked, so it always chases to the same spot if you click the same wrong door twice

💡 Pass the door's center coordinates instead: myDog.chase(door.x + door.w / 2, door.y + door.h / 2) so the dog chases toward the door center rather than the exact click point

STYLE Naming convention

The global variable 'myDog' is capitalized like a class name, but it's actually an instance

💡 Consider renaming to 'dog' (lowercase) to follow JavaScript conventions: let dog = new Dog(). Class names (Dog, Door) are capitalized; instance names (dog, money) are lowercase.

FEATURE Dog class

The dog's speed resets to 5 on every reset, but if you make it 10, it stays 10 across resets. There's no way to change the dog's speed persistently without editing the code

💡 Add a 'defaultSpeed' property to the Dog constructor and use it in reset(): this.defaultSpeed = 5; then in reset() use this.speed = this.defaultSpeed;

🔄 Code Flow

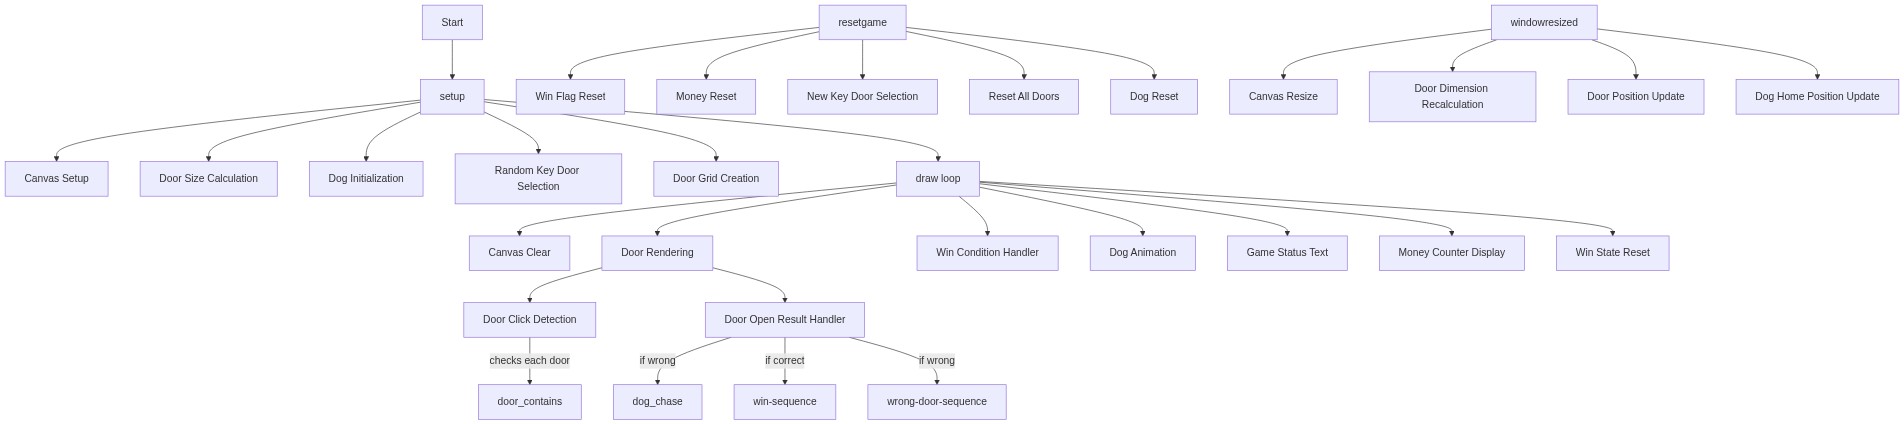
Code flow showing door, display, contains, tryopen, reset, dog, chase, update, dogdisplay, dogreset, setup, draw, mouseclicked, resetgame, windowresized

💡 Click on function names in the diagram to jump to their code

graph TD start[Start] --> setup[setup] setup --> door-grid-loop[door-grid-loop] door-grid-loop --> resetgame[resetgame] setup --> draw[draw loop] draw --> door-display-loop[door-display-loop] door-display-loop --> display[display] display --> open-closed-check[open-closed-check] display --> message-display[message-display] door-display-loop --> win-condition[win-condition] win-condition --> ui-message[ui-message] win-condition --> game-over-check[game-over-check] draw --> mouseclicked[mouseclicked] mouseclicked --> door-click-loop[door-click-loop] door-click-loop --> collision-check[collision-check] collision-check --> win-or-chase[win-or-chase] win-or-chase --> tryopen[tryopen] tryopen --> win-condition draw --> dog[dog] dog --> chase-active-check[chase-active-check] chase-active-check --> update[update] update --> distance-check[distance-check] distance-check --> timer-check[timer-check] timer-check --> home-arrival[home-arrival] update --> dogdisplay[dogdisplay] dogdisplay --> tail-wag[tail-wag] draw --> windowresized[windowresized] windowresized --> door-reposition-loop[door-reposition-loop] door-reposition-loop --> door-display-loop door-display-loop --> draw click setup href "#fn-setup" click draw href "#fn-draw" click door-grid-loop href "#sub-door-grid-loop" click resetgame href "#fn-resetgame" click door-display-loop href "#sub-door-display-loop" click display href "#fn-display" click open-closed-check href "#sub-open-closed-check" click message-display href "#sub-message-display" click win-condition href "#sub-win-condition" click ui-message href "#sub-ui-message" click game-over-check href "#sub-game-over-check" click mouseclicked href "#fn-mouseclicked" click door-click-loop href "#sub-door-click-loop" click collision-check href "#sub-collision-check" click win-or-chase href "#sub-win-or-chase" click tryopen href "#fn-tryopen" click dog href "#fn-dog" click chase-active-check href "#sub-chase-active-check" click update href "#fn-update" click distance-check href "#sub-distance-check" click timer-check href "#sub-timer-check" click home-arrival href "#sub-home-arrival" click dogdisplay href "#fn-dogdisplay" click tail-wag href "#sub-tail-wag" click windowresized href "#fn-windowresized" click door-reposition-loop href "#sub-door-reposition-loop"

❓ Frequently Asked Questions

What visual elements are featured in the 'You can’t find the right door heehee' sketch?

This sketch features multiple doors with different colors and states, illustrating closed and open door designs, along with status messages that display when interacted with.

How can users interact with the 'You can’t find the right door heehee' creative coding sketch?

Users can click on the doors to attempt to open them, triggering visual feedback such as changing colors and displaying messages based on whether they chose the correct door.

What creative coding concepts are showcased in this p5.js sketch?

The sketch demonstrates object-oriented programming through the Door class, along with animation techniques for updating door states and displaying messages based on user interaction.

Preview

You can’t find the right door heehee - p5.js creative coding sketch preview
Sketch Preview
Code flow diagram showing the structure of You can’t find the right door heehee - Code flow showing door, display, contains, tryopen, reset, dog, chase, update, dogdisplay, dogreset, setup, draw, mouseclicked, resetgame, windowresized
Code Flow Diagram