
Simple Game

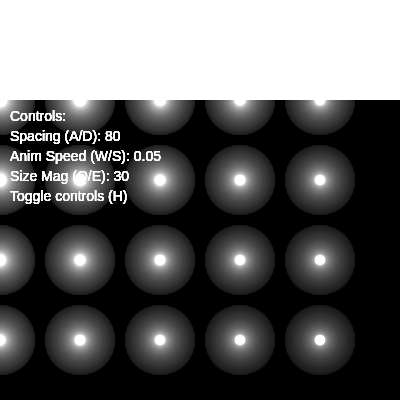
This sketch fills the screen with a grid of white circles that pulse in size like a slow-moving wave, thanks to a sine function tied to frameCount. Keyboard controls let you adjust the grid spacing, animation speed, and pulse size live, with a semi-transparent black background creating soft motion trails.

🧪 Try This!

Experiment with the code by making these changes:

  1. Slow the fade trails — Lowering the alpha value in background() makes old circles linger longer, creating longer, dreamier trails.
  2. Color the circles instead of white — Changing the fill color recolors every circle in the grid at once, giving the whole animation a new mood.
  3. Make circles pulse in unison — Removing the i and j offsets from the sine calculation makes every circle in the grid pulse perfectly in sync instead of rippling.
Prefer the full editor? Open it there →

📖 About This Sketch

This sketch draws a full-window grid of circles that gently grow and shrink in a wave-like pattern, powered entirely by the sine function combined with frameCount for continuous animation. What makes it visually engaging is the subtle trailing effect created by drawing a semi-transparent black rectangle each frame instead of a solid one, plus live keyboard controls that let you reshape the grid's spacing, pulse speed, and pulse size in real time. Core p5.js techniques on display include nested for loops for grid layout, the sin() function for smooth oscillation, and keyPressed() for interactive parameter tuning.

The code is organized around a handful of global variables that act as tunable settings, a setup() function that prepares the canvas, a draw() function that redraws the animated grid every frame, and two event-handling functions - windowResized() and keyPressed() - that keep the sketch responsive and interactive. By studying it you'll learn how to build an animated grid, how transparency creates trail effects, how sine waves drive organic-looking motion, and how to wire keyboard input to live-adjustable variables using constrain().

⚙️ How It Works

  1. When the sketch loads, setup() creates a canvas sized to the browser window (minus room for the heading), fills it with black, turns off shape outlines, and sets the frame rate to 30 frames per second
  2. Every frame, draw() paints a nearly-transparent black rectangle over the whole canvas instead of a fully opaque one, which slowly fades the previous frame rather than erasing it instantly - this is what produces the soft trailing/glow effect
  3. A pair of nested for loops walks across the canvas in steps of 'spacing' pixels, calculating an x,y position for every circle in the grid
  4. For each circle, sin(frameCount * animationSpeed + i * 0.1 + j * 0.1) produces a smoothly oscillating value between -1 and 1 that is scaled by sizeMagnitude and added to a base size, so neighboring circles pulse slightly out of phase and create a wave rippling across the grid
  5. If showControls is true, draw() also prints the current spacing, animation speed, and size magnitude values as on-screen text
  6. keyPressed() listens for A/D, W/S, Q/E, and H key presses to increase or decrease spacing, animationSpeed, and sizeMagnitude (each clamped with constrain() to sensible min/max ranges) or to toggle the control text on and off, while windowResized() keeps the canvas matching the browser size if the window changes

🎓 Concepts You'll Learn

Nested for loops for grid layoutSine wave oscillation for animationframeCount-driven motionTransparency and trailing backgroundsKeyboard input handlingValue clamping with constrain()

📝 Code Breakdown

setup()

setup() runs exactly once when the sketch starts, making it the right place to size the canvas and configure one-time drawing settings like noStroke() and frameRate().

function setup() {
  // Create a canvas that fills the remaining browser window height
  // We need to account for the height of the h1 and its padding/margin
  createCanvas(windowWidth, windowHeight - 100); // Adjusted canvas height slightly
  // Set the background color to black
  background(0);
  // Do not draw outlines around shapes
  noStroke();
  // Set the animation speed to 30 frames per second
  frameRate(30);
}
Line-by-line explanation (4 lines)
createCanvas(windowWidth, windowHeight - 100);
Makes a canvas as wide as the browser window and slightly shorter than the window's height, leaving room for the page's heading.
background(0);
Fills the canvas with solid black once, so the very first frame starts on a clean dark background.
noStroke();
Turns off outlines so every shape drawn afterward (the circles) has no border, just a solid fill.
frameRate(30);
Tells p5.js to try to run draw() 30 times per second, which sets the pace of the animation.
draw()

draw() runs continuously (about 30 times per second here due to frameRate(30)), redrawing the entire animated grid every frame. This is the heart of any p5.js animation - each call recalculates positions and sizes based on frameCount so the visuals appear to move over time.

🔬 The 0.1 multipliers on i and j control how quickly the wave phase shifts between neighboring circles. What happens if you change both 0.1 values to 0.5? What if you set them to 0 so every circle pulses perfectly in sync?

      let sizeOffset = sin(frameCount * animationSpeed + i * 0.1 + j * 0.1) * sizeMagnitude;

      // Calculate the actual size of the circle
      let size = spacing / 2 + sizeOffset;

🔬 These loops determine the grid density based on 'spacing'. What happens visually if spacing gets very small (like 20) versus very large (like 200)? Try pressing A and D while the sketch runs to see live.

  for (let i = 0; i < width / spacing; i++) {
    for (let j = 0; j < height / spacing; j++) {
function draw() {
  // Draw a semi-transparent black background.
  // This creates a trailing effect as old circles fade out.
  background(0, 10);

  // Use nested loops to create a grid of circles
  for (let i = 0; i < width / spacing; i++) {
    for (let j = 0; j < height / spacing; j++) {
      // Calculate the x and y position for the center of each circle
      let x = i * spacing;
      let y = j * spacing;

      // Create an offset for the circle size using the sine function.
      // frameCount provides continuous animation.
      // i and j create a wave-like pattern across the grid.
      // Now using animationSpeed and sizeMagnitude variables
      let sizeOffset = sin(frameCount * animationSpeed + i * 0.1 + j * 0.1) * sizeMagnitude;

      // Calculate the actual size of the circle
      let size = spacing / 2 + sizeOffset;

      // Set the fill color to white
      fill(255);
      // Draw the circle
      ellipse(x, y, size, size); // https://p5js.org/reference/p5/ellipse/
    }
  }

  // Display control instructions and current values
  if (showControls) {
    fill(255); // White text
    textAlign(LEFT, TOP);
    textSize(14);
    text("Controls:", 10, 10);
    text("Spacing (A/D): " + spacing, 10, 30);
    text("Anim Speed (W/S): " + animationSpeed.toFixed(2), 10, 50);
    text("Size Mag (Q/E): " + sizeMagnitude, 10, 70);
    text("Toggle controls (H)", 10, 90);
  }
}
Line-by-line explanation (11 lines)

🔧 Subcomponents:

for-loop Column Loop for (let i = 0; i < width / spacing; i++) {

Steps across the canvas horizontally in increments of 'spacing' to position each column of circles.

for-loop Row Loop for (let j = 0; j < height / spacing; j++) {

Steps down the canvas vertically for each column, positioning every circle in that column.

calculation Sine-based Size Offset let sizeOffset = sin(frameCount * animationSpeed + i * 0.1 + j * 0.1) * sizeMagnitude;

Uses a sine wave, offset by each circle's grid position, to make circles pulse at slightly different times, creating a rippling wave effect.

conditional Show Controls Text if (showControls) {

Only draws the on-screen instructions and current settings when showControls is true.

background(0, 10);
Draws black with low alpha (10 out of 255) over the whole canvas instead of clearing it fully, so old circles fade slowly instead of vanishing instantly - this creates the trailing/glow effect.
for (let i = 0; i < width / spacing; i++) {
Loops through grid columns; the number of columns depends on how many 'spacing'-sized steps fit across the canvas width.
for (let j = 0; j < height / spacing; j++) {
Nested inside the column loop, this loops through grid rows for the current column, so together they visit every cell in the grid.
let x = i * spacing;
Converts the column index i into an actual pixel x-coordinate by multiplying by the spacing amount.
let y = j * spacing;
Converts the row index j into an actual pixel y-coordinate the same way.
let sizeOffset = sin(frameCount * animationSpeed + i * 0.1 + j * 0.1) * sizeMagnitude;
Computes a smoothly oscillating number using sine; frameCount * animationSpeed drives it forward over time, while i * 0.1 + j * 0.1 shifts the wave slightly for each grid position so circles don't all pulse in perfect sync.
let size = spacing / 2 + sizeOffset;
Adds the oscillating offset to a base radius-like value (half the spacing), so the circle's size grows and shrinks around that baseline.
fill(255);
Sets the fill color to pure white for the circle about to be drawn.
ellipse(x, y, size, size);
Draws a circle (equal width and height ellipse) centered at (x, y) with the calculated pulsing size.
if (showControls) {
Checks the boolean flag showControls; if true, the block below draws the instructional text overlay.
text("Spacing (A/D): " + spacing, 10, 30);
Draws a text string on screen showing the current spacing value, updating automatically since it's concatenated fresh each frame.

windowResized()

windowResized() is a special p5.js function that p5 automatically calls whenever the browser window changes size, letting you keep responsive sketches that adapt to any screen.

function windowResized() {
  // This function is called automatically when the browser window is resized.
  // We resize the canvas to match the new window dimensions, keeping the sketch responsive.
  resizeCanvas(windowWidth, windowHeight - 100); // Adjusted canvas height slightly
}
Line-by-line explanation (1 lines)
resizeCanvas(windowWidth, windowHeight - 100);
Resizes the existing canvas to match the browser's new width and height (minus 100px for the heading) whenever the window is resized, so the grid always fills the available space.

keyPressed()

keyPressed() is a p5.js event function that automatically runs once whenever any key is pressed, making it the standard way to build keyboard-driven interactivity like live parameter tuning.

🔬 What happens if you remove the constrain() calls here? Try pressing A repeatedly - without constraining, could spacing become 0 or negative and break the grid loop?

  if (keyUpper === 'A') {
    spacing -= controlStep;
    spacing = constrain(spacing, minSpacing, maxSpacing); // https://p5js.org/reference/p5/constrain/
  } else if (keyUpper === 'D') {
    spacing += controlStep;
    spacing = constrain(spacing, minSpacing, maxSpacing);
  }
function keyPressed() {
  // Convert key to uppercase for easier comparison
  let keyUpper = key.toUpperCase();

  if (keyUpper === 'A') {
    spacing -= controlStep;
    spacing = constrain(spacing, minSpacing, maxSpacing); // https://p5js.org/reference/p5/constrain/
  } else if (keyUpper === 'D') {
    spacing += controlStep;
    spacing = constrain(spacing, minSpacing, maxSpacing);
  } else if (keyUpper === 'W') {
    animationSpeed += animStep;
    animationSpeed = constrain(animationSpeed, minAnimSpeed, maxAnimSpeed);
  } else if (keyUpper === 'S') {
    animationSpeed -= animStep;
    animationSpeed = constrain(animationSpeed, minAnimSpeed, maxAnimSpeed);
  } else if (keyUpper === 'Q') {
    sizeMagnitude -= controlStep;
    sizeMagnitude = constrain(sizeMagnitude, minSizeMagnitude, maxSizeMagnitude);
  } else if (keyUpper === 'E') {
    sizeMagnitude += controlStep;
    sizeMagnitude = constrain(sizeMagnitude, minSizeMagnitude, maxSizeMagnitude);
  } else if (keyUpper === 'H') {
    showControls = !showControls; // Toggle the display of controls
  }
  // Return false to prevent default browser behavior for these keys
  return false; // https://p5js.org/reference/p5/keyPressed/
}
Line-by-line explanation (7 lines)

🔧 Subcomponents:

conditional Spacing Adjustment (A/D) if (keyUpper === 'A') { spacing -= controlStep; ... } else if (keyUpper === 'D') { spacing += controlStep; ... }

Decreases or increases grid spacing when A or D is pressed, clamped to safe min/max limits.

conditional Animation Speed Adjustment (W/S) else if (keyUpper === 'W') { animationSpeed += animStep; ... } else if (keyUpper === 'S') { animationSpeed -= animStep; ... }

Speeds up or slows down the pulsing animation when W or S is pressed.

conditional Size Magnitude Adjustment (Q/E) else if (keyUpper === 'Q') { sizeMagnitude -= controlStep; ... } else if (keyUpper === 'E') { sizeMagnitude += controlStep; ... }

Makes the pulsing size swing more or less dramatically when Q or E is pressed.

conditional Toggle Controls Display (H) else if (keyUpper === 'H') { showControls = !showControls; }

Flips the showControls boolean between true and false, hiding or revealing the on-screen instructions.

let keyUpper = key.toUpperCase();
Converts the pressed key to uppercase so both 'a' and 'A' (for example) are treated the same way when compared.
if (keyUpper === 'A') {
Checks if the A key was pressed, which will decrease the grid spacing.
spacing -= controlStep;
Subtracts controlStep (5) from spacing, making the grid denser.
spacing = constrain(spacing, minSpacing, maxSpacing);
Clamps spacing so it never goes below minSpacing or above maxSpacing, preventing broken or invisible grids.
} else if (keyUpper === 'H') {
Checks if the H key was pressed, used to toggle the visibility of the control instructions.
showControls = !showControls; // Toggle the display of controls
Flips the boolean value: true becomes false and vice versa, using the logical NOT operator.
return false;
Prevents the browser's default behavior for these keys (like scrolling the page when pressing certain keys), keeping all input focused on the sketch.

📦 Key Variables

spacing number

Distance in pixels between each circle in the grid; also determines each circle's base size.

let spacing = 80;
animationSpeed number

Multiplier applied to frameCount inside the sine calculation, controlling how fast circles pulse.

let animationSpeed = 0.05;
sizeMagnitude number

Scales the sine wave's output to control how much each circle's size swings during its pulse.

let sizeMagnitude = 30;
minSpacing number

Lower bound used to clamp the spacing variable so the grid never becomes too dense or invalid.

let minSpacing = 20;
maxSpacing number

Upper bound used to clamp the spacing variable so the grid never becomes too sparse.

let maxSpacing = 200;
minAnimSpeed number

Lower bound for animationSpeed to prevent the animation from becoming imperceptibly slow.

let minAnimSpeed = 0.01;
maxAnimSpeed number

Upper bound for animationSpeed to prevent the animation from becoming too frantic.

let maxAnimSpeed = 0.2;
minSizeMagnitude number

Lower bound for sizeMagnitude so circles still visibly pulse.

let minSizeMagnitude = 5;
maxSizeMagnitude number

Upper bound for sizeMagnitude to prevent circles from becoming absurdly large or negative-sized.

let maxSizeMagnitude = 60;
controlStep number

Amount spacing and sizeMagnitude change by on each relevant key press.

let controlStep = 5;
animStep number

Amount animationSpeed changes by on each W or S key press.

let animStep = 0.01;
showControls boolean

Determines whether the on-screen control instructions and current values are displayed.

let showControls = true;

🔧 Potential Improvements (4)

Here are some ways this code could be enhanced:

BUG draw() controls text

The control instructions are drawn in plain white text with no background box, which can be hard to read on top of the animated white circles.

💡 Draw a semi-transparent dark rectangle behind the text (using fill and rect before the text calls) to improve readability regardless of what's behind it.

PERFORMANCE draw()

The loop conditions width / spacing and height / spacing are recalculated on every iteration of the outer and inner loops since they're evaluated as part of the loop condition each time.

💡 Precompute const cols = Math.ceil(width / spacing); const rows = Math.ceil(height / spacing); before the loops and use i < cols / j < rows instead, avoiding repeated division.

STYLE keyPressed()

The six near-identical if/else-if blocks for A/D/W/S/Q/E repeat the same pattern (adjust, then constrain), making the function long and repetitive.

💡 Consider a helper function like adjustValue(currentValue, delta, min, max) that returns the constrained result, reducing duplication and making each branch a single line.

FEATURE General sketch

There's no visual indicator of which color or shape parameter can be changed besides the three numeric ones, and the circle color is hardcoded to white.

💡 Add a hue or color variable adjustable via another key pair (e.g. Z/X) using colorMode(HSB) so users can also explore color alongside spacing, speed, and size.

🔄 Code Flow

Code flow showing setup, draw, windowresized, keypressed

💡 Click on function names in the diagram to jump to their code

graph TD start[Start] --> setup[setup] setup --> draw[draw loop] draw --> outergridloop[Column Loop] outergridloop --> innergridloop[Row Loop] innergridloop --> sizecalculation[Sine-based Size Offset] sizecalculation --> draw click setup href "#fn-setup" click draw href "#fn-draw" click outergridloop href "#sub-outer-grid-loop" click innergridloop href "#sub-inner-grid-loop" click sizecalculation href "#sub-size-calculation" draw --> controlsdisplay[Show Controls Text] controlsdisplay -->|if showControls true| draw click controlsdisplay href "#sub-controls-display" draw --> spacingcontrols[Spacing Adjustment (A/D)] spacingcontrols -->|if A pressed| draw spacingcontrols -->|if D pressed| draw click spacingcontrols href "#sub-spacing-controls" draw --> speedcontrols[Animation Speed Adjustment (W/S)] speedcontrols -->|if W pressed| draw speedcontrols -->|if S pressed| draw click speedcontrols href "#sub-speed-controls" draw --> magnitudecontrols[Size Magnitude Adjustment (Q/E)] magnitudecontrols -->|if Q pressed| draw magnitudecontrols -->|if E pressed| draw click magnitudecontrols href "#sub-magnitude-controls" draw --> togglecontrols[Toggle Controls Display (H)] togglecontrols -->|if H pressed| draw click togglecontrols href "#sub-toggle-controls" setup --> windowresized[windowResized] click windowresized href "#fn-windowresized" setup --> keypressed[keyPressed] click keypressed href "#fn-keypressed"

❓ Frequently Asked Questions

What does this p5.js sketch create visually?

This sketch creates a visually appealing grid of circles that animate with a wave-like pattern. The circles change size over time, creating a dynamic effect as they fade out, resulting in a smooth trailing visual.

How can users interact with this p5.js sketch?

This sketch is not directly interactive; instead, it drives animation through the use of the frameCount variable, which updates continuously to create movement. Users can modify parameters like spacing and size to influence the visual output.

What creative coding technique does this p5.js sketch demonstrate?

This sketch demonstrates the use of sine waves for animation, creating a rhythmic fluctuation in the size of circles. It effectively utilizes mathematical functions to generate smooth and visually engaging animations.

How can I recreate a similar wave effect in p5.js?

To recreate a similar wave effect in p5.js, you can use the sine function in combination with frameCount to vary the size of shapes over time. By adjusting parameters such as spacing and animation speed, you can achieve dynamic visual patterns.

Preview

Simple Game - p5.js creative coding sketch preview
Sketch Preview
Code flow diagram showing the structure of Simple Game - Code flow showing setup, draw, windowresized, keypressed
Code Flow Diagram