DRIFT STARS 2026

Drift Stars 2026 is a full 3D driving/drifting game built entirely with p5.js's WEBGL renderer. You steer a customizable car through a procedurally-styled city that cycles through time of day and weather, earning drift-combo points while dodging traffic and evading a wanted-level cop chase.

🧪 Try This!

Experiment with the code by making these changes:

  1. Speed Up the Day/Night Cycle — Increasing how fast worldTime advances makes the sky race from day to night in seconds instead of minutes, so you can watch every lighting transition quickly.
  2. Make Drift Points Worth More — Raising the drift scoring multiplier makes every drift combo pay out much bigger cash rewards.
  3. Give Traffic Neon Colors — Replacing the random RGB color with a fixed bright color makes every traffic car the exact same eye-catching neon shade instead of random pastel tones.
  4. Make Camera Shake Linger Longer — Slowing the shake decay rate keeps the camera rattling for much longer after a crash, exaggerating impacts.
Prefer the full editor? Open it there →

📖 About This Sketch

Drift Stars 2026 turns p5.js into a miniature open-world racer: a WEBGL canvas renders a car, a scrolling city, a sky that shifts from dawn to dusk, and rain or fog depending on the current weather state. Sliding into a handbrake turn spawns tire-smoke particles and skid marks, racks up a drift combo score, and can pull a wanted level with police cars if you clip traffic. Under the hood it leans on core p5.js/WEBGL techniques - custom camera(), specularMaterial() lighting, push()/pop() transform stacks, and p5.Vector math for movement.

The code is organized as a small state machine (gameState controls SPLASH, HOME, PLAYING, PAUSED, GAMEOVER) plus three ES6 classes - Vehicle, Camera, and AudioSystem - that are reused for the player, traffic, and cops alike. Reading through it teaches how to drive a 3D scene with vector-based physics, how a single Vehicle class can represent both a human-controlled car and an AI car just by flipping an isAI flag, and how particle arrays, skid marks, and a heat/wanted system are layered on top of the same update/render loop every frame.

⚙️ How It Works

  1. On load, setup() creates a full-window WEBGL canvas, sets a wide perspective so the city doesn't get clipped, builds the Camera/AudioSystem/Minimap objects, wires up keyboard/touch/gyro listeners, loads saved progress from localStorage, and after a 2-second splash delay switches gameState to 'HOME'.
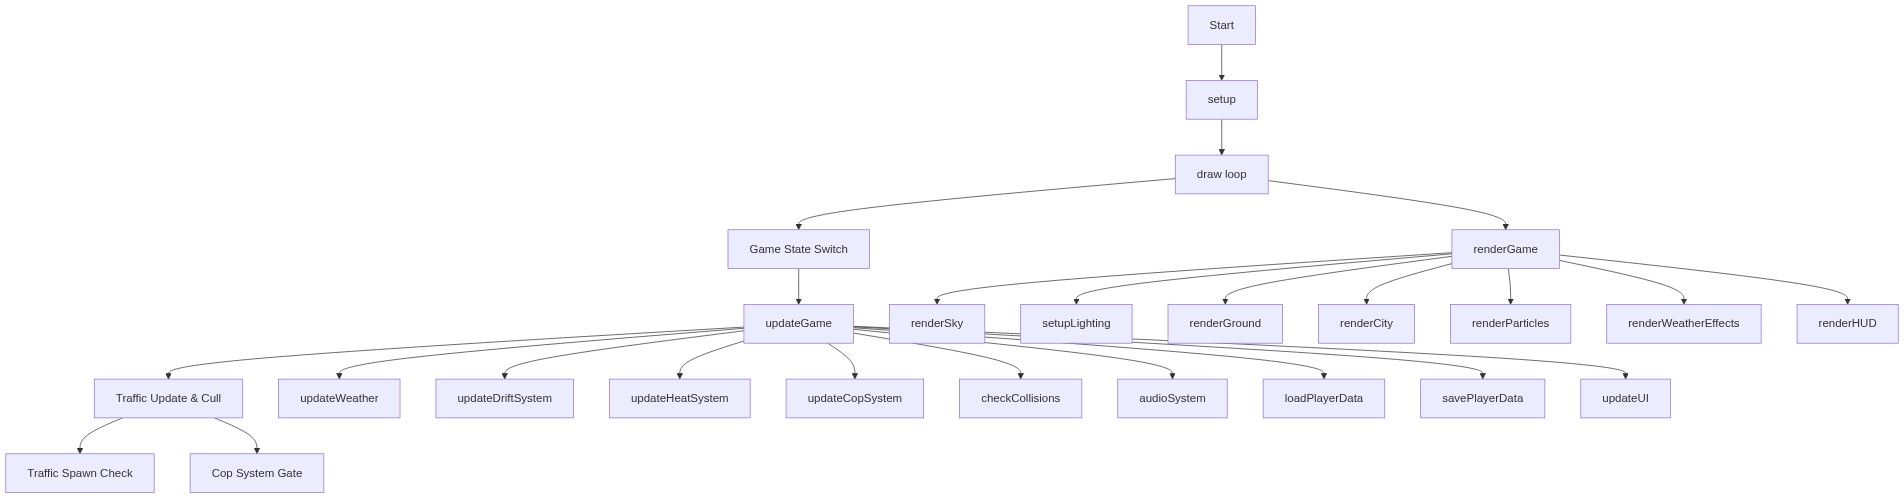
  2. Every frame, draw() advances worldTime (the in-game clock) and then branches on gameState - rendering the splash screen, the HTML-driven menu, or, once you press Play, calling updateGame() followed by renderGame().
  3. updateGame() moves the player and every traffic/cop Vehicle, spawns new traffic when the count is low, runs the weather/particle/drift/heat systems, checks collisions, and feeds the current speed into the audio engine's oscillator.
  4. renderGame() paints a time-of-day sky gradient, sets directional/ambient lighting for day or night, draws the ground plane and procedurally-boxed city buildings, then draws every traffic car, roadblock, cop, and the player car using push()/translate()/rotateY() transforms, followed by particles, weather effects, and a 2D-style HUD overlay drawn in front of the 3D camera.
  5. Handbrake input inside Vehicle.update() sets isDrifting, bends the car's heading, spawns skid marks and smoke, and feeds updateDriftSystem() which multiplies speed by a growing driftCombo to build a score that gets banked as cash once the drift ends.
  6. If the player collides with traffic or cops, wantedLevel and heatLevel rise, updateCopSystem() spawns and steers police Vehicles toward the player, and updateHeatSystem() slowly lets the heat cool back down once no cop is nearby, eventually clearing the wanted stars.

🎓 Concepts You'll Learn

WEBGL 3D rendering in p5.jsClass-based architecture (Vehicle, Camera, AudioSystem)Vector math with p5.Vector (add, sub, limit, lerp)Finite state machine for game screensParticle systems (smoke, fire, explosions)Procedural city generation with nested loopsDay/night lighting with lerpColor and directionalLightDevice input handling (keyboard, touch, gyroscope)Persistent progression via localStorage

📝 Code Breakdown

setup()

setup() runs once when the sketch starts. In a WEBGL sketch it's also where you configure the 3D lens with perspective() before anything is drawn, and where you construct the class instances (Camera, AudioSystem) that the rest of the game will reuse every frame.

function setup() {
  createCanvas(windowWidth, windowHeight, WEBGL);
  perspective(PI / 2.2, width / height, 10, 100000);
  
  // Initialize systems
  audioEngine = new AudioSystem();
  cam = new Camera();
  minimap = new Minimap();
  
  // Setup controls
  setupControlListeners();
  checkGyroSupport();
  
  // Load player data from localStorage
  loadPlayerData();
  
  // Show splash screen
  setTimeout(() => {
    gameState = 'HOME';
    updateUI();
  }, 2000);
}
Line-by-line explanation (7 lines)
createCanvas(windowWidth, windowHeight, WEBGL);
Creates a full-browser-window canvas using the WEBGL renderer, which unlocks 3D drawing functions like box(), sphere(), and camera().
perspective(PI / 2.2, width / height, 10, 100000);
Sets the camera's field-of-view angle, aspect ratio, and near/far clipping distances so far-away buildings don't disappear or clip through the lens.
audioEngine = new AudioSystem();
Builds the object that manages the engine sound oscillator.
cam = new Camera();
Creates the custom chase-camera controller that will be updated every frame.
setupControlListeners();
Registers keydown/keyup and touch event listeners so the controls object reflects what the player is pressing.
loadPlayerData();
Reads any previously-saved cash, level, and owned cars from the browser's localStorage.
setTimeout(() => { gameState = 'HOME'; updateUI(); }, 2000);
Waits 2000 milliseconds while the splash screen shows, then flips the state machine to the home menu.

draw()

draw() is the p5.js animation loop, called ~60 times per second. Using a switch statement on a state variable like gameState is a simple, common way to build a whole menu-and-gameplay flow inside a single draw() function.

🔬 This is the only case that calls updateGame(). What happens visually if you comment out just the updateGame() line but leave renderGame()? (Hint: think about what freezes vs. what keeps happening.)

    case 'PLAYING':
      updateGame();
      renderGame();
      break;
function draw() {
  // Update world time (1 min = 1 sec real time)
  worldTime = (worldTime + 0.016) % 1440;
  
  // Render based on game state
  switch(gameState) {
    case 'SPLASH':
      renderSplash();
      break;
    case 'HOME':
    case 'MODE_SELECT':
    case 'GARAGE':
      renderMenu();
      break;
    case 'PLAYING':
      updateGame();
      renderGame();
      break;
    case 'PAUSED':
      renderGame();
      renderPauseOverlay();
      break;
    case 'GAMEOVER':
      renderGameOver();
      break;
  }
}
Line-by-line explanation (4 lines)

🔧 Subcomponents:

switch-case Game State Switch switch(gameState) {

Chooses which set of update/render functions to run this frame based on the current screen the player is on.

worldTime = (worldTime + 0.016) % 1440;
Advances the in-game clock every frame and wraps it back to 0 after 1440 minutes (24 hours) using the modulo operator.
switch(gameState) {
Reads the current game state string and jumps to the matching case.
case 'PLAYING': updateGame(); renderGame(); break;
While actually playing, first update all game logic (physics, AI, particles) then draw everything for this frame.
case 'PAUSED': renderGame(); renderPauseOverlay(); break;
When paused, the world is still drawn (frozen in place because updateGame() is skipped) with a pause menu drawn on top.

updateGame()

updateGame() is the single place every subsystem (physics, AI, weather, particles, scoring, audio) gets ticked once per frame - a common 'update manager' pattern that keeps draw() itself simple.

🔬 This loop deletes traffic cars once they're 5000 units away. What happens to performance and traffic density if you change 5000 to a much smaller number like 1000?

  for(let i = traffic.length - 1; i >= 0; i--) {
    traffic[i].update();
    if(dist(traffic[i].pos.x, traffic[i].pos.y, player.pos.x, player.pos.y) > 5000) {
      traffic.splice(i, 1);
    }
  }
function updateGame() {
  // Update player
  player.update();
  
  // Update camera
  cam.update(player);
  
  // Update traffic
  for(let i = traffic.length - 1; i >= 0; i--) {
    traffic[i].update();
    if(dist(traffic[i].pos.x, traffic[i].pos.y, player.pos.x, player.pos.y) > 5000) {
      traffic.splice(i, 1);
    }
  }
  
  // Spawn traffic
  if(traffic.length < 20 && frameCount % 120 === 0) {
    spawnTraffic();
  }
  
  // Update cops
  if(wantedLevel > 0) {
    updateCopSystem();
  }
  
  // Update weather
  updateWeather();
  
  // Update particles
  updateParticles();
  
  // Update drift scoring
  updateDriftSystem();
  
  // Update heat system
  updateHeatSystem();
  
  // Check collisions
  checkCollisions();
  
  // Update audio
  audioEngine.update(player);
}
Line-by-line explanation (5 lines)

🔧 Subcomponents:

for-loop Traffic Update & Cull for(let i = traffic.length - 1; i >= 0; i--) {

Moves every traffic car and removes any that have drifted more than 5000 units away from the player to save memory.

conditional Traffic Spawn Check if(traffic.length < 20 && frameCount % 120 === 0) {

Keeps roughly 20 traffic cars on the road by spawning a new one every 120 frames when below the cap.

conditional Cop System Gate if(wantedLevel > 0) {

Only runs the (expensive) cop AI update when the player actually has a wanted level.

player.update();
Runs the player Vehicle's physics: reading controls, applying acceleration/friction, and moving its position.
for(let i = traffic.length - 1; i >= 0; i--) {
Loops backwards through the traffic array so that removing an element with splice() doesn't skip the next one.
if(dist(traffic[i].pos.x, traffic[i].pos.y, player.pos.x, player.pos.y) > 5000) {
Uses p5's dist() to measure how far a traffic car is from the player, culling ones that are too far to matter.
if(traffic.length < 20 && frameCount % 120 === 0) {
frameCount % 120 === 0 makes this true once every 120 frames (about every 2 seconds at 60fps), throttling how often new cars appear.
audioEngine.update(player);
Feeds the player's current speed into the engine sound so the pitch rises and falls with velocity.

renderGame()

renderGame() is the 'draw everything' function, and its ordering matters: sky and lighting are set up first, then world geometry, then cars, then particles/weather on top, and finally a flat HUD drawn last so it always appears in front of the 3D scene.

function renderGame() {
  // Sky gradient based on time of day
  renderSky();
  
  // Fog based on weather
  if(weather === 'FOG') {
    drawingContext.fillStyle = `rgba(200, 200, 200, ${weatherIntensity * 0.3})`;
    drawingContext.fillRect(-width/2, -height/2, width, height);
  }
  
  // Lighting
  setupLighting();
  
  // Ground
  renderGround();
  
  // City buildings
  renderCity();
  
  // Traffic
  for(let car of traffic) {
    car.display();
  }
  
  // Roadblocks & spike strips
  for(let rb of roadblocks) {
    rb.display();
  }
  for(let ss of spikeStrips) {
    ss.display();
  }
  
  // Cops
  for(let cop of cops) {
    cop.display();
  }
  
  // Player
  player.display();
  
  // Particles
  renderParticles();
  
  // Weather effects
  renderWeatherEffects();
  
  // HUD (2D overlay)
  renderHUD();
}
Line-by-line explanation (5 lines)

🔧 Subcomponents:

conditional Fog Overlay if(weather === 'FOG') {

Draws a semi-transparent gray rectangle over the whole screen using raw canvas drawingContext calls to simulate fog.

for-loop Draw Traffic for(let car of traffic) {

Calls .display() on every traffic Vehicle to draw its 3D model.

renderSky();
Paints the background sky color based on the current time of day.
drawingContext.fillStyle = `rgba(200, 200, 200, ${weatherIntensity * 0.3})`;
Reaches past p5 into the raw HTML5 canvas 2D context to set a gray fill color whose transparency depends on weatherIntensity.
setupLighting();
Configures ambientLight() and directionalLight() so the day/night sky is matched by day/night 3D lighting on the cars and buildings.
for(let car of traffic) { car.display(); }
A for-of loop that draws every car currently in the traffic array.
renderHUD();
Switches to an orthographic-feeling 2D camera and draws the speed, drift combo, wanted stars, and health/nitro bars on top of the 3D scene.

class Camera

This Camera class wraps p5's low-level camera() function in a reusable object with smoothing and screen shake - a pattern used in almost every 3D game to avoid a jittery, rigidly-locked viewpoint.

🔬 The -600 controls how far behind the car the camera sits. What happens if you make it a small number like -150 (camera very close) or a huge number like -2000 (camera far away)?

      case 'CHASE':
        let offset = p5.Vector.fromAngle(target.angle).mult(-600);
        offset.y = -300 - (target.speed * 2);
class Camera {
  constructor() {
    this.pos = createVector(0, -400, 800);
    this.target = createVector(0, 0, 0);
    this.smoothness = 0.1;
    this.shake = 0;
  }
  
  update(target) {
    // Calculate desired position based on mode
    let desiredPos, lookAt;
    
    switch(cameraMode) {
      case 'CHASE':
        let offset = p5.Vector.fromAngle(target.angle).mult(-600);
        offset.y = -300 - (target.speed * 2);
        desiredPos = createVector(target.pos.x + offset.x, offset.y, target.pos.y + offset.y);
        lookAt = createVector(target.pos.x, -20, target.pos.y);
        break;
      case 'HOOD':
        offset = p5.Vector.fromAngle(target.angle).mult(80);
        desiredPos = createVector(target.pos.x + offset.x, -60, target.pos.y + offset.y);
        offset = p5.Vector.fromAngle(target.angle).mult(500);
        lookAt = createVector(target.pos.x + offset.x, -30, target.pos.y + offset.y);
        break;
      case 'BUMPER':
        offset = p5.Vector.fromAngle(target.angle).mult(100);
        desiredPos = createVector(target.pos.x + offset.x, -30, target.pos.y + offset.y);
        offset = p5.Vector.fromAngle(target.angle).mult(800);
        lookAt = createVector(target.pos.x + offset.x, -20, target.pos.y + offset.y);
        break;
    }
    
    // Smooth interpolation
    this.pos.lerp(desiredPos, this.smoothness);
    this.target.lerp(lookAt, this.smoothness);
    
    // Camera shake
    if(this.shake > 0) {
      this.pos.add(createVector(random(-this.shake, this.shake), random(-this.shake, this.shake), random(-this.shake, this.shake)));
      this.shake *= 0.9;
    }
    
    // Apply camera
    camera(this.pos.x, this.pos.y, this.pos.z, this.target.x, this.target.y, this.target.z, 0, 1, 0);
  }
  
  addShake(amount) {
    this.shake += amount;
  }
}
Line-by-line explanation (5 lines)

🔧 Subcomponents:

switch-case Camera Mode Switch switch(cameraMode) {

Computes a different desired camera position and look-at target depending on whether the mode is CHASE, HOOD, or BUMPER.

conditional Shake Decay if(this.shake > 0) {

Applies a random jitter to the camera position when shake is active, then decays the shake amount toward zero.

this.pos = createVector(0, -400, 800);
Stores the camera's current 3D position as a p5.Vector; note y is negative because WEBGL's Y axis points down.
let offset = p5.Vector.fromAngle(target.angle).mult(-600);
Builds a vector pointing opposite the car's heading and scales it, so the camera sits 600 units behind the car.
this.pos.lerp(desiredPos, this.smoothness);
lerp() moves the camera a fraction of the way toward its desired position each frame instead of snapping instantly, creating smooth chase-cam motion.
this.shake *= 0.9;
Multiplies the shake amount by 0.9 every frame so a camera-shake impulse fades out exponentially rather than stopping abruptly.
camera(this.pos.x, this.pos.y, this.pos.z, this.target.x, this.target.y, this.target.z, 0, 1, 0);
The actual p5 WEBGL camera() call: eye position, look-at point, and an up-vector (0,1,0) meaning 'Y is up'.

class Vehicle

Vehicle is the single most important class in the sketch: the exact same code drives the player's car, every traffic car, and every cop car - only the isAI flag and which controls feed into update() differ. This is a great example of writing one reusable class instead of three near-duplicate ones.

🔬 0.97 controls how much speed a car loses per frame while drifting. What happens to how long you can hold a drift if you change it to 0.999 (almost no loss) versus 0.9 (rapid loss)?

    if(this.isDrifting) {
      this.angle += this.driftAngle;
      this.vel.mult(0.97); // Lose speed while drifting
      
      // Spawn skidmarks
      if(frameCount % 3 === 0) {
        this.spawnSkidmark();
      }
class Vehicle {
  constructor(x, y, carType) {
    this.pos = createVector(x, y);
    this.vel = createVector(0, 0);
    this.angle = 0;
    this.steerAngle = 0;
    
    // Get specs from database
    let specs = CAR_SPECS[carType] || CAR_SPECS.STARTER;
    this.type = carType;
    this.name = specs.name;
    this.maxSpeed = specs.maxSpeed / 3.6; // Convert to units
    this.accel = specs.accel;
    this.handling = specs.handling;
    this.driftFactor = specs.drift;
    this.weight = specs.weight;
    this.nitroMax = specs.nitro;
    this.nitro = specs.nitro;
    this.baseColor = color(specs.color);
    
    // State
    this.speed = 0;
    this.health = 100;
    this.isDrifting = false;
    this.driftAngle = 0;
    this.wheelAngle = 0;
    this.isAI = false;
    
    // Customization
    this.customColor = this.baseColor;
    this.underglow = null;
    this.spoiler = 0;
    this.hood = 0;
    this.rims = 0;
    this.tint = 0;
    this.vinyl = null;
    
    // Damage
    this.damage = [];
    this.smokeTimer = 0;
    
    // Effects
    this.headlightsOn = false;
    this.brakelightsOn = false;
    this.turningLeft = false;
    this.turningRight = false;
  }
  
  update() {
    // Get control inputs
    let gas = 0, steer = 0, brake = 0;
    
    if(!this.isAI) {
      if(controls.gas || touchControls.up) gas = 1;
      if(controls.brake || touchControls.down) brake = 1;
      if(controls.left || touchControls.left) steer = -1;
      if(controls.right || touchControls.right) steer = 1;
      
      // Gyro steering
      if(gyroEnabled && abs(gyroTilt) > 5) {
        steer = constrain(gyroTilt / 30, -1, 1);
      }
      
      // Handbrake drift
      if(controls.handbrake && this.speed > 20) {
        this.isDrifting = true;
        this.driftAngle = steer * 0.5;
      } else {
        this.isDrifting = false;
      }
      
      // Nitro boost
      if(controls.nitro && this.nitro > 0 && this.speed > 30) {
        gas = 2;
        this.nitro -= 0.5;
        this.spawnNitroFlame();
      }
    }
    
    // Steering
    this.wheelAngle = lerp(this.wheelAngle, steer * PI/6, 0.2);
    
    // Acceleration
    let forward = createVector(cos(this.angle), sin(this.angle));
    this.vel.add(forward.copy().mult(gas * this.accel));
    
    // Braking
    if(brake > 0) {
      this.vel.mult(0.95);
      this.brakelightsOn = true;
    } else {
      this.brakelightsOn = false;
    }
    
    // Friction
    this.vel.mult(0.98);
    
    // Speed
    this.speed = this.vel.mag();
    
    // Steering
    if(this.speed > 1) {
      let turnAmount = this.wheelAngle * this.handling * 0.1;
      this.angle += turnAmount;
    }
    
    // Drift physics
    if(this.isDrifting) {
      this.angle += this.driftAngle;
      this.vel.mult(0.97); // Lose speed while drifting
      
      // Spawn skidmarks
      if(frameCount % 3 === 0) {
        this.spawnSkidmark();
      }
      
      // Spawn smoke
      if(frameCount % 5 === 0) {
        this.spawnDriftSmoke();
      }
    }
    
    // Limit speed
    this.vel.limit(this.maxSpeed);
    
    // Update position
    this.pos.add(this.vel);
    
    // Regenerate nitro slowly
    if(this.nitro < this.nitroMax) {
      this.nitro += 0.01;
    }
    
    // Auto headlights
    this.headlightsOn = (worldTime < 360 || worldTime > 1140);
    
    // Turn signals
    this.turningLeft = steer < -0.3;
    this.turningRight = steer > 0.3;
  }
  
  display() {
    push();
    translate(this.pos.x, -40, this.pos.y);
    rotateY(-this.angle);
    
    // Car body
    noStroke();
    fill(this.customColor);
    specularMaterial(150);
    shininess(50);
    
    // Main chassis
    box(120, 30, 60);
    
    // Roof
    push();
    translate(0, -25, 0);
    fill(lerpColor(this.customColor, color(0), 0.3));
    box(70, 20, 55);
    pop();
    
    // Headlights
    if(this.headlightsOn) {
      push();
      translate(62, -10, 20);
      fill(255, 255, 200);
      emissiveMaterial(255, 255, 200);
      sphere(5);
      pointLight(255, 255, 200, 62, -10, 20);
      pop();
    }
    
    pop();
  }
  
  spawnSkidmark() {
    let rear = p5.Vector.fromAngle(this.angle).mult(-50);
    let left = p5.Vector.fromAngle(this.angle - HALF_PI).mult(25);
    
    skidmarks.push({
      x: this.pos.x + rear.x + left.x,
      z: this.pos.y + rear.y + left.y,
      life: 300
    });
    skidmarks.push({
      x: this.pos.x + rear.x - left.x,
      z: this.pos.y + rear.y - left.y,
      life: 300
    });
    
    if(skidmarks.length > 500) skidmarks.splice(0, 2);
  }
  
  spawnDriftSmoke() {
    let rear = p5.Vector.fromAngle(this.angle).mult(-50);
    particles.push({
      type: 'SMOKE',
      pos: createVector(this.pos.x + rear.x, -15, this.pos.y + rear.y),
      vel: createVector(random(-2, 2), random(-3, -1), random(-2, 2)),
      life: 255,
      size: random(20, 40),
      color: color(200, 200, 200, 150)
    });
  }
  
  spawnNitroFlame() {
    let rear = p5.Vector.fromAngle(this.angle).mult(-65);
    particles.push({
      type: 'FIRE',
      pos: createVector(this.pos.x + rear.x, -30, this.pos.y + rear.y),
      vel: p5.Vector.fromAngle(this.angle + PI).mult(random(5, 10)),
      life: 255,
      size: random(15, 30),
      color: color(255, random(100, 200), 0)
    });
  }
  
  takeDamage(amount) {
    this.health -= amount;
    cam.addShake(amount / 5);
    audioEngine.playSFX('crash');
    
    if(this.health <= 0) {
      this.explode();
    }
  }
  
  explode() {
    for(let i = 0; i < 50; i++) {
      particles.push({
        type: 'EXPLOSION',
        pos: this.pos.copy(),
        vel: p5.Vector.random3D().mult(random(5, 15)),
        life: 255,
        size: random(10, 30),
        color: color(255, random(100, 200), 0)
      });
    }
    audioEngine.playSFX('explosion');
  }
}
Line-by-line explanation (9 lines)

🔧 Subcomponents:

conditional Human Input Gate if(!this.isAI) {

Only reads keyboard/touch/gyro controls for the player - AI cars skip this whole block and rely on values set elsewhere (like updateCopSystem).

conditional Drift Physics if(this.isDrifting) {

While drifting, bends the car's angle by driftAngle, bleeds off speed faster, and periodically spawns skid marks and smoke particles.

conditional Nitro Boost if(controls.nitro && this.nitro > 0 && this.speed > 30) {

Doubles the gas value and drains the nitro meter while the boost button is held and enough speed/fuel remain.

let specs = CAR_SPECS[carType] || CAR_SPECS.STARTER;
Looks up the chosen car's stats in the CAR_SPECS database, falling back to the starter car if an invalid type is passed.
this.maxSpeed = specs.maxSpeed / 3.6;
Converts the spec's max speed from km/h-style units into the smaller units the physics engine moves the car in each frame.
let forward = createVector(cos(this.angle), sin(this.angle));
Builds a unit vector pointing in the direction the car is currently facing, using trigonometry on its angle.
this.vel.add(forward.copy().mult(gas * this.accel));
Adds thrust in the forward direction, scaled by how hard the gas is pressed and the car's acceleration stat.
this.vel.mult(0.98);
Multiplying velocity by a number less than 1 every frame simulates rolling friction/drag, slowly bleeding off speed.
this.vel.limit(this.maxSpeed);
p5.Vector's limit() caps the velocity's magnitude so the car can never exceed its top speed no matter how much gas is applied.
this.pos.add(this.vel);
Moves the car by adding its velocity vector to its position - the fundamental Euler-integration step of the physics.
translate(this.pos.x, -40, this.pos.y);
Moves the WEBGL drawing origin to the car's world position before drawing its 3D parts, so all the box()/sphere() calls below are relative to the car.
box(120, 30, 60);
Draws the car's main body as a rectangular box 120 units long, 30 tall, and 60 wide.

renderSky()

renderSky() shows a classic technique for day/night cycles: instead of one fixed color, define a handful of 'anchor' colors for key hours and use lerpColor() to smoothly blend between them as time passes.

🔬 The dawn transition lasts from hour 6 to hour 8 (2 hours). What happens to how abrupt the sunrise looks if you widen it to hour 6 through hour 12?

  if(hour < 6) { // Night
    skyColor = color(10, 10, 30);
  } else if(hour < 8) { // Dawn
    skyColor = lerpColor(color(10, 10, 30), color(135, 206, 235), (hour - 6) / 2);
function renderSky() {
  push();
  // Time-based sky color
  let hour = worldTime / 60;
  let skyColor;
  
  if(hour < 6) { // Night
    skyColor = color(10, 10, 30);
  } else if(hour < 8) { // Dawn
    skyColor = lerpColor(color(10, 10, 30), color(135, 206, 235), (hour - 6) / 2);
  } else if(hour < 18) { // Day
    skyColor = color(135, 206, 235);
  } else if(hour < 20) { // Dusk
    skyColor = lerpColor(color(135, 206, 235), color(255, 100, 50), (hour - 18) / 2);
  } else { // Night
    skyColor = lerpColor(color(255, 100, 50), color(10, 10, 30), (hour - 20) / 4);
  }
  
  background(skyColor);
  pop();
}
Line-by-line explanation (3 lines)

🔧 Subcomponents:

conditional Time-of-Day Color Chain if(hour < 6) { // Night

Chooses (or blends between) five sky colors depending on which hour range worldTime currently falls into.

let hour = worldTime / 60;
Converts worldTime from minutes into a decimal hour value (0-24) that's easier to compare against.
skyColor = lerpColor(color(10, 10, 30), color(135, 206, 235), (hour - 6) / 2);
lerpColor() blends smoothly between night-blue and day-blue; the fraction (hour - 6) / 2 goes from 0 to 1 across the 2-hour dawn window.
background(skyColor);
Fills the entire canvas with the computed sky color for this frame.

setupLighting()

In WEBGL, shapes only look 3D if there's light to catch their surfaces. This function keeps the lighting in sync with renderSky() so the mood of day vs. night is consistent across the whole scene.

function setupLighting() {
  let hour = worldTime / 60;
  
  if(hour >= 6 && hour < 18) {
    // Daytime
    ambientLight(150);
    directionalLight(255, 255, 255, 0.5, 1, -0.5);
  } else {
    // Nighttime
    ambientLight(30);
    directionalLight(100, 100, 150, 0.5, 1, -0.5);
  }
}
Line-by-line explanation (3 lines)

🔧 Subcomponents:

conditional Day/Night Lighting Switch if(hour >= 6 && hour < 18) {

Switches between bright white daytime lighting and dim blue-tinted nighttime lighting to match the sky color.

ambientLight(150);
Sets a bright, even fill light so shaded parts of cars/buildings aren't pitch black during the day.
directionalLight(255, 255, 255, 0.5, 1, -0.5);
Adds a white 'sun' light shining from a fixed direction (x=0.5, y=1, z=-0.5), which creates highlights and shading on 3D shapes via specularMaterial().
ambientLight(30);
A much dimmer ambient light at night so the scene reads as dark overall.

renderGround()

This function uses a common infinite-ground trick: recentre a large flat plane on the player every frame using floor() to snap to a grid, so the world always looks continuous no matter how far the car travels.

function renderGround() {
  push();
  translate(floor(player.pos.x / 2000) * 2000, 0, floor(player.pos.y / 2000) * 2000);
  fill(40);
  noStroke();
  rotateX(HALF_PI);
  plane(50000, 50000);
  
  // Road grid
  stroke(255, 255, 0, 100);
  strokeWeight(2);
  for(let i = -10; i <= 10; i++) {
    line(i * 500, -10000, i * 500, 10000);
    line(-10000, i * 500, 10000, i * 500);
  }
  pop();
}
Line-by-line explanation (4 lines)

🔧 Subcomponents:

for-loop Road Grid Lines for(let i = -10; i <= 10; i++) {

Draws 21 evenly-spaced horizontal and vertical yellow lines to simulate a city road grid painted on the ground plane.

translate(floor(player.pos.x / 2000) * 2000, 0, floor(player.pos.y / 2000) * 2000);
Snaps the ground plane's position to the nearest 2000-unit grid cell around the player, so an enormous 50000x50000 plane always appears to extend infinitely under the car without needing to be redrawn at the true world origin.
rotateX(HALF_PI);
Rotates the plane 90 degrees so it lies flat (horizontal) instead of standing up like a wall, since plane() is drawn facing the camera by default.
plane(50000, 50000);
Draws one giant flat rectangle to act as the road/ground surface.
line(i * 500, -10000, i * 500, 10000);
Draws a vertical grid line every 500 units, spanning from -10000 to 10000, to look like painted road markings.

renderCity()

renderCity() shows procedural generation with nested for loops: instead of hand-placing buildings, code fills a grid and uses random() for variety. Because the random() calls run fresh every frame, the buildings actually flicker in height/color each frame - a good bug to notice while studying this function.

🔬 This loop skips buildings within 1 grid cell of the center. What happens to the open road area if you change <= 1 to <= 3?

  for(let x = -5; x <= 5; x++) {
    for(let z = -5; z <= 5; z++) {
      if(abs(x) <= 1 && abs(z) <= 1) continue; // Skip center roads
function renderCity() {
  // Procedural city generation
  push();
  noStroke();
  for(let x = -5; x <= 5; x++) {
    for(let z = -5; z <= 5; z++) {
      if(abs(x) <= 1 && abs(z) <= 1) continue; // Skip center roads
      
      push();
      translate(x * 800, -random(100, 400), z * 800);
      fill(random(30, 60));
      box(200, random(200, 800), 200);
      
      // Windows
      if(worldTime < 360 || worldTime > 1140) {
        fill(255, 255, 200, random(100, 200));
        for(let i = 0; i < 10; i++) {
          push();
          translate(random(-90, 90), random(-200, 200), 105);
          box(10, 10, 2);
          pop();
        }
      }
      pop();
    }
  }
  pop();
}
Line-by-line explanation (3 lines)

🔧 Subcomponents:

for-loop Building Grid for(let x = -5; x <= 5; x++) {

A nested loop over an 11x11 grid of positions, placing one building box at each spot except the central intersection.

conditional Skip Center Roads if(abs(x) <= 1 && abs(z) <= 1) continue;

Leaves the middle 3x3 grid cells empty so there's open road space around the player's starting point.

for-loop Lit Windows for(let i = 0; i < 10; i++) {

Scatters 10 small glowing window boxes across each building's face, but only at night.

translate(x * 800, -random(100, 400), z * 800);
Places each building 800 units apart on a grid, with a random height offset so buildings aren't all the same size.
box(200, random(200, 800), 200);
Draws a building as a box 200 wide/deep with a random height between 200 and 800 units.
if(worldTime < 360 || worldTime > 1140) {
Checks if it's before 6 AM or after 7 PM (in minutes) to decide whether building windows should glow.

renderParticles()

This is a classic particle-system pattern: a plain array of objects (not a class) each storing position, velocity, life, and size, updated and culled in a single backwards for-loop every frame.

🔬 Particles grow by size += 0.5 every frame and fall with gravity 0.1. What happens if you make gravity negative so particles float upward instead of falling?

    p.pos.add(p.vel);
    p.vel.y += 0.1; // Gravity
    p.life -= 5;
    p.size += 0.5;
function renderParticles() {
  for(let i = particles.length - 1; i >= 0; i--) {
    let p = particles[i];
    
    push();
    translate(p.pos.x, p.pos.y, p.pos.z);
    noStroke();
    fill(p.color);
    
    if(p.type === 'SMOKE' || p.type === 'FIRE') {
      rotateX(HALF_PI);
      plane(p.size, p.size);
    } else {
      sphere(p.size / 2);
    }
    pop();
    
    p.pos.add(p.vel);
    p.vel.y += 0.1; // Gravity
    p.life -= 5;
    p.size += 0.5;
    
    if(p.life <= 0) particles.splice(i, 1);
  }
  
  // Skidmarks
  push();
  fill(30);
  noStroke();
  for(let i = skidmarks.length - 1; i >= 0; i--) {
    let s = skidmarks[i];
    push();
    translate(s.x, -1, s.z);
    rotateX(HALF_PI);
    plane(15, 15);
    pop();
    s.life--;
    if(s.life <= 0) skidmarks.splice(i, 1);
  }
  pop();
}
Line-by-line explanation (4 lines)

🔧 Subcomponents:

for-loop Particle Update & Draw for(let i = particles.length - 1; i >= 0; i--) {

Draws each particle as either a flat plane (smoke/fire) or sphere, then updates its position, applies gravity, ages it, and removes it once its life runs out.

for-loop Skidmark Fade for(let i = skidmarks.length - 1; i >= 0; i--) {

Draws each skid mark as a small dark plane on the ground and removes it once its life counter expires.

p.vel.y += 0.1; // Gravity
Adds a constant downward acceleration to every particle's vertical velocity each frame, simulating gravity.
p.life -= 5;
Counts down each particle's remaining lifespan; combined with fill(p.color) using its alpha, particles are meant to fade (though color itself isn't updated here).
if(p.life <= 0) particles.splice(i, 1);
Removes expired particles from the array so the list doesn't grow forever.
if(p.type === 'SMOKE' || p.type === 'FIRE') { rotateX(HALF_PI); plane(p.size, p.size); }
Smoke and fire particles are drawn as a flat billboard-like plane instead of a 3D sphere, which is cheaper and looks like a puff/flame.

renderWeatherEffects()

Notice this function only handles the RAIN weather type - the SNOW and FOG weather states change lighting/fog elsewhere but have no matching particle effect here, which is a good gap to try filling in yourself.

function renderWeatherEffects() {
  if(weather === 'RAIN' && raindrops.length < 200 * weatherIntensity) {
    for(let i = 0; i < 5; i++) {
      raindrops.push({
        x: player.pos.x + random(-1000, 1000),
        y: random(-500, 100),
        z: player.pos.y + random(-1000, 1000),
        vy: random(-15, -20)
      });
    }
  }
  
  // Render rain
  stroke(150, 150, 255, 150);
  strokeWeight(1);
  for(let i = raindrops.length - 1; i >= 0; i--) {
    let r = raindrops[i];
    line(r.x, r.y, r.z, r.x, r.y + 20, r.z);
    r.y += r.vy;
    if(r.y < -600) raindrops.splice(i, 1);
  }
}
Line-by-line explanation (3 lines)

🔧 Subcomponents:

conditional Rain Spawn Cap if(weather === 'RAIN' && raindrops.length < 200 * weatherIntensity) {

Only spawns new raindrops while it's raining and the total count is below a cap scaled by how intense the storm is.

for-loop Rain Update & Draw for(let i = raindrops.length - 1; i >= 0; i--) {

Draws every raindrop as a short vertical line, moves it downward, and removes it once it falls below the scene.

raindrops.length < 200 * weatherIntensity
Caps the total raindrops based on weatherIntensity (0-1), so a light drizzle spawns far fewer drops than a heavy storm.
line(r.x, r.y, r.z, r.x, r.y + 20, r.z);
Draws each raindrop as a 20-unit-long streak by connecting its current position to a point 20 units below it.
r.y += r.vy;
Moves the raindrop downward each frame using its own falling speed (vy is negative-large, moving it toward negative y, i.e. down toward the ground in this coordinate system).

renderHUD()

Because WEBGL has no separate 2D drawing mode, this HUD is drawn by temporarily pointing the 3D camera flat at the origin and drawing text/rect() as if it were 2D - a common trick for overlay UI in WEBGL sketches.

function renderHUD() {
  push();
  camera(0, 0, height/2 / tan(PI/3), 0, 0, 0, 0, 1, 0);
  
  // Speed
  fill(255);
  textSize(48);
  textAlign(LEFT);
  text(round(player.speed * 3.6) + " MPH", -width/2 + 30, height/2 - 100);
  
  // Drift score
  if(driftCombo > 0) {
    fill(255, 215, 0);
    textSize(32);
    text("DRIFT COMBO: " + driftCombo + "x", -width/2 + 30, height/2 - 150);
    text("+" + round(driftScore), -width/2 + 30, height/2 - 200);
  }
  
  // Wanted level
  if(wantedLevel > 0) {
    fill(255, 50, 50);
    textSize(36);
    textAlign(RIGHT);
    let stars = "\u2605".repeat(wantedLevel) + "\u2606".repeat(5 - wantedLevel);
    text("WANTED " + stars, width/2 - 30, -height/2 + 80);
  }
  
  // Health bar
  fill(255, 0, 0, 100);
  rect(-width/2 + 30, -height/2 + 30, 200, 20);
  fill(0, 255, 0);
  rect(-width/2 + 30, -height/2 + 30, player.health * 2, 20);
  
  // Nitro bar
  fill(100, 100, 255, 100);
  rect(-width/2 + 30, -height/2 + 60, 200, 15);
  fill(100, 200, 255);
  rect(-width/2 + 30, -height/2 + 60, player.nitro * 200 / player.nitroMax, 15);
  
  pop();
}
Line-by-line explanation (4 lines)

🔧 Subcomponents:

conditional Drift Combo Display if(driftCombo > 0) {

Only shows the drift combo multiplier and running score text while an active combo exists.

conditional Wanted Stars Display if(wantedLevel > 0) {

Only draws the wanted-level star rating in the corner when the player actually has a wanted level above zero.

camera(0, 0, height/2 / tan(PI/3), 0, 0, 0, 0, 1, 0);
Temporarily repositions the 3D camera to look straight down the Z axis, turning the WEBGL scene into a flat 2D-like surface just long enough to draw HUD text/rectangles.
text(round(player.speed * 3.6) + " MPH", -width/2 + 30, height/2 - 100);
Converts speed units to miles-per-hour-style numbers (times 3.6) and draws it near the bottom-left of the screen.
let stars = "\u2605".repeat(wantedLevel) + "\u2606".repeat(5 - wantedLevel);
Builds a string of filled and empty star characters to visually represent the 0-5 wanted level, similar to classic GTA-style wanted stars.
rect(-width/2 + 30, -height/2 + 30, player.health * 2, 20);
Draws the green foreground of the health bar with a width proportional to the player's health (0-100 becomes 0-200 pixels).

updateWeather()

This function shows a simple weighted-random-choice pattern: pick one random number, then use a chain of if/else if thresholds to divide it into differently-sized outcome buckets.

🔬 Only 20% of rolls produce bad weather. What happens if you flip the odds so CLEAR only has a 20% chance instead?

    if(rand < 0.1) weather = 'RAIN';
    else if(rand < 0.15) weather = 'SNOW';
    else if(rand < 0.2) weather = 'FOG';
    else weather = 'CLEAR';
function updateWeather() {
  // Random weather changes
  if(frameCount % 3600 === 0) { // Every minute
    let rand = random();
    if(rand < 0.1) weather = 'RAIN';
    else if(rand < 0.15) weather = 'SNOW';
    else if(rand < 0.2) weather = 'FOG';
    else weather = 'CLEAR';
    
    weatherIntensity = random(0.3, 1);
  }
}
Line-by-line explanation (3 lines)

🔧 Subcomponents:

conditional Weather Roll if(frameCount % 3600 === 0) { // Every minute

Every 3600 frames (about a minute at 60fps), rolls a random number to decide whether the weather changes to rain, snow, fog, or stays clear.

if(frameCount % 3600 === 0) {
Only runs the weather roll on one frame out of every 3600, throttling how often weather can change.
if(rand < 0.1) weather = 'RAIN';
Gives rain a 10% chance by checking if the random 0-1 value falls in the first tenth of the range.
weatherIntensity = random(0.3, 1);
Whenever weather changes, also picks a random strength between 0.3 and 1 that other systems (like fog opacity or rain density) read from.

updateDriftSystem()

updateDriftSystem() demonstrates a 'grace period' pattern common in combo-scoring games: instead of ending your combo the instant you stop drifting, a countdown timer gives you a couple seconds to start drifting again before the score is banked and reset.

🔬 This requires speed > 30 to score points. What happens to how easy scoring feels if you lower that threshold to 10, letting slow drifts count too?

  if(player.isDrifting && player.speed > 30) {
    driftScore += player.speed * 0.1 * driftCombo;
    comboTimer = 120;
    driftCombo = min(driftCombo + 0.01, 10);
function updateDriftSystem() {
  if(player.isDrifting && player.speed > 30) {
    driftScore += player.speed * 0.1 * driftCombo;
    comboTimer = 120;
    driftCombo = min(driftCombo + 0.01, 10);
  } else {
    comboTimer--;
    if(comboTimer <= 0) {
      if(driftScore > 0) {
        playerData.cash += round(driftScore);
        showNotification("+" + round(driftScore) + " DRIFT POINTS!");
        if(driftScore > playerData.bestDriftScore) {
          playerData.bestDriftScore = round(driftScore);
        }
      }
      driftScore = 0;
      driftCombo = 0;
    }
  }
}
Line-by-line explanation (4 lines)

🔧 Subcomponents:

conditional Active Drift Scoring if(player.isDrifting && player.speed > 30) {

While the player is drifting fast enough, keeps adding to the drift score and slowly growing the combo multiplier, resetting the grace-period timer.

conditional Combo Timeout & Payout if(comboTimer <= 0) {

Once the grace period after a drift ends expires, banks the accumulated drift score as cash, checks for a new best score, and resets everything.

driftScore += player.speed * 0.1 * driftCombo;
Adds points every frame proportional to current speed and the current combo multiplier, rewarding fast, sustained drifts.
driftCombo = min(driftCombo + 0.01, 10);
Slowly grows the combo multiplier each frame while drifting, but caps it at 10 using min() so it can't grow forever.
comboTimer = 120;
Resets a 120-frame (~2 second) grace period every frame you're actively drifting, so a brief pause won't instantly end your combo.
playerData.cash += round(driftScore);
Converts the accumulated drift score into in-game cash once the combo officially ends.

updateHeatSystem()

This heat/wanted system is a simplified version of the classic 'GTA-style' pursuit mechanic: staying hidden from all pursuers for long enough gradually cools you down and eventually calls off the chase.

function updateHeatSystem() {
  // Heat decays when cops can't see you
  if(wantedLevel > 0) {
    let canSeePlayer = false;
    for(let cop of cops) {
      if(dist(cop.pos.x, cop.pos.y, player.pos.x, player.pos.y) < 1000) {
        canSeePlayer = true;
        break;
      }
    }
    
    if(!canSeePlayer) {
      heatLevel -= 0.5;
      if(heatLevel <= 0) {
        wantedLevel = max(0, wantedLevel - 1);
        heatLevel = 0;
        if(wantedLevel === 0) {
          showNotification("WANTED LEVEL CLEARED!");
          cops = [];
        }
      }
    } else {
      heatLevel = min(100, heatLevel + 0.1);
    }
  }
}
Line-by-line explanation (4 lines)

🔧 Subcomponents:

for-loop Cop Visibility Check for(let cop of cops) {

Loops through every active cop to see if any of them is within 1000 units of the player, meaning the player is currently 'seen'.

conditional Heat Decay & Wanted Drop if(!canSeePlayer) {

When no cop can see the player, heat slowly drains; once it hits zero, the wanted level drops by one star and heat resets.

if(dist(cop.pos.x, cop.pos.y, player.pos.x, player.pos.y) < 1000) {
Checks whether this particular cop is within 1000 units of the player, treating that as 'within sight range'.
break;
Stops checking further cops the moment one is found close enough - no need to keep looping once visibility is confirmed.
wantedLevel = max(0, wantedLevel - 1);
Drops the wanted level by one star, using max() to make sure it never goes below zero.
cops = [];
Once the wanted level fully clears, the entire cops array is emptied, removing all police cars from the world at once.

updateCopSystem()

updateCopSystem() is a minimal seek-and-pursue AI: compute the angle toward a target with atan2(), smoothly rotate toward it with lerp(), then move forward - the same basic recipe used for enemies in countless 2D and 3D games.

🔬 0.05 controls how quickly cops turn to face the player. What happens to how 'smart' the chase feels if you raise this to 0.3?

    cop.angle = lerp(cop.angle, desiredAngle, 0.05);
function updateCopSystem() {
  // Spawn cops based on wanted level
  if(cops.length < wantedLevel * 3 && frameCount % 180 === 0) {
    spawnCop();
  }
  
  // Update cops
  for(let cop of cops) {
    // AI pursuit
    let toPlayer = createVector(player.pos.x - cop.pos.x, player.pos.y - cop.pos.y);
    let desiredAngle = atan2(toPlayer.y, toPlayer.x);
    
    cop.angle = lerp(cop.angle, desiredAngle, 0.05);
    
    let forward = createVector(cos(cop.angle), sin(cop.angle));
    cop.vel.add(forward.mult(cop.accel * 1.5));
    cop.vel.limit(cop.maxSpeed * 1.1);
    cop.pos.add(cop.vel);
    cop.vel.mult(0.98);
    
    cop.update();
  }
}
Line-by-line explanation (5 lines)

🔧 Subcomponents:

conditional Cop Spawn Cap if(cops.length < wantedLevel * 3 && frameCount % 180 === 0) {

Keeps the number of cops proportional to the wanted level (up to 3 cops per star) and throttles spawning to once every 180 frames.

for-loop Cop Pursuit AI for(let cop of cops) {

For every cop, steers its heading toward the player's current position and pushes it forward, giving simple chase AI.

let toPlayer = createVector(player.pos.x - cop.pos.x, player.pos.y - cop.pos.y);
Builds a vector pointing from the cop to the player by subtracting positions.
let desiredAngle = atan2(toPlayer.y, toPlayer.x);
atan2() converts that direction vector into an angle in radians, telling the cop which way it needs to face.
cop.angle = lerp(cop.angle, desiredAngle, 0.05);
Smoothly rotates the cop's current heading a little bit toward the desired angle each frame instead of snapping instantly, giving a natural turning motion.
cop.vel.limit(cop.maxSpeed * 1.1);
Lets cop cars drive 10% faster than their base max speed, on top of the class already boosting cop speed elsewhere, giving them a slight edge in the chase.
cop.update();
Also runs the cop's normal Vehicle.update(), which - since isAI is true - skips the human input section but still applies drift/nitro/lighting logic.

spawnCop()

Notice the local variable is named dist, which shadows p5's built-in dist() function within this function's scope - a subtle naming collision worth watching out for in your own code.

function spawnCop() {
  let angle = random(TWO_PI);
  let dist = 1500;
  let x = player.pos.x + cos(angle) * dist;
  let y = player.pos.y + sin(angle) * dist;
  
  let cop = new Vehicle(x, y, 'STARTER');
  cop.isAI = true;
  cop.customColor = color(0, 0, 255);
  cop.maxSpeed *= 1.2;
  cops.push(cop);
}
Line-by-line explanation (4 lines)
let angle = random(TWO_PI);
Picks a completely random direction (0 to 2*PI radians, a full circle) around the player to spawn from.
let x = player.pos.x + cos(angle) * dist;
Uses trigonometry to convert the random angle and distance into an actual x offset from the player's position.
let cop = new Vehicle(x, y, 'STARTER');
Creates a brand-new Vehicle instance for the cop, reusing the exact same class as the player and traffic cars.
cop.maxSpeed *= 1.2;
Boosts this cop's top speed by 20% above a normal STARTER car, giving police a slight performance edge.

spawnTraffic()

spawnTraffic() and spawnCop() are nearly identical - both create a Vehicle at a random point around the player. This mirrors how the whole sketch treats player, traffic, and cops as the same underlying object type.

function spawnTraffic() {
  let angle = random(TWO_PI);
  let dist = 2000;
  let x = player.pos.x + cos(angle) * dist;
  let y = player.pos.y + sin(angle) * dist;
  
  let car = new Vehicle(x, y, 'STARTER');
  car.isAI = true;
  car.customColor = color(random(100, 255), random(100, 255), random(100, 255));
  traffic.push(car);
}
Line-by-line explanation (3 lines)
let angle = random(TWO_PI);
Chooses a random direction around the player to spawn the new traffic car.
car.customColor = color(random(100, 255), random(100, 255), random(100, 255));
Gives every traffic car a random bright color by picking random red/green/blue values between 100 and 255.
traffic.push(car);
Adds the newly created car to the traffic array so it starts being updated and drawn.

checkCollisions()

This is a basic distance-based collision check - simpler than true bounding-box or shape collision, but cheap to compute for every car pair each frame.

function checkCollisions() {
  // Player vs traffic
  for(let car of traffic) {
    if(dist(player.pos.x, player.pos.y, car.pos.x, car.pos.y) < 100) {
      handleCollision(player, car);
    }
  }
  
  // Player vs cops
  for(let cop of cops) {
    if(dist(player.pos.x, player.pos.y, cop.pos.x, cop.pos.y) < 100) {
      handleCollision(player, cop);
    }
  }
}
Line-by-line explanation (2 lines)

🔧 Subcomponents:

for-loop Player vs Traffic for(let car of traffic) {

Checks the distance between the player and every traffic car, triggering a collision if they're closer than 100 units.

for-loop Player vs Cops for(let cop of cops) {

Checks the distance between the player and every cop car, triggering a collision if they're closer than 100 units.

if(dist(player.pos.x, player.pos.y, car.pos.x, car.pos.y) < 100) {
Uses simple circle-distance collision detection: if the two cars' centers are within 100 units, treat it as a hit.
handleCollision(player, car);
Delegates the actual physics response (bounce + damage) to a shared handleCollision() function.

handleCollision()

handleCollision() is a simplified elastic-collision response: instead of real physics math based on mass and momentum, it just pushes both cars apart along the line between their centers and applies flat damage.

🔬 The bounce strength is fixed at 10. What happens to how violent crashes look if you raise this to 40?

  a.vel.add(dir.mult(10));
  b.vel.sub(dir.mult(10));
function handleCollision(a, b) {
  let dir = p5.Vector.sub(a.pos, b.pos).normalize();
  a.vel.add(dir.mult(10));
  b.vel.sub(dir.mult(10));
  
  a.takeDamage(15);
  b.takeDamage(15);
}
Line-by-line explanation (4 lines)
let dir = p5.Vector.sub(a.pos, b.pos).normalize();
Computes the direction pointing from car b toward car a, then normalize() shrinks it to length 1 so it only represents direction, not distance.
a.vel.add(dir.mult(10));
Pushes car a away from car b along that direction, simulating a bounce impulse.
b.vel.sub(dir.mult(10));
Pushes car b in the opposite direction, so both cars bounce apart from each other.
a.takeDamage(15);
Applies a fixed 15 points of damage to both vehicles involved in the collision, regardless of how hard the impact was.

showNotification()

This is a lightweight notification queue pattern - other systems just call showNotification('some message') and don't need to know how or where it gets displayed.

function showNotification(text) {
  notifications.push({ text: text, life: 180 });
}
Line-by-line explanation (1 lines)
notifications.push({ text: text, life: 180 });
Adds a new notification object with a 180-frame lifespan (~3 seconds) to the notifications array so it can be displayed and eventually expire.

class AudioSystem

This shows a minimal use of p5.sound's Oscillator to turn a gameplay value (speed) directly into an audio parameter (pitch) - a simple form of procedural audio instead of pre-recorded sound clips.

class AudioSystem {
  constructor() {
    this.engineOsc = new p5.Oscillator('sawtooth');
    this.engineOsc.start();
    this.engineOsc.amp(0);
  }
  
  update(vehicle) {
    let freq = map(vehicle.speed, 0, vehicle.maxSpeed, 80, 400);
    let amp = map(vehicle.speed, 0, vehicle.maxSpeed, 0.1, 0.3);
    this.engineOsc.freq(freq, 0.1);
    this.engineOsc.amp(amp, 0.1);
  }
  
  playSFX(type) {
    // Simple SFX
  }
}
Line-by-line explanation (3 lines)
this.engineOsc = new p5.Oscillator('sawtooth');
Creates a sawtooth-wave audio oscillator (from p5.sound) that will act as the engine's droning sound.
let freq = map(vehicle.speed, 0, vehicle.maxSpeed, 80, 400);
map() rescales the car's current speed (0 to maxSpeed) into a pitch range of 80-400 Hz, so faster driving sounds higher-pitched.
this.engineOsc.freq(freq, 0.1);
Smoothly ramps the oscillator to the new frequency over 0.1 seconds instead of snapping instantly, avoiding harsh clicks.

class Minimap

Minimap is a stub class - a good example of how larger projects sketch out planned features as empty classes/methods first, then fill them in later. Try implementing display() yourself using the player's and traffic's positions.

class Minimap {
  constructor() {
    this.size = 200;
  }
  
  display() {
    // TODO: Render minimap
  }
}
Line-by-line explanation (2 lines)
this.size = 200;
Stores the intended pixel size of the minimap, ready for a display() implementation to use.
display() { // TODO: Render minimap }
This method is a placeholder stub - it's called nowhere yet and contains no drawing code, meaning the minimap feature isn't actually implemented.

setupControlListeners()

This function shows the standard way to read continuous input (like 'is gas held down') in JavaScript: keydown sets a flag true, keyup sets it back to false, and the game loop reads that flag every frame rather than reacting to individual key events.

function setupControlListeners() {
  // Keyboard
  document.addEventListener('keydown', (e) => {
    if(e.key === 'w' || e.key === 'ArrowUp') controls.gas = true;
    if(e.key === 's' || e.key === 'ArrowDown') controls.brake = true;
    if(e.key === 'a' || e.key === 'ArrowLeft') controls.left = true;
    if(e.key === 'd' || e.key === 'ArrowRight') controls.right = true;
    if(e.key === ' ') controls.handbrake = true;
    if(e.key === 'Shift') controls.nitro = true;
    if(e.key === 'c') {
      let modes = ['CHASE', 'HOOD', 'BUMPER'];
      let idx = modes.indexOf(cameraMode);
      cameraMode = modes[(idx + 1) % modes.length];
    }
    if(e.key === 'Escape') {
      if(gameState === 'PLAYING') {
        gameState = 'PAUSED';
      } else if(gameState === 'PAUSED') {
        gameState = 'PLAYING';
      }
    }
  });
  
  document.addEventListener('keyup', (e) => {
    if(e.key === 'w' || e.key === 'ArrowUp') controls.gas = false;
    if(e.key === 's' || e.key === 'ArrowDown') controls.brake = false;
    if(e.key === 'a' || e.key === 'ArrowLeft') controls.left = false;
    if(e.key === 'd' || e.key === 'ArrowRight') controls.right = false;
    if(e.key === ' ') controls.handbrake = false;
    if(e.key === 'Shift') controls.nitro = false;
  });
  
  // Touch controls
  setupTouchControls();
}
Line-by-line explanation (5 lines)

🔧 Subcomponents:

calculation Camera Mode Cycling cameraMode = modes[(idx + 1) % modes.length];

Cycles through the CHASE/HOOD/BUMPER camera modes in order each time 'c' is pressed, wrapping back to the start using modulo.

conditional Pause Toggle if(e.key === 'Escape') {

Flips between PLAYING and PAUSED game states whenever Escape is pressed.

document.addEventListener('keydown', (e) => {
Registers a listener that fires once whenever any key is pressed down, giving access to the event object 'e' with details about which key.
if(e.key === 'w' || e.key === 'ArrowUp') controls.gas = true;
Sets the shared controls.gas flag to true if either the W key or the up arrow is pressed, supporting two control schemes at once.
let idx = modes.indexOf(cameraMode);
Finds the current camera mode's position in the modes array.
cameraMode = modes[(idx + 1) % modes.length];
Advances to the next mode in the list, using modulo so it wraps from the last mode back to the first.
document.addEventListener('keyup', (e) => {
Registers a second listener for when keys are released, setting the matching controls flags back to false.

setupTouchControls()

bindBtn is a small factory function pattern: instead of writing four nearly-identical blocks of addEventListener code, one reusable function is called four times with different arguments.

function setupTouchControls() {
  const bindBtn = (id, key) => {
    let el = document.getElementById(id);
    if(!el) return;
    el.addEventListener('touchstart', (e) => {
      e.preventDefault();
      touchControls[key] = true;
    });
    el.addEventListener('touchend', (e) => {
      e.preventDefault();
      touchControls[key] = false;
    });
  };
  
  bindBtn('btn-gas', 'up');
  bindBtn('btn-brake', 'down');
  bindBtn('btn-left', 'left');
  bindBtn('btn-right', 'right');
}
Line-by-line explanation (4 lines)
const bindBtn = (id, key) => {
Defines a small reusable helper function (a closure) that wires up touch events for a given HTML element id and a matching key in the touchControls object.
if(!el) return;
Safely bails out if the HTML button doesn't exist on the page, preventing a crash on desktop layouts that may not include mobile buttons.
e.preventDefault();
Stops the browser's default touch behavior (like scrolling or zooming) so the game controls respond cleanly instead.
bindBtn('btn-gas', 'up');
Calls the helper once per on-screen button, connecting the HTML gas button to the touchControls.up flag.

checkGyroSupport()

This is a simple mobile input path: tilting a phone changes gyroTilt, which Vehicle.update() maps into a steering value with constrain(gyroTilt / 30, -1, 1) - turning device motion into a game control.

function checkGyroSupport() {
  if(window.DeviceOrientationEvent) {
    window.addEventListener('deviceorientation', (e) => {
      gyroTilt = e.gamma; // -90 to 90
    });
  }
}
Line-by-line explanation (2 lines)

🔧 Subcomponents:

conditional Feature Detection if(window.DeviceOrientationEvent) {

Only attaches the tilt listener if the browser/device actually supports device orientation events, avoiding errors on unsupported devices.

if(window.DeviceOrientationEvent) {
Feature-detects whether the browser exposes device orientation data before trying to use it.
gyroTilt = e.gamma; // -90 to 90
Stores the phone's left-right tilt angle (gamma, roughly -90 to 90 degrees) into a global variable that Vehicle.update() later reads for steering.

loadPlayerData()

localStorage lets a browser game remember progress (cash, level, owned cars) between visits without any server - JSON.stringify()/JSON.parse() is the standard way to convert objects to and from the plain strings localStorage can store.

function loadPlayerData() {
  let saved = localStorage.getItem('driftStars2026');
  if(saved) {
    playerData = JSON.parse(saved);
  }
}
Line-by-line explanation (2 lines)
let saved = localStorage.getItem('driftStars2026');
Reads a previously-saved string of player data from the browser's persistent localStorage under a fixed key.
if(saved) { playerData = JSON.parse(saved); }
If save data actually exists, JSON.parse() converts the stored string back into a real JavaScript object and replaces the default playerData.

savePlayerData()

This is the save half of the load/save pair - notice it's defined but never actually called anywhere else in the sketch, meaning progress currently isn't being saved during play (a good bug to fix).

function savePlayerData() {
  localStorage.setItem('driftStars2026', JSON.stringify(playerData));
}
Line-by-line explanation (1 lines)
localStorage.setItem('driftStars2026', JSON.stringify(playerData));
Converts the entire playerData object into a JSON string and writes it to localStorage so it persists after the page is closed.

updateUI()

updateUI() is the bridge between the p5.js game logic and the plain HTML/CSS menu screens - it reaches out with document.getElementById() to update text that lives outside the canvas entirely.

function updateUI() {
  // Update cash display
  let cashEl = document.getElementById('cash-display');
  if(cashEl) cashEl.innerText = "$" + playerData.cash.toLocaleString();
}
Line-by-line explanation (2 lines)
let cashEl = document.getElementById('cash-display');
Grabs the HTML element that shows the player's cash on the home screen.
if(cashEl) cashEl.innerText = "$" + playerData.cash.toLocaleString();
toLocaleString() adds comma separators to large numbers (like 50,000), and this line only runs if the element actually exists on the page.

renderSplash()

renderSplash() reuses the same 'point the WEBGL camera flat' trick as renderHUD() to draw simple centered title text before any gameplay starts.

function renderSplash() {
  background(0);
  push();
  camera(0, 0, height/2 / tan(PI/3), 0, 0, 0, 0, 1, 0);
  fill(255, 215, 0);
  textSize(64);
  textAlign(CENTER);
  text("DRIFT STARS", 0, -50);
  textSize(48);
  fill(150);
  text("2026", 0, 20);
  pop();
}
Line-by-line explanation (3 lines)
background(0);
Clears the canvas to solid black for the splash screen.
camera(0, 0, height/2 / tan(PI/3), 0, 0, 0, 0, 1, 0);
Points the WEBGL camera straight at the origin so text drawn afterward behaves like a flat, centered 2D overlay.
text("DRIFT STARS", 0, -50);
Draws the game's title text centered horizontally (because textAlign(CENTER) was set) slightly above the vertical center.

renderMenu()

This shows a hybrid UI approach: instead of drawing every button and menu with p5 shapes, the game reuses ordinary HTML/CSS for menus (see index.html's #home-screen and #garage-screen) and only uses the canvas for the 3D game and HUD.

function renderMenu() {
  background(20);
  // Menu rendering handled by HTML
}
Line-by-line explanation (2 lines)
background(20);
Fills the canvas with a dark gray so it doesn't flash a stale frame behind the HTML menu overlays.
// Menu rendering handled by HTML
A comment clarifying that the actual HOME/GARAGE/MODE_SELECT menus are separate HTML <div> elements shown/hidden by CSS, not drawn with p5 shapes.

renderPauseOverlay()

A dark semi-transparent rectangle drawn over the whole frame is the simplest way to create a 'dimmed overlay' effect for pause menus or dialogs.

function renderPauseOverlay() {
  push();
  camera(0, 0, height/2 / tan(PI/3), 0, 0, 0, 0, 1, 0);
  fill(0, 0, 0, 150);
  rect(-width/2, -height/2, width, height);
  fill(255);
  textSize(64);
  textAlign(CENTER);
  text("PAUSED", 0, 0);
  textSize(24);
  text("Press ESC to Resume", 0, 50);
  pop();
}
Line-by-line explanation (3 lines)
fill(0, 0, 0, 150);
Sets a semi-transparent black fill (alpha 150 out of 255) so the paused game world is still faintly visible underneath.
rect(-width/2, -height/2, width, height);
Draws a rectangle covering the entire screen using the flattened HUD-style camera, dimming everything behind it.
text("PAUSED", 0, 0);
Draws the word PAUSED centered exactly in the middle of the screen.

renderGameOver()

renderGameOver() reads driftScore directly - but since nothing in the code currently sets gameState to 'GAMEOVER', this screen is built but not yet wired up to any trigger, another good gap to explore and fix.

function renderGameOver() {
  background(20);
  push();
  camera(0, 0, height/2 / tan(PI/3), 0, 0, 0, 0, 1, 0);
  fill(255, 50, 50);
  textSize(64);
  textAlign(CENTER);
  text("BUSTED", 0, -50);
  fill(255);
  textSize(24);
  text("Final Score: " + round(driftScore), 0, 20);
  pop();
}
Line-by-line explanation (2 lines)
fill(255, 50, 50);
Sets a harsh red color for the 'BUSTED' game-over text.
text("Final Score: " + round(driftScore), 0, 20);
Concatenates the rounded final drift score into the displayed string, showing how the player did.

startGame()

startGame() is the 'reset and go' function bridging the menu and gameplay: it re-initializes all the mutable global state before flipping gameState to 'PLAYING', which is important so replaying doesn't inherit stale data from the last run.

function startGame(mode) {
  gameMode = mode;
  gameState = 'PLAYING';
  
  player = new Vehicle(0, 0, playerData.currentCar);
  cam = new Camera();
  traffic = [];
  cops = [];
  particles = [];
  skidmarks = [];
  wantedLevel = 0;
  
  userStartAudio();
  
  document.getElementById('ui-overlay').style.display = 'block';
}
Line-by-line explanation (5 lines)
player = new Vehicle(0, 0, playerData.currentCar);
Creates the player's car at world origin (0,0) using whichever car the player currently owns/has selected.
cam = new Camera();
Builds a brand-new Camera so any leftover shake or position from a previous run doesn't carry over.
traffic = []; cops = []; particles = []; skidmarks = [];
Resets every dynamic array to empty so a fresh run doesn't start with cars/particles left over from a previous session.
userStartAudio();
A required p5.sound call that unlocks audio playback, since browsers block sound until triggered by a real user interaction (like clicking Play).
document.getElementById('ui-overlay').style.display = 'block';
Reveals the HTML HUD/touch-control overlay div that was hidden while on the menu screens.

windowResized()

windowResized() is a built-in p5.js callback that fires automatically on browser resize - always worth pairing resizeCanvas() with re-applying any WEBGL camera/perspective settings that depend on width and height.

function windowResized() {
  resizeCanvas(windowWidth, windowHeight);
  perspective(PI / 2.2, width / height, 10, 100000);
}
Line-by-line explanation (2 lines)
resizeCanvas(windowWidth, windowHeight);
p5's automatically-called function whenever the browser window changes size, here used to resize the canvas to match.
perspective(PI / 2.2, width / height, 10, 100000);
Recomputes the 3D perspective using the new aspect ratio, since a resized window changes width/height and would otherwise distort the 3D view.

bindMenuButtons()

This function connects the plain HTML buttons in index.html to the p5.js game logic - a common pattern when mixing a canvas-based game with a regular HTML/CSS menu system.

function bindMenuButtons() {
  let playBtn = document.getElementById('btn-play');
  if(playBtn) playBtn.onclick = () => startGame('FREEPLAY');
  
  let garageBtn = document.getElementById('btn-garage');
  if(garageBtn) garageBtn.onclick = () => {
    gameState = 'GARAGE';
    document.getElementById('home-screen').style.display = 'none';
    document.getElementById('garage-screen').style.display = 'flex';
  };
}
Line-by-line explanation (3 lines)
let playBtn = document.getElementById('btn-play');
Looks up the HTML Play button by its id so a click handler can be attached to it.
if(playBtn) playBtn.onclick = () => startGame('FREEPLAY');
Wires the button's click event to call startGame() with 'FREEPLAY' mode, safely skipping if the button isn't found on the page.
document.getElementById('home-screen').style.display = 'none';
Hides the home screen div and, on the next line, shows the garage screen div, switching between HTML overlays purely with CSS display toggles.

📦 Key Variables

gameState string

Tracks which screen/mode the app is in (SPLASH, HOME, PLAYING, PAUSED, GAMEOVER, etc.) and drives the switch statement in draw().

let gameState = 'SPLASH';
gameMode string

Stores which gameplay mode was selected (FREEPLAY, CAREER, DRIFT_BATTLE, etc.).

let gameMode = 'FREEPLAY';
difficulty string

Stores the selected difficulty level, intended to scale AI toughness.

let difficulty = 'NORMAL';
player object

Holds the player's Vehicle instance, created when a run starts.

let player;
players array

Reserved array for multiple player Vehicles in a future multiplayer mode.

let players = [];
cam object

The Camera instance that computes and applies the 3D view every frame.

let cam;
cameraMode string

Which camera view is active (CHASE, HOOD, BUMPER, ORBIT); cycled with the 'c' key.

let cameraMode = 'CHASE';
worldTime number

The in-game clock in minutes (0-1440), driving sky color, lighting, and headlights.

let worldTime = 720;
weather string

Current weather type (CLEAR, RAIN, SNOW, FOG, STORM) affecting visuals and fog overlay.

let weather = 'CLEAR';
weatherIntensity number

A 0-1 strength value used to scale fog opacity and rain density.

let weatherIntensity = 0;
temperature number

A Fahrenheit temperature value tracked for flavor/future features.

let temperature = 72;
season string

Current season name, reserved for future seasonal visual changes.

let season = 'SUMMER';
traffic array

Holds all AI traffic Vehicle instances currently active in the world.

let traffic = [];
cops array

Holds all active police Vehicle instances chasing the player.

let cops = [];
helicopters array

Reserved array for future helicopter pursuit units.

let helicopters = [];
roadblocks array

Holds roadblock obstacle objects that get displayed during a chase.

let roadblocks = [];
spikeStrips array

Holds spike-strip obstacle objects intended to slow the player down.

let spikeStrips = [];
playerData object

The player's persistent profile - cash, level, XP, owned cars, and stats - loaded/saved via localStorage.

let playerData = { cash: 50000, level: 1, xp: 0 };
wantedLevel number

How many wanted stars (0-5) the player currently has, controlling cop spawning.

let wantedLevel = 0;
heatLevel number

A 0-100 meter that rises when cops see the player and decays otherwise, eventually dropping the wanted level.

let heatLevel = 0;
escapeZones array

Reserved array for special zones where the player could shake a police chase.

let escapeZones = [];
cooldownTimer number

A reserved timer variable, intended to gate how often certain actions can repeat.

let cooldownTimer = 0;
skidmarks array

Stores tire skid mark objects (position + remaining life) drawn on the ground during drifts.

let skidmarks = [];
particles array

The universal particle array used for smoke, nitro flames, and explosions.

let particles = [];
debris array

Reserved array for crash debris particles/objects.

let debris = [];
raindrops array

Stores active raindrop objects during RAIN weather.

let raindrops = [];
snowflakes array

Reserved array for snow particles during SNOW weather (not yet rendered).

let snowflakes = [];
audioEngine object

The AudioSystem instance managing the procedural engine sound.

let audioEngine;
musicTracks object

Reserved object intended to hold background music track references.

let musicTracks = {};
soundEffects object

Reserved object intended to hold sound effect clip references.

let soundEffects = {};
notifications array

Holds temporary on-screen messages (like drift point payouts) with a countdown life.

let notifications = [];
driftScore number

The current, still-active drift combo's accumulated score before it's banked as cash.

let driftScore = 0;
driftCombo number

The current combo multiplier (grows while drifting, capped at 10) applied to drift scoring.

let driftCombo = 0;
comboTimer number

A countdown grace period that keeps the drift combo alive briefly after drifting stops.

let comboTimer = 0;
speedText string

A cached text string for displaying speed (declared but superseded by direct text() calls in renderHUD).

let speedText = "0 MPH";
minimap object

The Minimap instance, currently a stub with an empty display() method.

let minimap;
controls object

Boolean flags (gas, brake, left, right, handbrake, nitro, horn) reflecting which keyboard controls are currently held down.

let controls = { gas: false, brake: false };
touchControls object

Boolean flags for on-screen mobile touch buttons (up, down, left, right).

let touchControls = { up: false, down: false, left: false, right: false };
gyroEnabled boolean

Whether gyroscope/tilt steering is currently enabled.

let gyroEnabled = false;
gyroTilt number

The device's current left-right tilt angle from deviceorientation events, used for gyro steering.

let gyroTilt = 0;
CAR_SPECS object

A constant database of every car's stats (speed, acceleration, handling, drift, color, price) keyed by car type.

const CAR_SPECS = { STARTER: { name: "Street Racer", maxSpeed: 140 } };

🔧 Potential Improvements (6)

Here are some ways this code could be enhanced:

BUG Camera.update() CHASE case

desiredPos = createVector(target.pos.x + offset.x, offset.y, target.pos.y + offset.y) reuses offset.y (which was just overwritten to be the camera's height) as the Z-axis offset too, instead of using offset.x for both the X and Z components of the behind-the-car vector.

💡 Store the horizontal offset and height separately, e.g. let behind = p5.Vector.fromAngle(target.angle).mult(-600); let camHeight = -300 - target.speed*2; desiredPos = createVector(target.pos.x + behind.x, camHeight, target.pos.y + behind.y);

PERFORMANCE renderCity()

Building height, color, and window positions are all chosen with random() every single frame, so the entire city visibly flickers/reshuffles 60 times per second instead of looking like a stable skyline.

💡 Generate the city once (e.g. in setup() or the first time renderCity() runs) and store each building's size/color/window layout in an array, then just draw those saved values every frame.

BUG checkCollisions() / handleCollision()

While two cars remain within the 100-unit collision radius, handleCollision() fires every single frame, applying 15 damage per frame and potentially destroying a car's health almost instantly on contact.

💡 Add a short collision cooldown per car pair (e.g. an invulnerability timer after a hit) so damage is only applied once per collision event rather than every frame of overlap.

FEATURE renderWeatherEffects() / snowflakes

The snowflakes array is declared globally but never populated or rendered, so selecting SNOW weather changes nothing visually.

💡 Add a snow-spawning and snow-rendering block similar to the existing rain logic, using slower falling speeds and white particles.

STYLE spawnCop() and spawnTraffic()

Both functions declare a local variable named 'dist', which shadows p5's built-in dist() function within that function's scope - confusing to read and risky if the function is later extended to also call dist().

💡 Rename the local variable to something like spawnDistance to avoid shadowing the global dist() function.

FEATURE savePlayerData() / AudioSystem.playSFX()

savePlayerData() is defined but never called anywhere, so cash earned from drifting is lost on refresh; playSFX() is an empty stub, so crash/explosion sounds never actually play despite being triggered.

💡 Call savePlayerData() whenever playerData changes (e.g. right after the cash payout in updateDriftSystem()), and implement playSFX() using p5.sound's loadSound()/play() or short synthesized oscillator blips.

🔄 Code Flow

Code flow showing setup, draw, updategame, rendergame, camera, vehicle, rendersky, setuplighting, renderground, rendercity, renderparticles, renderweathereffects, renderhud, updateweather, updatedriftsystem, updateheatsystem, updatecopsystem, spawncop, spawntraffic, checkcollisions, handlecollision, shownotification, audiosystem, minimap, setupcontrollisteners, setuptouchcontrols, checkgyrosupport, loadplayerdata, saveplayerdata, updateui, rendersplash, rendermenu, renderpauseoverlay, rendergameover, startgame, windowresized, bindmenubuttons

💡 Click on function names in the diagram to jump to their code

graph TD start[Start] --> setup[setup] setup --> draw[draw loop] draw --> gamestate-switch[Game State Switch] gamestate-switch --> updategame[updateGame] updategame --> traffic-update-loop[Traffic Update & Cull] traffic-update-loop --> traffic-spawn-check[Traffic Spawn Check] traffic-update-loop --> cop-update-check[Cop System Gate] updategame --> updateweather[updateWeather] updategame --> updatedriftsystem[updateDriftSystem] updategame --> updateheatsystem[updateHeatSystem] updategame --> updatecopsystem[updateCopSystem] updategame --> checkcollisions[checkCollisions] updategame --> audiosystem[audioSystem] updategame --> loadplayerdata[loadPlayerData] updategame --> saveplayerdata[savePlayerData] updategame --> updateui[updateUI] draw --> rendergame[renderGame] rendergame --> rendersky[renderSky] rendergame --> setuplighting[setupLighting] rendergame --> renderground[renderGround] rendergame --> rendercity[renderCity] rendergame --> renderparticles[renderParticles] rendergame --> renderweathereffects[renderWeatherEffects] rendergame --> renderhud[renderHUD] click setup href "#fn-setup" click draw href "#fn-draw" click gamestate-switch href "#sub-gamestate-switch" click updategame href "#fn-updategame" click traffic-update-loop href "#sub-traffic-update-loop" click traffic-spawn-check href "#sub-traffic-spawn-check" click cop-update-check href "#sub-cop-update-check" click updateweather href "#fn-updateweather" click updatedriftsystem href "#fn-updatedriftsystem" click updateheatsystem href "#fn-updateheatsystem" click updatecopsystem href "#fn-updatecopsystem" click checkcollisions href "#fn-checkcollisions" click audiosystem href "#fn-audiosystem" click loadplayerdata href "#fn-loadplayerdata" click saveplayerdata href "#fn-saveplayerdata" click updateui href "#fn-updateui" click rendersky href "#fn-rendersky" click setuplighting href "#fn-setuplighting" click renderground href "#fn-renderground" click rendercity href "#fn-rendercity" click renderparticles href "#fn-renderparticles" click renderweathereffects href "#fn-renderweathereffects" click renderhud href "#fn-renderhud"

❓ Frequently Asked Questions

What does this sketch create visually?

This sketch, titled DRIFT STARS 2026, creates a dynamic cityscape where colorful cars drift through various weather conditions and times of day. The visuals include shifting seasons, cinematic particle effects, and responsive traffic elements, enhancing the immersive driving experience.

How can users interact with DRIFT STARS 2026?

Users can interact with DRIFT STARS 2026 by driving cars in different game modes, switching camera views, and adjusting difficulty settings. The gameplay features controls for acceleration, steering, and nitro boosts, allowing players to perform drifts and evade traffic and police.

What creative coding technique does DRIFT STARS 2026 demonstrate?

This sketch demonstrates the use of a particle system to create dynamic visual effects such as skid marks, debris, and weather elements like rain and snow. The integration of these particle effects enhances realism and engagement in the driving simulation.

How could someone recreate a similar effect in p5.js?

To recreate a similar effect in p5.js, one could implement a particle system using arrays to manage particle objects and their behaviors. By defining properties like position, velocity, and lifespan, and using functions to update and draw these particles on the canvas, you can create engaging visual effects that respond to user interactions.

Preview

DRIFT STARS 2026 - p5.js creative coding sketch preview
Sketch Preview
Code flow diagram showing the structure of DRIFT STARS 2026 - Code flow showing setup, draw, updategame, rendergame, camera, vehicle, rendersky, setuplighting, renderground, rendercity, renderparticles, renderweathereffects, renderhud, updateweather, updatedriftsystem, updateheatsystem, updatecopsystem, spawncop, spawntraffic, checkcollisions, handlecollision, shownotification, audiosystem, minimap, setupcontrollisteners, setuptouchcontrols, checkgyrosupport, loadplayerdata, saveplayerdata, updateui, rendersplash, rendermenu, renderpauseoverlay, rendergameover, startgame, windowresized, bindmenubuttons
Code Flow Diagram