inf road trip

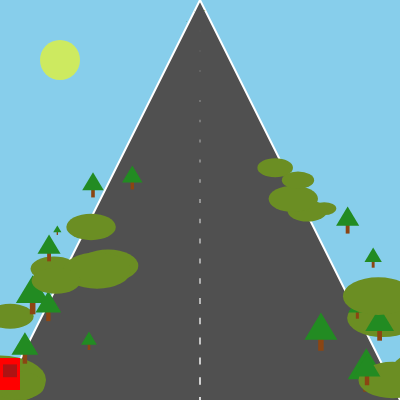
This sketch creates a relaxing infinite driving scene where you cruise down a perspective road with trees and hills scrolling past. The car stays centered while the road lines and scenery continuously move toward you, simulating forward motion without the car actually moving.

🧪 Try This!

Experiment with the code by making these changes:

  1. Speed up the drive — Higher carSpeed makes the road rush toward you faster, intensifying the sense of motion
  2. Widen the road — Increase roadWidthFactor to create a wider freeway, decreasing it narrows the road to a tight lane
  3. Paint a sunset sky — Change the background color from sky blue to warm orange and purple tones for a dramatic evening drive
  4. Make the car blue — Swap the red car color for blue or any other color by changing the RGB values
  5. Pack in more scenery — Increase the number of trees and hills on both sides of the road for a denser forest
  6. Shift the road left
Prefer the full editor? Open it there →

📖 About This Sketch

This sketch creates a mesmerizing endless road trip where you pilot a red car down a sun-lit highway. Trees and hills whiz past on both sides, and the road's center dashes rush toward you, all creating a convincing illusion of forward motion. The magic comes from three core p5.js techniques: perspective geometry with a vanishing point, arrays that store and update moving objects, and the animation loop that scrolls scenery at different speeds to fake depth.

The code is organized into setup (which initializes the car, road lines, and scenery objects), draw (which calls helper functions to render everything), and specialized functions for drawing and updating each element. By studying it, you will learn how to create 3D depth on a 2D canvas, manage multiple animated objects in arrays, and use the map() function to scale objects based on their distance from the camera.

⚙️ How It Works

  1. When the sketch loads, setup() creates a canvas, initializes the car at the bottom center, and populates two arrays: one with 20 dashed road lines spaced from bottom to top, and another with 40 random trees and hills scattered along the road.
  2. Every frame, draw() calls five helper functions in sequence: drawSun() adds a yellow circle in the sky, drawRoad() paints the gray road surface and white dashes using perspective math, drawScenery() renders trees and hills, drawCar() draws the red car at the bottom, then three update functions advance the animation.
  3. moveCar() tracks your mouse and arrow key input to slide the car left and right, keeping it within the canvas with constrain().
  4. updateRoad() increases each dashed line's y-position by carSpeed each frame, creating the illusion that the road rushes toward you; when a dash scrolls off the bottom, it resets to the top.
  5. updateScenery() moves trees and hills slower than the road (carSpeed * 0.8) so they appear farther away; when they scroll off screen, they are replaced with fresh random objects at the top.
  6. The perspective system uses map() to scale everything based on how close it is to the camera: objects near the bottom (y near height) are larger and wider, while objects near the top (y near 0) are tiny and squeezed toward the center vanishing point.

🎓 Concepts You'll Learn

Perspective and vanishing pointsAnimation loop and frame-based movementArrays for managing multiple objectsParallax scrolling for depth illusionmap() function for scaling based on distanceConditional object resets for infinite scrollingUser input handling with mouse and keyboardResponsive canvas with windowResized()

📝 Code Breakdown

setup()

setup() runs once at startup and initializes all the variables and arrays your sketch needs. For responsive designs, use windowWidth and windowHeight instead of hard-coded numbers so the sketch scales to any screen size.

function setup() {
  createCanvas(windowWidth, windowHeight);
  vanishingPointY = height;
  vanishingPointX = width / 2;

  // Initialize car
  carWidth = width * 0.05;
  carHeight = height * 0.08;
  carX = width / 2;

  // Initialize road lines
  for (let i = 0; i < numRoadLines; i++) {
    roadLines.push({
      y: map(i, 0, numRoadLines, height, 0), // Start from bottom, spaced out
      height: height * 0.02, // Initial height of a dashed segment
      width: width * 0.005, // Initial width of a dashed segment
    });
  }

  // Initialize scenery
  for (let i = 0; i < numSceneryItems; i++) {
    scenery.push(createSceneryItem(i));
  }
}
Line-by-line explanation (9 lines)

🔧 Subcomponents:

calculation Canvas and vanishing point initialization createCanvas(windowWidth, windowHeight); vanishingPointY = height; vanishingPointX = width / 2;

Creates a full-screen canvas and sets the vanishing point at the center-bottom where all perspective lines converge

calculation Car dimension and position setup carWidth = width * 0.05; carHeight = height * 0.08; carX = width / 2;

Scales the car size relative to canvas dimensions and centers it horizontally

for-loop Road lines initialization loop for (let i = 0; i < numRoadLines; i++) { roadLines.push({...}); }

Creates 20 dashed road segments spaced evenly from bottom to top using map() to distribute y-positions

for-loop Scenery objects initialization loop for (let i = 0; i < numSceneryItems; i++) { scenery.push(createSceneryItem(i)); }

Populates the scenery array with 40 random trees and hills scattered across the landscape

createCanvas(windowWidth, windowHeight);
Creates a full-screen canvas that fills the entire browser window
vanishingPointY = height;
Sets the vanishing point's y-coordinate to the bottom of the screen, where perspective lines would converge
vanishingPointX = width / 2;
Centers the vanishing point horizontally, making the road appear to recede straight ahead
carWidth = width * 0.05;
Makes the car width 5% of the canvas width, so it scales responsively on different screen sizes
carHeight = height * 0.08;
Makes the car height 8% of canvas height for proper proportions
carX = width / 2;
Centers the car horizontally on the screen
y: map(i, 0, numRoadLines, height, 0),
Uses map() to spread the 20 road lines from bottom (y = height) to top (y = 0), creating even spacing
height: height * 0.02,
Sets each dashed segment's vertical thickness to 2% of canvas height
width: width * 0.005,
Sets each dashed segment's horizontal width to 0.5% of canvas width
draw()

draw() executes repeatedly, typically 60 times per second. This is where all rendering and updates happen each frame, creating the illusion of motion. The order matters: background() must come first to clear the previous frame, then draw all visuals, then update positions for next frame.

function draw() {
  background(135, 206, 235); // Sky blue background

  drawSun();
  drawRoad();
  drawScenery();
  drawCar();

  moveCar();
  updateRoad();
  updateScenery();
}
Line-by-line explanation (8 lines)
background(135, 206, 235);
Fills the entire canvas with a sky-blue color, clearing the previous frame so nothing trails
drawSun();
Calls the function that paints a yellow sun in the top-left sky
drawRoad();
Draws the gray road surface and white dashed center lines using perspective math
drawScenery();
Renders all trees and hills from the scenery array, scaled by their distance from the camera
drawCar();
Draws the red car and its window at the bottom of the screen
moveCar();
Updates the car's x-position based on mouse or arrow key input
updateRoad();
Moves road dashes down the screen and resets those that scroll off the bottom
updateScenery();
Moves scenery objects down and replaces those that go off-screen with new random items

createSceneryItem(index)

This factory function generates consistent scenery objects with random properties. Using a function to create similar objects keeps your code DRY (Don't Repeat Yourself) and makes it easy to add new properties to all scenery at once.

🔬 These two lines control size and horizontal position variation. What happens if you change the first random to always return height * 0.15 (no variation)? Try it: what would a uniform-sized landscape look like?

  let size = random(height * 0.05, height * 0.2);
  let xOffset = random(-width * 0.4, width * 0.4);
function createSceneryItem(index) {
  let type = random(['tree', 'hill']);
  let size = random(height * 0.05, height * 0.2);
  let xOffset = random(-width * 0.4, width * 0.4); // Offset from road edge
  let y = map(index, 0, numSceneryItems, height, 0);

  // Ensure scenery doesn't start too close to the car
  if (y > height * 0.8) y = random(0, height * 0.8);

  return {
    type: type,
    xOffset: xOffset,
    y: y,
    size: size,
    color: (type === 'tree') ? color(34, 139, 34) : color(107, 142, 35),
    trunkColor: color(139, 69, 19),
    hillColor: color(107, 142, 35)
  };
}
Line-by-line explanation (7 lines)

🔧 Subcomponents:

calculation Random scenery type selection let type = random(['tree', 'hill']);

Randomly chooses whether this scenery item is a tree or a hill

calculation Random size generation let size = random(height * 0.05, height * 0.2);

Generates a random size between 5% and 20% of screen height for visual variety

calculation Y-position distribution let y = map(index, 0, numSceneryItems, height, 0);

Spreads scenery items evenly from top to bottom based on their index

conditional Avoid spawning near car if (y > height * 0.8) y = random(0, height * 0.8);

Prevents scenery from appearing too close to the camera/car for visual clarity

let type = random(['tree', 'hill']);
random() picks a random element from an array—either 'tree' or 'hill' with equal probability
let size = random(height * 0.05, height * 0.2);
Generates a random size between 5% and 20% of canvas height, creating scenery of varying sizes
let xOffset = random(-width * 0.4, width * 0.4);
Randomly places scenery up to 40% of canvas width left or right of the road center
let y = map(index, 0, numSceneryItems, height, 0);
map() converts the index (0 to 39) into a y-position (height to 0), distributing items from bottom to top
if (y > height * 0.8) y = random(0, height * 0.8);
If the random y-position is too close to the bottom (in the car's area), reassign it higher up
color: (type === 'tree') ? color(34, 139, 34) : color(107, 142, 35),
Ternary operator: if type is 'tree', use dark green; otherwise use olive green for hills
return { type: type, xOffset: xOffset, ... };
Returns a JavaScript object containing all the properties needed to draw and update this scenery item

drawSun()

This simple function demonstrates how to draw a single decorative element. The sun's position and size scale with the canvas, so it stays proportional on any screen size.

function drawSun() {
  noStroke();
  fill(255, 255, 0, 150);
  ellipse(width * 0.15, height * 0.15, width * 0.1);
}
Line-by-line explanation (3 lines)
noStroke();
Disables outlines for shapes drawn after this point
fill(255, 255, 0, 150);
Sets the fill color to yellow (255, 255, 0) with 150/255 opacity (semi-transparent)
ellipse(width * 0.15, height * 0.15, width * 0.1);
Draws a circle at 15% from the left and 15% from the top, with diameter 10% of canvas width

drawRoad()

This is the core of the perspective illusion. By scaling every element based on its distance from the camera (y-position), distant objects appear tiny and close together, while nearby objects appear large and spread out. This mimics how human eyes perceive depth.

🔬 This loop scales every dash based on perspectiveScale. What happens if you remove the perspectiveScale multiplier and set currentWidth and currentHeight to fixed values (e.g., lineSegment.width and lineSegment.height)? Try it—why does the road look flat or wrong without perspective scaling?

  for (let lineSegment of roadLines) {
    let perspectiveScale = map(lineSegment.y, 0, height, 0, 1);
    let currentRoadWidth = width * roadWidthFactor * perspectiveScale;
    let currentX = vanishingPointX;
    let currentY = lineSegment.y;
    let currentWidth = lineSegment.width * perspectiveScale;
    let currentHeight = lineSegment.height * perspectiveScale;

    rectMode(CENTER);
    rect(currentX, currentY, currentWidth, currentHeight);
function drawRoad() {
  noStroke();
  fill(80); // Dark gray road

  // Draw road surface
  beginShape();
  vertex(0, height);
  vertex(width, height);
  // Calculate road edges at the top based on perspective
  let topRoadWidth = width * roadWidthFactor * map(0, 0, height, 0, 1);
  vertex(vanishingPointX + topRoadWidth / 2, 0); // Top right
  vertex(vanishingPointX - topRoadWidth / 2, 0); // Top left
  endShape(CLOSE);

  // Draw road edges (white lines)
  stroke(255);
  strokeWeight(width * 0.005);
  // Left edge
  line(0, height, vanishingPointX - topRoadWidth / 2, 0);
  // Right edge
  line(width, height, vanishingPointX + topRoadWidth / 2, 0);

  // Draw center dashed lines
  noStroke();
  fill(255, 200); // White dashes with some transparency
  for (let lineSegment of roadLines) {
    let perspectiveScale = map(lineSegment.y, 0, height, 0, 1);
    let currentRoadWidth = width * roadWidthFactor * perspectiveScale;
    let currentX = vanishingPointX;
    let currentY = lineSegment.y;
    let currentWidth = lineSegment.width * perspectiveScale;
    let currentHeight = lineSegment.height * perspectiveScale;

    rectMode(CENTER);
    rect(currentX, currentY, currentWidth, currentHeight);
  }
}
Line-by-line explanation (8 lines)

🔧 Subcomponents:

calculation Perspective road surface drawing beginShape(); vertex(0, height); vertex(width, height); ... endShape(CLOSE);

Creates a trapezoid (quadrilateral) that represents the road receding toward the vanishing point

calculation Road edge lines line(0, height, vanishingPointX - topRoadWidth / 2, 0); line(width, height, vanishingPointX + topRoadWidth / 2, 0);

Draws the left and right white boundary lines that converge at the vanishing point

for-loop Center dashed lines rendering for (let lineSegment of roadLines) { ... perspectiveScale = map(...); ... rect(...); }

Scales each dashed center line based on its distance from camera, making close dashes wide and distant dashes narrow

noStroke();
Disables stroke/outline for the filled road surface
fill(80);
Sets the road color to dark gray (80/255 brightness)
beginShape(); vertex(...); ... endShape(CLOSE);
Creates a custom polygon using four vertices: the full road width at the bottom and the narrowed width at the top, forming a trapezoid
let topRoadWidth = width * roadWidthFactor * map(0, 0, height, 0, 1);
map(0, 0, height, 0, 1) returns 1, so this calculates the road width at y=0 (top), which is narrowest due to perspective
let perspectiveScale = map(lineSegment.y, 0, height, 0, 1);
Converts a line's y-position (0 to height) into a scale factor (0 to 1): lines at bottom (y=height) scale to 1 (full size), lines at top scale toward 0 (tiny)
let currentWidth = lineSegment.width * perspectiveScale;
Multiplies the dash width by the perspective scale, making distant dashes thinner
let currentHeight = lineSegment.height * perspectiveScale;
Multiplies the dash height by the perspective scale, making distant dashes shorter
rect(currentX, currentY, currentWidth, currentHeight);
Draws each dashed segment as a centered rectangle at its scaled size

drawCar()

drawCar() renders a simple two-part car: a body and a window. Both use rectMode(CENTER) so they scale proportionally with the canvas. The window's position is offset upward relative to the body for a realistic look.

function drawCar() {
  noStroke();
  fill(255, 0, 0); // Red car body
  rectMode(CENTER);
  rect(carX, height - carHeight / 2 - 10, carWidth, carHeight);

  // Draw car windows (darker)
  fill(50, 100);
  let windowWidth = carWidth * 0.7;
  let windowHeight = carHeight * 0.4;
  rect(carX, height - carHeight / 2 - 10 - carHeight * 0.1, windowWidth, windowHeight);
}
Line-by-line explanation (8 lines)
noStroke();
Disables outlines for shapes drawn after this point
fill(255, 0, 0);
Sets the fill color to pure red for the car body
rectMode(CENTER);
Changes rect drawing mode so coordinates specify the center, not the top-left corner
rect(carX, height - carHeight / 2 - 10, carWidth, carHeight);
Draws the red car body centered at carX, positioned near the bottom of the screen, with the canvas-responsive width and height
fill(50, 100);
Sets fill to dark semi-transparent gray for the window
let windowWidth = carWidth * 0.7;
Makes the window 70% as wide as the car body for realistic proportions
let windowHeight = carHeight * 0.4;
Makes the window 40% as tall as the car body
rect(carX, height - carHeight / 2 - 10 - carHeight * 0.1, windowWidth, windowHeight);
Draws the window at the same x-position as the car, but slightly higher (y offset by -carHeight * 0.1)

drawScenery()

This loop applies perspective to all scenery items using the same map() technique as the road. By scaling position, size, and x-offset by perspectiveScale, scenery converges toward the vanishing point and shrinks as it recedes, creating the convincing 3D depth illusion.

🔬 This whole block calculates perspective. What happens if you remove the perspectiveScale multiplier from the x-position calculation and just use the raw xOffset (without scaling)? How does the scenery positioning look?

    let perspectiveScale = map(item.y, 0, height, 0, 1);
    let currentRoadWidth = width * roadWidthFactor * perspectiveScale;

    // Calculate x-position relative to road edge
    let x;
    if (item.xOffset < 0) { // Left side
      x = vanishingPointX - currentRoadWidth / 2 + item.xOffset * perspectiveScale;
    } else { // Right side
      x = vanishingPointX + currentRoadWidth / 2 + item.xOffset * perspectiveScale;
    }
function drawScenery() {
  for (let item of scenery) {
    let perspectiveScale = map(item.y, 0, height, 0, 1);
    let currentRoadWidth = width * roadWidthFactor * perspectiveScale;

    // Calculate x-position relative to road edge
    let x;
    if (item.xOffset < 0) { // Left side
      x = vanishingPointX - currentRoadWidth / 2 + item.xOffset * perspectiveScale;
    } else { // Right side
      x = vanishingPointX + currentRoadWidth / 2 + item.xOffset * perspectiveScale;
    }

    let y = item.y;
    let size = item.size * perspectiveScale;

    if (item.type === 'tree') {
      drawTree(x, y, size, item.color, item.trunkColor);
    } else if (item.type === 'hill') {
      drawHill(x, y, size, item.hillColor);
    }
  }
}
Line-by-line explanation (8 lines)

🔧 Subcomponents:

calculation Perspective scaling calculation let perspectiveScale = map(item.y, 0, height, 0, 1);

Converts the scenery item's y-position into a scale factor (0 to 1) representing distance from camera

conditional Left/right scenery positioning if (item.xOffset < 0) { x = ... } else { x = ... }

Calculates the x-position by anchoring scenery to either the left or right road edge and scaling with distance

calculation Scenery size scaling let size = item.size * perspectiveScale;

Makes distant scenery tiny and nearby scenery large to enhance the depth illusion

conditional Draw type-specific scenery if (item.type === 'tree') { ... } else if (item.type === 'hill') { ... }

Calls the appropriate drawing function based on whether this is a tree or a hill

for (let item of scenery) {
Loops through every tree and hill object in the scenery array
let perspectiveScale = map(item.y, 0, height, 0, 1);
Converts the item's y-position into a scale (0 = at top/far away, 1 = at bottom/close), which controls size
let currentRoadWidth = width * roadWidthFactor * perspectiveScale;
Recalculates the road width at this item's distance—wider at bottom, narrower at top
if (item.xOffset < 0) { // Left side
Checks if the scenery should appear on the left or right side of the road
x = vanishingPointX - currentRoadWidth / 2 + item.xOffset * perspectiveScale;
For left-side scenery: start at the left road edge, then add the offset (which converges toward the vanishing point as it recedes)
x = vanishingPointX + currentRoadWidth / 2 + item.xOffset * perspectiveScale;
For right-side scenery: start at the right road edge, then add the offset
let size = item.size * perspectiveScale;
Scales the scenery size by perspective: distant items shrink, close items enlarge
if (item.type === 'tree') { drawTree(...); } else if (item.type === 'hill') { drawHill(...); }
Calls the appropriate drawing function based on the item's type

drawTree(x, y, size, color, trunkColor)

drawTree() is a helper function that packages the logic for drawing a tree into a reusable procedure. By accepting size and color as parameters, the same function can draw trees of any size or color. This is cleaner than repeating the same code 40 times in drawScenery().

function drawTree(x, y, size, color, trunkColor) {
  noStroke();

  // Trunk
  fill(trunkColor);
  rectMode(CENTER);
  let trunkWidth = size * 0.1;
  let trunkHeight = size * 0.4;
  rect(x, y, trunkWidth, trunkHeight);

  // Leaves (triangle crown)
  fill(color);
  triangle(
    x, y - trunkHeight / 2 - size * 0.3, // Top point
    x - size * 0.3, y - trunkHeight / 2 + size * 0.2, // Bottom left
    x + size * 0.3, y - trunkHeight / 2 + size * 0.2 // Bottom right
  );
}
Line-by-line explanation (8 lines)

🔧 Subcomponents:

calculation Tree trunk drawing rect(x, y, trunkWidth, trunkHeight);

Draws a brown rectangular trunk using proportional dimensions based on the size parameter

calculation Tree crown drawing triangle( x, y - trunkHeight / 2 - size * 0.3, x - size * 0.3, y - trunkHeight / 2 + size * 0.2, x + size * 0.3, y - trunkHeight / 2 + size * 0.2 );

Draws a green triangle above the trunk to represent the tree's leafy crown

noStroke();
Disables outlines for shapes in this function
fill(trunkColor);
Sets fill to the trunk color (brown) passed in as a parameter
rectMode(CENTER);
Ensures rect() uses center-based positioning
let trunkWidth = size * 0.1;
Calculates trunk width as 10% of the tree's overall size for realistic proportions
let trunkHeight = size * 0.4;
Calculates trunk height as 40% of the tree's size
rect(x, y, trunkWidth, trunkHeight);
Draws the trunk as a centered brown rectangle
fill(color);
Changes fill to the tree's leaf color (green) passed in as a parameter
triangle( x, y - trunkHeight / 2 - size * 0.3, ... );
Draws a triangle with apex above the trunk (first point), and base below the trunk top (two lower points), creating a classic pine tree silhouette

drawHill(x, y, size, color)

drawHill() is simpler than drawTree(): it just draws one ellipse. The width (size * 1.5) is larger than the height (size * 0.8), creating an elongated, natural-looking hill bump.

function drawHill(x, y, size, color) {
  noStroke();
  fill(color);
  ellipseMode(CENTER);
  ellipse(x, y, size * 1.5, size * 0.8);
}
Line-by-line explanation (4 lines)
noStroke();
Disables outlines for the ellipse
fill(color);
Sets fill to the hill color (olive green) passed as a parameter
ellipseMode(CENTER);
Ensures the ellipse is drawn from its center point
ellipse(x, y, size * 1.5, size * 0.8);
Draws an ellipse (stretched horizontally) at position (x, y) with width 1.5x size and height 0.8x size, creating a rounded hill shape

moveCar()

moveCar() demonstrates two input methods: mouseX gives continuous tracking, while keyIsDown() allows holding multiple keys. constrain() is a handy utility that clamps values within a range, preventing edge-of-canvas glitches.

function moveCar() {
  // Move car with mouse
  carX = mouseX;

  // Move car with arrow keys
  if (keyIsDown(LEFT_ARROW)) {
    carX -= 10;
  }
  if (keyIsDown(RIGHT_ARROW)) {
    carX += 10;
  }

  // Keep car within canvas bounds
  carX = constrain(carX, carWidth / 2, width - carWidth / 2);
}
Line-by-line explanation (6 lines)

🔧 Subcomponents:

calculation Mouse-based car positioning carX = mouseX;

Directly ties the car's x-position to the mouse's x-position

conditional Arrow key controls if (keyIsDown(LEFT_ARROW)) { carX -= 10; } if (keyIsDown(RIGHT_ARROW)) { carX += 10; }

Allows arrow keys to move the car left or right by 10 pixels per frame

calculation Canvas boundary enforcement carX = constrain(carX, carWidth / 2, width - carWidth / 2);

Prevents the car from moving off the left or right edges of the canvas

carX = mouseX;
Sets the car's x-position to wherever the mouse cursor is on the screen
if (keyIsDown(LEFT_ARROW)) {
Checks if the left arrow key is currently pressed (not just clicked once)
carX -= 10;
If left arrow is down, move the car 10 pixels to the left
if (keyIsDown(RIGHT_ARROW)) {
Checks if the right arrow key is currently pressed
carX += 10;
If right arrow is down, move the car 10 pixels to the right
carX = constrain(carX, carWidth / 2, width - carWidth / 2);
constrain() clamps carX between min (carWidth / 2, the left boundary) and max (width - carWidth / 2, the right boundary), preventing the car from leaving the canvas

updateRoad()

This is the core animation loop for the road. By continuously moving dashes downward and recycling them at the top, we create an infinite scrolling effect without storing more than 20 dashes in memory. This is an efficient pattern for any repeating visual element.

🔬 This loop moves road lines down and resets them. What happens if you change carSpeed to a much larger value (e.g., 20 instead of 5)? Or what if you change the reset condition to reset when lineSegment.y > height * 0.5 instead of height? Try it—what visual effect do you notice?

  for (let lineSegment of roadLines) {
    lineSegment.y += carSpeed; // Move down

    // If line segment goes off screen, reset to top
    if (lineSegment.y > height + lineSegment.height / 2) {
      lineSegment.y = 0 - lineSegment.height / 2;
    }
  }
function updateRoad() {
  for (let lineSegment of roadLines) {
    lineSegment.y += carSpeed; // Move down

    // If line segment goes off screen, reset to top
    if (lineSegment.y > height + lineSegment.height / 2) {
      lineSegment.y = 0 - lineSegment.height / 2;
    }
  }
}
Line-by-line explanation (4 lines)

🔧 Subcomponents:

calculation Road dash movement lineSegment.y += carSpeed;

Moves each dashed line downward by carSpeed pixels each frame, creating the sensation of forward motion

conditional Off-screen reset if (lineSegment.y > height + lineSegment.height / 2) { lineSegment.y = 0 - lineSegment.height / 2; }

When a dash scrolls off the bottom of the canvas, it resets to the top to loop infinitely without creating new objects

for (let lineSegment of roadLines) {
Loops through every dashed line segment in the roadLines array
lineSegment.y += carSpeed;
Increases each dash's y-position by carSpeed pixels, moving it downward toward the viewer
if (lineSegment.y > height + lineSegment.height / 2) {
Checks if the dash has scrolled completely off the bottom edge of the screen
lineSegment.y = 0 - lineSegment.height / 2;
Resets the dash to the top (just off-screen above y = 0) so it loops infinitely without memory bloat

updateScenery()

updateScenery() implements parallax scrolling: objects move at different speeds to fake depth. The 0.8 multiplier creates the classic effect where background objects move slower, enhancing the illusion of a 3D world. Replacing old scenery with new random items keeps the landscape feeling infinite and varied.

🔬 This line uses 0.8 as the parallax multiplier. What happens if you change it to 1.0 (same speed as the road) or 0.5 (much slower)? How does the depth effect change?

  for (let i = 0; i < scenery.length; i++) {
    scenery[i].y += carSpeed * 0.8; // Scenery moves slightly slower than road for depth
function updateScenery() {
  for (let i = 0; i < scenery.length; i++) {
    scenery[i].y += carSpeed * 0.8; // Scenery moves slightly slower than road for depth

    // If scenery goes off screen, reset to top with new properties
    if (scenery[i].y > height + scenery[i].size / 2) {
      scenery[i] = createSceneryItem(i); // Create a new random item
      scenery[i].y = 0 - scenery[i].size / 2; // Position at the very top
    }
  }
}
Line-by-line explanation (5 lines)

🔧 Subcomponents:

calculation Scenery scrolling at parallax speed scenery[i].y += carSpeed * 0.8;

Moves scenery slower than the road (0.8 factor) to enhance the parallax depth effect

conditional Off-screen scenery replacement if (scenery[i].y > height + scenery[i].size / 2) { scenery[i] = createSceneryItem(i); scenery[i].y = 0 - scenery[i].size / 2; }

Replaces off-screen scenery with new random trees/hills at the top, maintaining constant visual density

for (let i = 0; i < scenery.length; i++) {
Loops through every scenery item using an index (required here because we reassign the array element)
scenery[i].y += carSpeed * 0.8;
Moves scenery downward at 80% of road speed, creating the illusion that scenery is farther away (parallax scrolling)
if (scenery[i].y > height + scenery[i].size / 2) {
Checks if a scenery item has scrolled completely off the bottom of the screen
scenery[i] = createSceneryItem(i);
Replaces the old scenery object with a brand new random tree or hill (same position in array, but new properties)
scenery[i].y = 0 - scenery[i].size / 2;
Positions the new scenery just off-screen above the top, so it scrolls in naturally

windowResized()

windowResized() is a p5.js hook function that runs whenever the browser window is resized. It ensures all sizes and positions scale correctly. This is crucial for responsive designs that work on phones, tablets, and desktops.

function windowResized() {
  resizeCanvas(windowWidth, windowHeight);
  vanishingPointY = height;
  vanishingPointX = width / 2;

  // Recalculate car size and position
  carWidth = width * 0.05;
  carHeight = height * 0.08;
  carX = width / 2;

  // Recalculate road lines (optional, but good for consistency)
  for (let i = 0; i < numRoadLines; i++) {
    roadLines[i].y = map(i, 0, numRoadLines, height, 0);
    roadLines[i].height = height * 0.02;
    roadLines[i].width = width * 0.005;
  }

  // Reset scenery on resize to avoid weird scaling artifacts
  scenery = [];
  for (let i = 0; i < numSceneryItems; i++) {
    scenery.push(createSceneryItem(i));
  }
}
Line-by-line explanation (9 lines)

🔧 Subcomponents:

calculation Canvas resizing resizeCanvas(windowWidth, windowHeight);

Adjusts the canvas size to match the new window dimensions

calculation Vanishing point recalculation vanishingPointY = height; vanishingPointX = width / 2;

Recenters the vanishing point for the new canvas dimensions

calculation Car size and position recalculation carWidth = width * 0.05; carHeight = height * 0.08; carX = width / 2;

Rescales the car to stay proportional on the resized canvas

for-loop Road line properties recalculation for (let i = 0; i < numRoadLines; i++) { ... }

Recalculates y-positions and dimensions of road lines to fit the new canvas

for-loop Scenery recreation scenery = []; for (let i = 0; i < numSceneryItems; i++) { scenery.push(createSceneryItem(i)); }

Clears and rebuilds the scenery array to prevent visual artifacts from old proportions

resizeCanvas(windowWidth, windowHeight);
p5.js built-in function that resizes the canvas to match the new window size
vanishingPointY = height;
Updates the vanishing point's y-coordinate to the new canvas height
vanishingPointX = width / 2;
Recenters the vanishing point horizontally for the new canvas width
carWidth = width * 0.05;
Recalculates car width as 5% of the new canvas width, maintaining proportions
carHeight = height * 0.08;
Recalculates car height as 8% of the new canvas height
carX = width / 2;
Recenters the car on the new canvas width
for (let i = 0; i < numRoadLines; i++) { roadLines[i].y = map(...); ... }
Loops through each road line and recalculates its y-position and dimensions for the new canvas
scenery = [];
Clears the scenery array completely
for (let i = 0; i < numSceneryItems; i++) { scenery.push(createSceneryItem(i)); }
Rebuilds the scenery array with new random items at appropriate positions for the new canvas size

📦 Key Variables

carX number

Stores the car's horizontal position on the canvas; updated by mouse and keyboard input

let carX;
carSpeed number

Controls how fast the road and scenery scroll toward the camera; higher values create faster motion

let carSpeed = 5;
carWidth number

The car's width in pixels, scaled to 5% of canvas width for responsive sizing

let carWidth;
carHeight number

The car's height in pixels, scaled to 8% of canvas height for responsive sizing

let carHeight;
roadWidthFactor number

Controls the road's width as a proportion of canvas width; 0.6 means the road is 60% of canvas width at the bottom

let roadWidthFactor = 0.6;
roadLines array

An array of objects, each representing a dashed center line segment with properties: y, height, width

let roadLines = [];
numRoadLines number

The total number of dashed road segments to maintain on screen; higher numbers create denser dashing

let numRoadLines = 20;
scenery array

An array of objects, each representing a tree or hill with properties: type, xOffset, y, size, color, trunkColor, hillColor

let scenery = [];
numSceneryItems number

The total number of scenery objects (trees and hills) to maintain; higher numbers create a denser landscape

let numSceneryItems = 40;
minSceneryDistance number

Minimum vertical distance between scenery items (unused in current code but available for spacing control)

let minSceneryDistance = 50;
vanishingPointY number

The y-coordinate of the vanishing point where all perspective lines converge; set to the bottom of the screen

let vanishingPointY;
vanishingPointX number

The x-coordinate of the vanishing point where all perspective lines converge; set to the center of the screen

let vanishingPointX;

🔧 Potential Improvements (5)

Here are some ways this code could be enhanced:

PERFORMANCE moveCar()

moveCar() is called every frame (60x/sec) but keyIsDown() checks run even when no keys are pressed, wasting CPU cycles

💡 Cache the result: move the constrain() call inside moveCar() only if carX actually changed, or use a state variable to track car velocity instead of direct position assignment

BUG drawRoad() - topRoadWidth calculation

The formula 'let topRoadWidth = width * roadWidthFactor * map(0, 0, height, 0, 1);' always passes 0 to map, returning exactly 1, making it redundant

💡 The map() call is unnecessary since map(0, 0, height, 0, 1) always returns 1. Simplify to: let topRoadWidth = width * roadWidthFactor;

FEATURE setup() and updateScenery()

Scenery spawns randomly above and below the road but there's no game mechanic or collision detection

💡 Add collision detection with scenery items to create gameplay (crash, score points, etc.), or add sound effects when hitting obstacles to enhance immersion

STYLE drawTree() and drawHill()

Color values are hardcoded inside each drawing function instead of being generated by createSceneryItem()

💡 Pass colors as parameters (already done!) but consider pre-defining a palette of appealing colors at the top of the sketch to make tweaking the color scheme easier

BUG updateScenery()

If carSpeed is very high or numSceneryItems is very low, scenery items can disappear completely before new ones spawn, creating gaps

💡 Spawn new scenery items preemptively (before the old ones fully leave) to ensure continuous coverage: change the reset condition from 'y > height' to 'y > height * 0.8' or add more scenery items

🔄 Code Flow

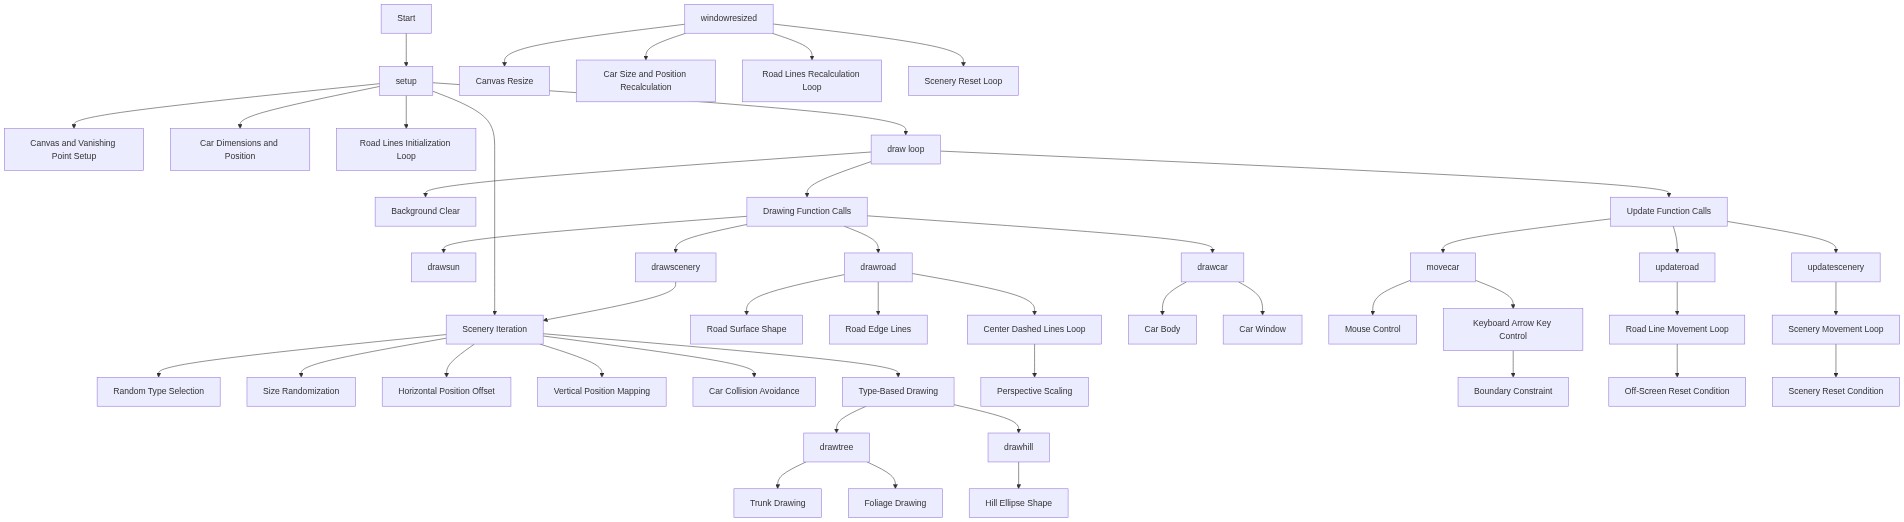
Code flow showing setup, draw, createsceneryitem, drawsun, drawroad, drawcar, drawscenery, drawtree, drawhill, movecar, updateroad, updatescenery, windowresized

💡 Click on function names in the diagram to jump to their code

graph TD start[Start] --> setup[setup] setup --> canvas-setup[Canvas Setup] setup --> car-init[Car Init] setup --> road-loop[Road Loop] setup --> scenery-loop[Scenery Loop] setup --> draw[draw loop] draw --> background[background()] draw --> drawsun[drawSun()] draw --> drawroad[drawRoad()] draw --> drawcar[drawCar()] draw --> drawscenery[drawScenery()] draw --> movecar[moveCar()] draw --> updateroad[updateRoad()] draw --> updatescenery[updateScenery()] drawsun --> click drawsun href "#fn-drawsun" drawroad --> road-surface[Road Surface] drawroad --> road-edges[Road Edges] drawroad --> dashed-lines-loop[Dashed Lines Loop] dashed-lines-loop --> click dashed-lines-loop href "#sub-dashed-lines-loop" drawscenery --> scenery-loop scenery-loop --> type-randomize[Type Randomize] scenery-loop --> size-randomize[Size Randomize] scenery-loop --> position-mapping[Position Mapping] scenery-loop --> near-car-check[Near Car Check] scenery-loop --> type-dispatch[Type Dispatch] type-dispatch --> drawtree[drawTree()] type-dispatch --> drawhill[drawHill()] drawtree --> trunk-draw[Trunk Draw] drawtree --> leaves-draw[Leaves Draw] drawhill --> click drawhill href "#fn-drawhill" movecar --> mouse-control[Mouse Control] movecar --> keyboard-control[Keyboard Control] movecar --> boundary-constraint[Boundary Constraint] updateroad --> position-update[Position Update] updateroad --> reset-condition[Reset Condition] updatescenery --> scenery-movement[Scenery Movement] updatescenery --> scenery-reset[Scenery Reset] windowresized --> canvas-resize[Canvas Resize] windowresized --> vanishing-update[Vanishing Update] windowresized --> car-recalc[Car Recalc] windowresized --> road-recalc[Road Recalc] windowresized --> scenery-reset[Scenery Reset] click setup href "#fn-setup" click draw href "#fn-draw" click canvas-setup href "#sub-canvas-setup" click car-init href "#sub-car-init" click road-loop href "#sub-road-loop" click scenery-loop href "#sub-scenery-loop" click type-randomize href "#sub-type-randomize" click size-randomize href "#sub-size-randomize" click position-mapping href "#sub-position-mapping" click near-car-check href "#sub-near-car-check" click road-surface href "#sub-road-surface" click road-edges href "#sub-road-edges" click dashed-lines-loop href "#sub-dashed-lines-loop" click perspective-calc href "#sub-perspective-calc" click x-position-calc href "#sub-x-position-calc" click size-scaling href "#sub-size-scaling" click type-dispatch href "#sub-type-dispatch" click trunk-draw href "#sub-trunk-draw" click leaves-draw href "#sub-leaves-draw" click mouse-control href "#sub-mouse-control" click keyboard-control href "#sub-keyboard-control" click boundary-constraint href "#sub-boundary-constraint" click position-update href "#sub-position-update" click reset-condition href "#sub-reset-condition" click scenery-movement href "#sub-scenery-movement" click scenery-reset href "#sub-scenery-reset" click canvas-resize href "#sub-canvas-resize" click vanishing-update href "#sub-vanishing-update" click car-recalc href "#sub-car-recalc" click road-recalc href "#sub-road-recalc" click scenery-reset href "#sub-scenery-reset"

❓ Frequently Asked Questions

What visual experience does the 'inf road trip' sketch provide?

The 'inf road trip' sketch creates a relaxing, dynamic scene where users cruise down a sunlit road with scrolling trees and hills, simulating an endless drive.

Can users interact with the 'inf road trip' sketch, and if so, how?

While the sketch is primarily automatic with the car gliding forward, users can resize the window to change the canvas dimensions and experience the animation differently.

What creative coding concepts are demonstrated in the 'inf road trip' sketch?

The sketch showcases techniques such as perspective rendering, dynamic object movement, and the use of arrays to manage multiple scenery elements.

Preview

inf road trip - p5.js creative coding sketch preview
Sketch Preview
Code flow diagram showing the structure of inf road trip - Code flow showing setup, draw, createsceneryitem, drawsun, drawroad, drawcar, drawscenery, drawtree, drawhill, movecar, updateroad, updatescenery, windowresized
Code Flow Diagram