
talking ben

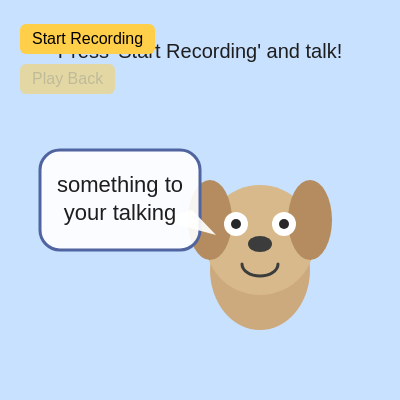
This sketch creates an interactive cartoon dog that fills the screen with expressive animations and a speech bubble. Users can record their voice through their microphone, play it back, and watch the dog react with silly comments and changing facial expressions.

🧪 Try This!

Experiment with the code by making these changes:

  1. Change the dog's color — Adjust the RGB values in drawDog() to give the dog a new fur color—try gray, orange, or even purple.
  2. Add more silly reactions — Expand the reactions array with your own funny phrases—the dog will randomly pick from the longer list.
  3. Make the dog listen longer — Increase the recording duration from 2.5 seconds to 5 seconds—users have more time to speak before the dog responds.
  4. Change the background color — Pick a new RGB color for the canvas background—try warm tones, cool tones, or go wild with bright neon.
  5. Enlarge the speech bubble — Increase the bubble's width and height percentages so the dog's reactions have more room and are easier to read.
Prefer the full editor? Open it there →

📖 About This Sketch

This sketch brings a cartoon dog to life on your screen with expressive eyes, an animated mouth, and a speech bubble full of personality. When you click the record button, the dog listens to your voice for 2.5 seconds, then plays it back while making silly reactions. The code combines p5.sound library for microphone recording and playback, p5.js drawing functions to animate the dog's face based on state, and interactive buttons to control the experience—making it a complete mini-game in under 300 lines.

The sketch is organized around three main tasks: drawing the dog's face (which changes expression based on whether it's recording or playing), managing audio input and playback with the p5.sound library, and responding to user clicks on buttons or the dog itself. By studying it, you will learn how to use p5.sound to record from a microphone, how to drive animation through state variables like isRecording and isPlaying, and how p5.js buttons and event handlers let you build interactive sketches that feel like real applications.

⚙️ How It Works

  1. When the sketch loads, setup() creates a full-window canvas and two UI buttons: 'Start Recording' and 'Play Back'. The dog is drawn centered on screen, and several global variables track whether the sketch is recording, playing, or idle.
  2. Every frame, draw() clears the background and calls drawDog() to render the cartoon character. The dog's pupils and mouth change position and shape based on the current state—pupils look down while recording, up while playing, and the mouth opens during both actions.
  3. When you click 'Start Recording', startRecording() initializes the microphone and sound recorder, sets isRecording to true, and automatically stops after 2.5 seconds. The dog's expression changes to show it is listening, and a random reaction from the reactions array appears in the speech bubble.
  4. Clicking 'Play Back' triggers playRecording(), which plays the recorded audio while setting isPlaying to true. The dog's pupils look up and its mouth stays open, then a different reaction appears when playback finishes.
  5. You can also click directly on the dog's head to trigger a random reaction without recording—this uses a distance calculation to detect if the click is near the dog's face.

🎓 Concepts You'll Learn

p5.sound library (microphone input, recording, playback)State management (tracking isRecording, isPlaying, hasRecording)Conditional animation (expressions change based on state)UI interaction (buttons, click detection, hit testing)Scaling and responsive design (min/max, windowWidth/windowHeight)Drawing complex shapes (ellipses, arcs, triangles for character design)

📝 Code Breakdown

setup()

setup() runs once at the very start of your sketch. It is the perfect place to initialize the canvas, create buttons, and set up any variables that need starting values. After setup() finishes, draw() begins running repeatedly.

function setup() {
  createCanvas(windowWidth, windowHeight);
  textAlign(CENTER, CENTER);
  textSize(24);

  // Create UI buttons
  recordBtn = createButton("Start Recording");
  recordBtn.position(20, 20);
  recordBtn.mousePressed(startRecording);

  playBtn = createButton("Play Back");
  playBtn.position(20, 60);
  playBtn.attribute("disabled", ""); // disabled until we have a recording
  playBtn.mousePressed(playRecording);
}
Line-by-line explanation (10 lines)

🔧 Subcomponents:

function-call Canvas setup createCanvas(windowWidth, windowHeight);

Makes the canvas fill the entire browser window, so the dog draws at full screen

function-calls Text formatting defaults textAlign(CENTER, CENTER); textSize(24);

Centers all text both horizontally and vertically, and sets a base font size

button-creation Record button setup recordBtn = createButton("Start Recording"); recordBtn.position(20, 20); recordBtn.mousePressed(startRecording);

Creates the button to start recording and connects it to the startRecording function

button-creation Play button setup playBtn = createButton("Play Back"); playBtn.position(20, 60); playBtn.attribute("disabled", ""); playBtn.mousePressed(playRecording);

Creates the play button, starts it disabled (grayed out) until a recording exists, and connects it to playRecording

createCanvas(windowWidth, windowHeight);
Creates a canvas as wide and tall as the browser window, so the dog scales to fill the screen
textAlign(CENTER, CENTER);
Tells p5.js to center text both horizontally and vertically at the point where you draw it
textSize(24);
Sets the default font size to 24 pixels for all text drawn afterward
recordBtn = createButton("Start Recording");
Creates a clickable button labeled 'Start Recording' and stores it in the recordBtn variable
recordBtn.position(20, 20);
Positions the record button 20 pixels from the top-left corner of the browser
recordBtn.mousePressed(startRecording);
Tells p5.js to call the startRecording function whenever someone clicks this button
playBtn = createButton("Play Back");
Creates the play button and stores it in the playBtn variable
playBtn.position(20, 60);
Positions the play button below the record button (60 pixels from the top)
playBtn.attribute("disabled", "");
Disables the play button (grays it out) so users cannot click it until a recording exists
playBtn.mousePressed(playRecording);
Tells p5.js to call the playRecording function when the play button is clicked
draw()

draw() runs 60 times per second, redrawing the entire scene each frame. The background() call at the start erases the previous frame—if you remove it, you will see motion trails and overlapping shapes. The if-else chain is a common pattern for managing different states in animation: recording, playing, idle, etc.

🔬 This chain of if-else checks the sketch state and picks a message. What happens if you swap the order of the first two conditions, so isPlaying is checked BEFORE isRecording? Will the messages still appear correctly?

  let status = "";
  if (isRecording) {
    status = "Recording... say something!";
  } else if (isPlaying) {
    status = "Playing your voice...";
  } else if (hasRecording) {
    status = "Press 'Record Again' or 'Play Back'.";
  } else {
    status = "Press 'Start Recording' and talk!";
  }
function draw() {
  background(200, 225, 255);

  drawDog();

  // Info / status text
  noStroke();
  fill(30);
  textSize(20);

  let status = "";
  if (isRecording) {
    status = "Recording... say something!";
  } else if (isPlaying) {
    status = "Playing your voice...";
  } else if (hasRecording) {
    status = "Press 'Record Again' or 'Play Back'.";
  } else {
    status = "Press 'Start Recording' and talk!";
  }

  text(status, width * 0.5, height * 0.13);

  // Reaction bubble text
  textSize(22);
  drawSpeechBubble(infoText);
}
Line-by-line explanation (9 lines)

🔧 Subcomponents:

function-call Clear the canvas background(200, 225, 255);

Fills the entire canvas with a light blue color, erasing everything drawn in the previous frame

conditional Status message selector if (isRecording) { status = "Recording... say something!"; } else if (isPlaying) { status = "Playing your voice..."; } else if (hasRecording) { status = "Press 'Record Again' or 'Play Back'."; } else { status = "Press 'Start Recording' and talk!"; }

Chooses different instruction text to display based on whether the sketch is recording, playing, or idle

background(200, 225, 255);
Erases the previous frame by filling the canvas with light blue (RGB: 200, 225, 255)
drawDog();
Calls the drawDog() function to render the cartoon character with current facial expressions
noStroke();
Removes the outline from any shapes drawn after this line (used for text, which doesn't have a stroke anyway)
fill(30);
Sets the fill color to dark gray (RGB: 30, 30, 30) for the status text
textSize(20);
Sets the font size to 20 pixels for the status text (smaller than the default 24)
if (isRecording) { status = "Recording... say something!"; } else if (isPlaying) { status = "Playing your voice..."; } else if (hasRecording) { status = "Press 'Record Again' or 'Play Back'."; } else { status = "Press 'Start Recording' and talk!"; }
Checks the current state and assigns the appropriate instruction message to the status variable so users know what to do next
text(status, width * 0.5, height * 0.13);
Draws the status text centered horizontally and near the top of the screen (13% down from the top)
textSize(22);
Changes the font size to 22 pixels for the speech bubble text
drawSpeechBubble(infoText);
Calls drawSpeechBubble() to render the white speech bubble and display the dog's current reaction

drawDog()

This function demonstrates scalable character design: by using the scale factor 's' and percentages for position, the dog stays perfectly proportioned no matter the window size. The state-based conditionals (checking isRecording and isPlaying) are the heart of animation—they make the character feel alive by responding to what's happening. Study how push() and pop() protect drawing settings from affecting other code.

🔬 The pupils move up or down based on state. What happens if you increase the values 0.015 to something much larger, like 0.05? What if you make them negative so the directions swap?

  // Pupils change with state
  let pupilY = cy + eyeOffsetY;
  if (isRecording) {
    pupilY += s * 0.015; // looking down while recording
  } else if (isPlaying) {
    pupilY -= s * 0.015; // looking up while playing
  }

🔬 The mouth arc grows and shrinks based on state. The second argument to arc() is the width, and the third is the height. What happens if you swap these values or make the open mouth much wider?

  if (isRecording || isPlaying) {
    // Open mouth
    arc(cx, mouthY, s * 0.18, s * 0.2, 0, PI);
  } else {
    // Small smile
    arc(cx, mouthY, s * 0.18, s * 0.12, 0, PI);
  }
function drawDog() {
  push();

  const s = min(width, height) * 0.5; // overall dog size
  const cx = width * 0.65;
  const cy = height * 0.6;

  // Body
  noStroke();
  fill(205, 170, 125);
  ellipse(cx, cy + s * 0.15, s * 0.5, s * 0.6);

  // Head
  fill(215, 185, 140);
  ellipse(cx, cy, s * 0.55, s * 0.55);

  // Ears
  fill(180, 140, 95);
  ellipse(cx - s * 0.25, cy - s * 0.1, s * 0.22, s * 0.4);
  ellipse(cx + s * 0.25, cy - s * 0.1, s * 0.22, s * 0.4);

  // Eyes
  const eyeOffsetX = s * 0.12;
  const eyeOffsetY = -s * 0.08;
  fill(255);
  ellipse(cx - eyeOffsetX, cy + eyeOffsetY, s * 0.12, s * 0.12);
  ellipse(cx + eyeOffsetX, cy + eyeOffsetY, s * 0.12, s * 0.12);

  // Pupils change with state
  let pupilY = cy + eyeOffsetY;
  if (isRecording) {
    pupilY += s * 0.015; // looking down while recording
  } else if (isPlaying) {
    pupilY -= s * 0.015; // looking up while playing
  }

  fill(40);
  ellipse(cx - eyeOffsetX, pupilY, s * 0.05, s * 0.05);
  ellipse(cx + eyeOffsetX, pupilY, s * 0.05, s * 0.05);

  // Nose
  fill(60);
  ellipse(cx, cy + s * 0.02, s * 0.12, s * 0.08);

  // Mouth
  stroke(60);
  strokeWeight(3);
  noFill();
  const mouthY = cy + s * 0.12;

  if (isRecording || isPlaying) {
    // Open mouth
    arc(cx, mouthY, s * 0.18, s * 0.2, 0, PI);
  } else {
    // Small smile
    arc(cx, mouthY, s * 0.18, s * 0.12, 0, PI);
  }

  pop();
}
Line-by-line explanation (23 lines)

🔧 Subcomponents:

calculation Size and position calculations const s = min(width, height) * 0.5; // overall dog size const cx = width * 0.65; const cy = height * 0.6;

Calculates the dog's scale factor and center position using percentages, so it resizes responsively when the window changes

shape-drawing Body ellipse fill(205, 170, 125); ellipse(cx, cy + s * 0.15, s * 0.5, s * 0.6);

Draws a brown ellipse below the head to form the dog's torso

conditional Pupil position based on state let pupilY = cy + eyeOffsetY; if (isRecording) { pupilY += s * 0.015; // looking down while recording } else if (isPlaying) { pupilY -= s * 0.015; // looking up while playing }

Moves the pupils up or down depending on whether the dog is recording or playing, creating expressive eye movement

conditional Mouth shape based on state if (isRecording || isPlaying) { // Open mouth arc(cx, mouthY, s * 0.18, s * 0.2, 0, PI); } else { // Small smile arc(cx, mouthY, s * 0.18, s * 0.12, 0, PI); }

Draws a wider arc (open mouth) when recording or playing, and a smaller arc (smile) when idle—the key to the dog's expression

push();
Saves the current drawing settings so changes made in this function don't affect drawing elsewhere
const s = min(width, height) * 0.5; // overall dog size
Calculates a scale factor by taking the smaller of width or height and multiplying by 0.5, so the dog scales to fit the screen
const cx = width * 0.65;
Sets the dog's center X position to 65% across the screen (right side)
const cy = height * 0.6;
Sets the dog's center Y position to 60% down the screen (slightly below center)
noStroke(); fill(205, 170, 125);
Removes outlines from shapes and sets the fill color to a tan brown (like dog fur)
ellipse(cx, cy + s * 0.15, s * 0.5, s * 0.6);
Draws the body as an ellipse positioned slightly below the head, with width s*0.5 and height s*0.6 (taller than wide)
fill(215, 185, 140); ellipse(cx, cy, s * 0.55, s * 0.55);
Draws the head as a circle (ellipse with equal width and height) at the center position, slightly lighter than the body
fill(180, 140, 95); ellipse(cx - s * 0.25, cy - s * 0.1, s * 0.22, s * 0.4);
Draws the left ear by offsetting horizontally and vertically, filling it with a darker brown
ellipse(cx + s * 0.25, cy - s * 0.1, s * 0.22, s * 0.4);
Draws the right ear at a mirror position to the left ear
const eyeOffsetX = s * 0.12; const eyeOffsetY = -s * 0.08;
Pre-calculates how far left/right and up/down the eyes sit relative to the head center
fill(255); ellipse(cx - eyeOffsetX, cy + eyeOffsetY, s * 0.12, s * 0.12);
Draws the left white eye using the offset values
ellipse(cx + eyeOffsetX, cy + eyeOffsetY, s * 0.12, s * 0.12);
Draws the right white eye at the mirror position
let pupilY = cy + eyeOffsetY;
Sets the pupil's starting Y position to the same level as the eyes
if (isRecording) { pupilY += s * 0.015; // looking down while recording
Moves the pupils down by a small amount when the dog is recording, so it appears to look down
} else if (isPlaying) { pupilY -= s * 0.015; // looking up while playing
Moves the pupils up slightly when playing, so the dog appears to look up in surprise
fill(40); ellipse(cx - eyeOffsetX, pupilY, s * 0.05, s * 0.05);
Draws the left pupil (dark gray) at the calculated position
ellipse(cx + eyeOffsetX, pupilY, s * 0.05, s * 0.05);
Draws the right pupil at the mirror position
fill(60); ellipse(cx, cy + s * 0.02, s * 0.12, s * 0.08);
Draws a dark gray nose below the head center, wider than it is tall
stroke(60); strokeWeight(3); noFill();
Sets up for drawing the mouth: dark outline, 3 pixels thick, no fill inside the arc
const mouthY = cy + s * 0.12;
Calculates the Y position where the mouth (arc) should be drawn, below the nose
if (isRecording || isPlaying) { arc(cx, mouthY, s * 0.18, s * 0.2, 0, PI);
Draws a wide open mouth arc (half circle) when the dog is recording or playing
} else { arc(cx, mouthY, s * 0.18, s * 0.12, 0, PI);
Draws a smaller, shallow smile when the dog is idle (not recording or playing)
pop();
Restores the drawing settings saved by push() so other drawing code isn't affected

drawSpeechBubble(textContent)

This function shows how to build a complete UI element (a speech bubble) from basic shapes: a rounded rectangle, a triangle tail, and text. The function takes textContent as a parameter, making it reusable for any message. The padding calculations (bw * 0.85, bh * 0.8) prevent text from touching the bubble edges—a professional design detail.

🔬 This triangle creates the tail pointing from the bubble to the dog. What happens if you swap the first two points of the triangle? Or change 0.6 to 0.9?

  triangle(
    bx + bw * 0.45, by + bh * 0.1,
    bx + bw * 0.6, by + bh * 0.35,
    bx + bw * 0.25, by + bh * 0.2
  );
function drawSpeechBubble(textContent) {
  const bx = width * 0.3;
  const by = height * 0.5;
  const bw = width * 0.4;
  const bh = height * 0.25;

  push();
  rectMode(CENTER);
  stroke(80, 100, 160);
  strokeWeight(3);
  fill(255, 255, 255, 230);
  rect(bx, by, bw, bh, 20);

  // Tail of bubble
  noStroke();
  fill(255, 255, 255, 230);
  triangle(
    bx + bw * 0.45, by + bh * 0.1,
    bx + bw * 0.6, by + bh * 0.35,
    bx + bw * 0.25, by + bh * 0.2
  );

  // Text
  fill(30);
  textAlign(CENTER, CENTER);
  textWrap(WORD);
  text(textContent, bx, by, bw * 0.85, bh * 0.8);

  pop();
}
Line-by-line explanation (18 lines)

🔧 Subcomponents:

calculation Bubble position and size const bx = width * 0.3; const by = height * 0.5; const bw = width * 0.4; const bh = height * 0.25;

Calculates bubble dimensions and position using percentages, so it scales with the screen and stays left of the dog

shape-drawing Bubble rectangle rectMode(CENTER); stroke(80, 100, 160); strokeWeight(3); fill(255, 255, 255, 230); rect(bx, by, bw, bh, 20);

Draws the main bubble box with a blue outline, white fill, and rounded corners

shape-drawing Bubble tail triangle noStroke(); fill(255, 255, 255, 230); triangle( bx + bw * 0.45, by + bh * 0.1, bx + bw * 0.6, by + bh * 0.35, bx + bw * 0.25, by + bh * 0.2 );

Draws a triangular tail pointing from the bubble toward the dog's head

text-drawing Text rendering in bubble fill(30); textAlign(CENTER, CENTER); textWrap(WORD); text(textContent, bx, by, bw * 0.85, bh * 0.8);

Draws the dog's reaction text centered in the bubble, wrapping words to fit

const bx = width * 0.3;
Sets the bubble's horizontal center to 30% across the screen (left side, away from the dog)
const by = height * 0.5;
Sets the bubble's vertical center to 50% down the screen (middle height)
const bw = width * 0.4;
Calculates the bubble's width as 40% of the canvas width
const bh = height * 0.25;
Calculates the bubble's height as 25% of the canvas height
push();
Saves current drawing settings so changes in this function don't affect other drawing code
rectMode(CENTER);
Tells p5.js that rect() coordinates refer to the center of the rectangle (not the top-left corner)
stroke(80, 100, 160);
Sets the outline color to a medium blue (RGB: 80, 100, 160) for the bubble's border
strokeWeight(3);
Sets the outline thickness to 3 pixels, making the bubble border clearly visible
fill(255, 255, 255, 230);
Sets the fill color to white with slight transparency (alpha 230 out of 255), so the bubble is semi-opaque
rect(bx, by, bw, bh, 20);
Draws the main speech bubble box centered at (bx, by) with width bw, height bh, and 20-pixel rounded corners
noStroke();
Removes outlines from shapes drawn next (the tail triangle doesn't need a border)
fill(255, 255, 255, 230);
Keeps the same white color so the tail matches the bubble
triangle( bx + bw * 0.45, by + bh * 0.1, bx + bw * 0.6, by + bh * 0.35, bx + bw * 0.25, by + bh * 0.2 );
Draws a three-sided tail pointing from the bubble toward the dog's head, using percentages of the bubble dimensions
fill(30);
Sets the fill color to dark gray for the text inside the bubble
textAlign(CENTER, CENTER);
Centers text both horizontally and vertically within its bounding box
textWrap(WORD);
Enables word wrapping so long reactions break into multiple lines instead of overflowing
text(textContent, bx, by, bw * 0.85, bh * 0.8);
Draws the reaction text centered in the bubble, within a slightly smaller area (85% width, 80% height) to leave padding
pop();
Restores the drawing settings saved by push() so other parts of the sketch aren't affected

startRecording()

This function demonstrates p5.sound's microphone and recording workflow: initialize objects once, start the mic with a callback, set up the recorder, and use a timeout callback to auto-stop after a duration. The flags (isRecording, hasRecording, audioStarted) manage state across frames, ensuring the UI and visuals stay in sync with what's actually happening with the audio.

function startRecording() {
  if (isRecording) {
    return;
  }

  // Start Web Audio context on first user interaction
  if (!audioStarted) {
    userStartAudio();
    audioStarted = true;
  }

  if (!mic) {
    mic = new p5.AudioIn();
  }
  if (!recorder) {
    recorder = new p5.SoundRecorder();
  }

  // New sound buffer each time
  soundFile = new p5.SoundFile();

  // Start mic, then record
  mic.start(() => {
    recorder.setInput(mic);
    isRecording = true;
    hasRecording = false;
    playBtn.attribute("disabled", "");
    recordBtn.html("Recording...");

    infoText = "The dog is listening...";

    // Record for 2.5 seconds, then stop automatically
    recorder.record(soundFile, 2.5, () => {
      isRecording = false;
      hasRecording = true;
      recordBtn.html("Record Again");
      playBtn.removeAttribute("disabled");

      infoText = random(reactions);
    });
  });
}
Line-by-line explanation (20 lines)

🔧 Subcomponents:

conditional Prevent re-recording while active if (isRecording) { return; }

Exits the function immediately if the dog is already recording, preventing overlapping recordings

conditional Web Audio context setup if (!audioStarted) { userStartAudio(); audioStarted = true; }

Initializes the browser's Web Audio context on first interaction (required for microphone access)

conditional Microphone initialization if (!mic) { mic = new p5.AudioIn(); } if (!recorder) { recorder = new p5.SoundRecorder(); }

Creates the microphone and recorder objects only once, reusing them on subsequent recordings

callback Record and auto-stop recorder.record(soundFile, 2.5, () => { isRecording = false; hasRecording = true; recordBtn.html("Record Again"); playBtn.removeAttribute("disabled"); infoText = random(reactions); });

Records audio for 2.5 seconds, then automatically stops and picks a random reaction

if (isRecording) { return; }
If the dog is already recording, stop the function here—this prevents the user from starting multiple recordings at once
if (!audioStarted) {
Checks if the Web Audio context has been started (most browsers require user interaction first for security)
userStartAudio();
p5.js function that asks the browser to activate the Web Audio API—required before microphone access is permitted
audioStarted = true;
Sets the flag so userStartAudio() is only called once, not on every recording
if (!mic) { mic = new p5.AudioIn(); }
Creates the microphone object only if it doesn't exist yet—p5.AudioIn() connects to the user's microphone
if (!recorder) { recorder = new p5.SoundRecorder(); }
Creates the recorder object only once—p5.SoundRecorder() handles capturing audio from the mic
soundFile = new p5.SoundFile();
Creates a fresh, empty sound buffer to store this new recording (done every time so old recordings aren't overwritten)
mic.start(() => {
Starts the microphone and then runs the callback function (the code inside the curly braces) once it's ready
recorder.setInput(mic);
Tells the recorder to listen to the microphone input
isRecording = true;
Sets the state flag so draw() and drawDog() know to show recording visuals (pupils down, mouth open)
hasRecording = false;
Clears the flag so the sketch knows a new recording is being made (not a playback of an old one)
playBtn.attribute("disabled", "");
Disables the Play button while recording, so users can't try to play the old recording
recordBtn.html("Recording...");
Changes the button text to show the recording is in progress
infoText = "The dog is listening...";
Updates the speech bubble to show the dog is listening, not talking
recorder.record(soundFile, 2.5, () => {
Tells the recorder to capture audio for 2.5 seconds, then run the callback function when done
isRecording = false;
Stops the recording state so the dog's expression returns to normal
hasRecording = true;
Sets the flag so the sketch knows a recording exists and can be played back
recordBtn.html("Record Again");
Updates the button to offer a second recording instead of the first start
playBtn.removeAttribute("disabled");
Enables the Play button now that a recording exists
infoText = random(reactions);
Picks a random reaction from the reactions array and displays it in the speech bubble

playRecording()

This function is the complement to startRecording(): it plays back audio and manages the playback state. The onended callback is crucial—it lets you respond when audio finishes without needing to constantly check if it's done. This pattern is common in p5.sound workflows.

function playRecording() {
  if (!hasRecording || isPlaying) {
    return;
  }

  isPlaying = true;
  infoText = "Ho ho ho!";

  soundFile.play();
  soundFile.onended(() => {
    isPlaying = false;
    infoText = random(reactions);
  });
}
Line-by-line explanation (8 lines)

🔧 Subcomponents:

conditional Guard against invalid playback if (!hasRecording || isPlaying) { return; }

Exits the function if there's no recording or playback is already happening

callback Handle playback end soundFile.onended(() => { isPlaying = false; infoText = random(reactions); });

Runs code when audio finishes playing—stops the animation state and picks a new reaction

if (!hasRecording || isPlaying) {
Checks if a recording exists AND playback is not already happening
return;
Exits the function if either condition is false—no recording means nothing to play, and already-playing audio shouldn't restart
isPlaying = true;
Sets the state flag so draw() and drawDog() show playback visuals (pupils up, mouth open)
infoText = "Ho ho ho!";
Changes the speech bubble text to show the dog is laughing at the user's voice
soundFile.play();
Starts playing the recorded audio
soundFile.onended(() => {
Registers a callback function to run when the audio finishes playing
isPlaying = false;
Stops the playback state so the dog's expression returns to normal
infoText = random(reactions);
Picks another random reaction and displays it after the laugh

mousePressed()

This function demonstrates hit-testing—a common game programming technique where you check if a click or touch is inside an interactive area. Using dist() and comparing to a radius is simple and works well for circular targets. The coordinates (cx, cy) must match drawDog() exactly or the hit zone won't align with the visual character.

🔬 This hit-test checks if you're within 0.35 * s pixels of the dog's head. What happens if you increase 0.35 to 0.5? The dog will be clickable from farther away—can you think of why?

  const d = dist(mouseX, mouseY, cx, cy);
  if (d < s * 0.35) {
    infoText = random(reactions);
  }
function mousePressed() {
  const s = min(width, height) * 0.5;
  const cx = width * 0.65;
  const cy = height * 0.6;

  // Simple hit-test: if click is near the head
  const d = dist(mouseX, mouseY, cx, cy);
  if (d < s * 0.35) {
    infoText = random(reactions);
  }
}
Line-by-line explanation (5 lines)

🔧 Subcomponents:

calculation Distance-based hit detection const d = dist(mouseX, mouseY, cx, cy); if (d < s * 0.35) { infoText = random(reactions); }

Uses dist() to check if the click is within a circular area around the dog's head, triggering a reaction if it is

const s = min(width, height) * 0.5;
Recalculates the dog's scale factor to know its size
const cx = width * 0.65; const cy = height * 0.6;
Recalculates the dog's center position (must match drawDog to work correctly)
const d = dist(mouseX, mouseY, cx, cy);
Uses p5.js's dist() function to calculate distance from the mouse click to the dog's center
if (d < s * 0.35) {
If the distance is less than 35% of the dog's scale, the click is inside the dog's head—this is the hit zone
infoText = random(reactions);
Picks a random reaction and displays it when the dog is clicked

touchStarted()

touchStarted() is a p5.js function that runs whenever the user touches a touchscreen device. By returning false, you prevent the browser's default scroll behavior—important for mobile sketches so taps on the canvas don't accidentally scroll the page.

function touchStarted() {
  return false;
}
Line-by-line explanation (1 lines)
return false;
Tells the browser NOT to scroll the page when the user touches the canvas—keeps the canvas interaction focused

windowResized()

windowResized() is called automatically by p5.js whenever the browser window is resized. By calling resizeCanvas(), you ensure the sketch scales beautifully on any screen size—desktop, tablet, or phone. Combined with the percentage-based positioning in drawDog() and drawSpeechBubble(), this creates a truly responsive experience.

function windowResized() {
  resizeCanvas(windowWidth, windowHeight);
}
Line-by-line explanation (1 lines)
resizeCanvas(windowWidth, windowHeight);
Automatically resizes the p5.js canvas to fill the entire browser window whenever the user resizes it

📦 Key Variables

mic p5.AudioIn

Holds the microphone object that captures audio input from the user's device

let mic;
recorder p5.SoundRecorder

Holds the recorder object that saves microphone input to a sound file

let recorder;
soundFile p5.SoundFile

Holds the audio data of the most recent recording, which can be played back

let soundFile;
audioStarted boolean

Tracks whether the Web Audio context has been initialized (required for microphone access)

let audioStarted = false;
isRecording boolean

Tracks whether the microphone is currently recording, used to animate the dog's expression

let isRecording = false;
hasRecording boolean

Tracks whether a recording exists and can be played back

let hasRecording = false;
isPlaying boolean

Tracks whether audio is currently playing back, used to animate the dog's expression

let isPlaying = false;
recordBtn p5.Renderer

Stores reference to the 'Start Recording' button so you can update its text and disable it

let recordBtn;
playBtn p5.Renderer

Stores reference to the 'Play Back' button so you can enable/disable it based on whether a recording exists

let playBtn;
infoText string

Holds the current text displayed in the speech bubble (reactions, status, or laughs)

let infoText = "Say something to your talking dog!";
reactions array

Array of silly strings that the dog randomly picks from when reacting

let reactions = ["Heh heh heh...", "Ugh...", "No.", "Yes.", "Hmm...", "Really?"];

🔧 Potential Improvements (5)

Here are some ways this code could be enhanced:

BUG drawDog() pupil positioning

The pupil Y position calculation doesn't account for when neither recording nor playing is active—the pupils stay at the same Y position even though the conditionals might suggest otherwise

💡 Consider using an else clause or explicitly setting pupilY when isRecording and isPlaying are both false, to make the intent clearer: `} else { pupilY = cy + eyeOffsetY; }`

FEATURE sketch overall

Users cannot delete or clear a recording—once a recording exists, it stays until they start a new one

💡 Add a 'Clear Recording' button that resets hasRecording to false and disables the play button, giving users more control

PERFORMANCE startRecording()

The scale and position constants (s, cx, cy) are recalculated on every mousePressed() and drawDog() call, even though they rarely change

💡 Consider storing these as global constants and only recalculating them in windowResized(), reducing unnecessary math every frame

STYLE all functions

The code lacks comments explaining what p5.sound functions do and why they're needed (e.g., why userStartAudio() is called)

💡 Add inline comments explaining the Web Audio context requirement and why new p5.SoundFile() is created each recording session

BUG mousePressed() hit-test

The dog's head coordinates (cx, cy, s) must exactly match drawDog() or the clickable area won't align with the visual head—a maintenance issue if values change

💡 Extract these constants to global variables or a shared function to ensure consistency across drawDog() and mousePressed()

🔄 Code Flow

Code flow showing setup, draw, drawdog, drawspeechbubble, startrecording, playrecording, mousepressed, touchstarted, windowresized

💡 Click on function names in the diagram to jump to their code

graph TD start[Start] --> setup[setup] setup --> canvas-creation[Canvas Creation] setup --> text-defaults[Text Defaults] setup --> record-button[Record Button] setup --> play-button[Play Button] setup --> draw[draw loop] click setup href "#fn-setup" click canvas-creation href "#sub-canvas-creation" click text-defaults href "#sub-text-defaults" click record-button href "#sub-record-button" click play-button href "#sub-play-button" draw --> background-clear[Background Clear] draw --> status-text-logic[Status Text Logic] draw --> scaling-setup[Scaling Setup] draw --> drawdog[Draw Dog] draw --> drawspeechbubble[Draw Speech Bubble] click draw href "#fn-draw" click background-clear href "#sub-background-clear" click status-text-logic href "#sub-status-text-logic" click scaling-setup href "#sub-scaling-setup" click drawdog href "#fn-drawdog" click drawspeechbubble href "#fn-drawspeechbubble" drawdog --> body-drawing[Body Drawing] drawdog --> pupil-logic[Pupil Logic] drawdog --> mouth-logic[Mouth Logic] click body-drawing href "#sub-body-drawing" click pupil-logic href "#sub-pupil-logic" click mouth-logic href "#sub-mouth-logic" drawspeechbubble --> bubble-positioning[Bubble Positioning] drawspeechbubble --> bubble-rect[Bubble Rectangle] drawspeechbubble --> bubble-tail[Bubble Tail] drawspeechbubble --> bubble-text[Bubble Text] click bubble-positioning href "#sub-bubble-positioning" click bubble-rect href "#sub-bubble-rect" click bubble-tail href "#sub-bubble-tail" click bubble-text href "#sub-bubble-text" draw --> mousepressed[Mouse Pressed] draw --> touchstarted[Touch Started] draw --> windowresized[Window Resized] click mousepressed href "#fn-mousepressed" click touchstarted href "#fn-touchstarted" click windowresized href "#fn-windowresized" startrecording --> double-click-guard[Double Click Guard] startrecording --> audio-context-init[Audio Context Init] startrecording --> mic-setup[Mic Setup] startrecording --> recording-callback[Recording Callback] click startrecording href "#fn-startrecording" click double-click-guard href "#sub-double-click-guard" click audio-context-init href "#sub-audio-context-init" click mic-setup href "#sub-mic-setup" click recording-callback href "#sub-recording-callback" playrecording --> play-guard[Play Guard] playrecording --> playback-callback[Playback Callback] click playrecording href "#fn-playrecording" click play-guard href "#sub-play-guard" click playback-callback href "#sub-playback-callback" mousepressed --> hit-test-calculation[Hit Test Calculation] click hit-test-calculation href "#sub-hit-test-calculation"

❓ Frequently Asked Questions

What visual experience does the talking Ben sketch provide?

The sketch features a large cartoon dog with expressive eyes and a changing mouth, filling the screen and accompanied by a speech bubble that displays silly reactions.

How can users interact with the talking dog in this p5.js sketch?

Users can interact by clicking buttons to record their voice and play it back, allowing the dog to respond with various reactions.

What creative coding concepts are showcased in the talking Ben sketch?

The sketch demonstrates the use of sound recording and playback, along with interactive user interface elements to create an engaging experience.

Preview

talking ben - p5.js creative coding sketch preview
Sketch Preview
Code flow diagram showing the structure of talking ben - Code flow showing setup, draw, drawdog, drawspeechbubble, startrecording, playrecording, mousepressed, touchstarted, windowresized
Code Flow Diagram
